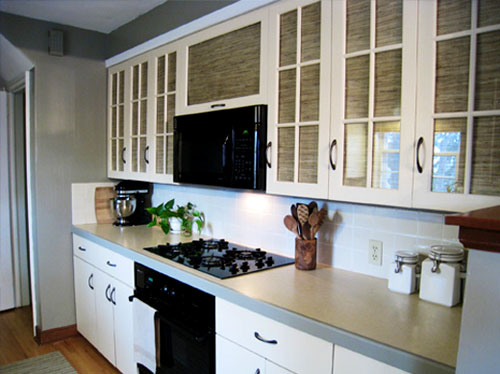

Replacing cabinets can turn a small decorating itch into a full renovation, complete withght. When the cabinet boxes and doors are still sound, a smarter option is to repaint them and add grasscloth as a textured accent.
Paint gives old cabinetry a clean, durable foundation. Grasscloth adds warmth, movement, and the tailored look of a custom inset. The combination works on kitchen cupboards, dining-room built-ins, bathroom vanities, media cabinets, bookcases, and freestanding sideboards. Done carefully, it can make an ordinary cabinet look designed for the room rather than merely parked in it.
Why Paint and Grasscloth Make a Strong Pair
Paint changes color; grasscloth changes character. Traditional grasscloth is made from woven natural fibers bonded to a backing, so it catches light and displays subtle shifts in texture and tone. Those variations, along with visible panel seams, are normal features of a handcrafted material rather than flaws. inet door, smooth painted rails and stiles act like a frame around the weave. Dark green paint with natural tan grasscloth feels rich and architectural. Cream paint with pale gray grasscloth creates a softer coastal look. Navy with warm sisal is polished without becoming fussy. Grasscloth can also sit behind glass doors, cover recessed centers, line cabinet backs, or wrap selected furniture panels.
Decide Whether Your Cabinets Are Good Candidates
This makeover works best when the cabinet structure is stable and the surfaces are reasonably flat. Repair loose hinges, cracked joints, swollen particleboard, peeling veneer, deep chips, and water damage before decorating. Paint and wallpaper are talented stylists, but neither has a contractor’s license.
Solid wood, wood veneer, paint-grade MDF, and properly prepared laminate can all be suitable. Recessed-panel doors are especially convenient because the frame naturally protects the grasscloth edges. Glass-front doors are another excellent option because the material can be installed behind the glass.
Use caution around sinks, ranges, showers, and other high-moisture or grease-prone areas. Natural grasscloth is more delicate than washable vinyl wallcovering, and moisture or aggressive cleaning can affect its fibers and color. In demanding locations, use faux grasscloth, woven vinyl, or real grasscloth protected behind glass.
Plan the Cabinet Makeover Before Starting
Choose the Application
Decide whether grasscloth will cover recessed door centers, drawer fronts, side panels, cabinet backs, or panels behind glass. A selective application usually looks more refined than wrapping every available inch. Sketch the cabinet layout and number each door and drawer so every piece returns to its original opening. Small alignment differences are common, especially in older cabinetry. nate Paint and Grasscloth
View the grasscloth sample in the actual room during daylight and under artificial lighting. Pulling a dominant or secondary tone from the weave creates harmony. A close match feels calm, while a darker painted frame gives a pale insert stronger definition. Designers also recommend using colors from the wallcovering to connect paint and pattern. he Weave and Panel Order
Keep the weave direction consistent across neighboring doors. Cut panels from the roll in sequence and label their backs. Natural grasscloth may shift slightly in color from one section to another, so arranging the pieces before gluing helps the finished cabinet look intentional. Wallcovering specialists recommend discussing paneling, seams, and shading before installation rather than treating them as unpleasant surprises afterward.
Materials and Tools
- Degreasing cleaner, microfiber cloths, and a vacuum
- Screwdriver or drill, painter’s tape, marker, and labeled bags
- Wood filler, putty knife, caulk, and sanding sponges
- Compatible bonding or stain-blocking primer
- Cabinet, trim, or furniture enamel
- Angled brush and small microfiber or foam roller
- Grasscloth or faux-grasscloth wallcovering
- Manufacturer-approved wallpaper adhesive
- Sharp utility knife, spare blades, straightedge, and cutting mat
- Soft wallpaper brush and optional decorative molding
Follow each product label for ventilation, protective equipment, drying time, adhesive selection, and surface compatibility. Natural grasscloth can be stained by excess paste, and hard-edged tools may crush its fibers.
How to Paint Cabinets for a Smooth, Durable Finish
1. Remove and Label the Parts
Take off doors, drawers, hinges, knobs, pulls, and bumpers. Store the hardware in labeled bags. Set doors horizontally on supports so the finish can level with fewer drips.
2. Degrease Before Sanding
Wash every paintable surface with a suitable degreaser, rinse if required, and let it dry. Kitchen cabinets can hold invisible layers of cooking oil, hand lotion, cleaner residue, and general household mystery. Major refinishing guides consistently place cleaning before sanding and priming because contamination interferes with adhesion. air and Scuff-Sand
Fill dents, chips, and unwanted hardware holes. Sand repairs smooth, then dull the existing finish so primer can grip. The goal is usually not to strip the surface to bare wood. For many coated or laminate surfaces, a light scuff with roughly 180- to 220-grit abrasive is commonly recommended. Vacuum and wipe away all dust. ly a Compatible Primer
Use bonding primer on slick factory finishes or laminate, and stain-blocking primer when tannins or discoloration may bleed through. Brush corners and profiles first, then roll broad areas in thin passes. Spot-prime filler or bare wood exposed during sanding. d the Primer Lightly
After the primer dries according to its label, smooth dust nibs and raised grain with fine abrasive. Some systems call for about 24 hours before sanding, while faster products specify shorter intervals. The product data sheet should win every scheduling argument. ly Two Thin Finish Coats
Choose an enamel made for cabinets, doors, trim, or furniture. Apply thin coats, maintain a wet edge, and avoid brushing paint after it begins to set. Sand between coats only when directed or when imperfections require it. Two controlled coats usually look better than one heroic coat with the consistency of cake frosting. ow Proper Cure Time
Paint may feel dry before it is hard enough for hinges, pulls, and daily handling. Give the finish the full curing time listed by the manufacturer and handle it gently after reassembly. Refinishing guides commonly recommend at least a full day before reconstruction, with longer curing preferred when practical.
How to Apply Grasscloth to Cabinet Panels
Make a Template
Measure every panel separately. Even matching doors can differ slightly. Create a paper template or test piece before cutting the expensive material. Decide whether the grasscloth will stop inside a recessed bevel, sit behind glass, or extend beneath applied trim.
Cut Carefully
Place the material face down on a clean cutting mat. Mark the backing lightly, then cut with a metal straightedge and a fresh utility blade. Change blades often because a dull edge can pull fibers and create a fuzzy cut. Align the weave with the cabinet door instead of assuming the roll edge is perfectly square.
Test the Adhesive System
Use the paste specified by the wallcovering manufacturer. First attach a scrap to a painted sample board. This shows whether the adhesive stains the face, softens the coating, causes curling, or allows repositioning. Natural grasscloth can be unforgiving when paste touches the decorative surface. on and Smooth Gently
Apply adhesive evenly as directed. Set the panel without stretching it and smooth from the center outward with a soft brush. Avoid hard pressure and aggressive wiping. If paste reaches the front, use the maker’s cleanup method rather than scrubbing and creating a pale halo.
Protect the Edges
A clean recessed edge may need no trim. On flat doors, narrow molding can frame the grasscloth and protect the perimeter. Paint the molding separately when possible, miter the corners carefully, and attach it without crushing the weave. For a reversible update, mount the grasscloth on thin removable panels fitted inside the door recess.
Best Places to Use This Treatment
Dining-room sideboards, home-office built-ins, bookcases, and media cabinets are ideal because they usually stay dry. Behind-glass kitchen installations add texture while protecting the material and softening the view of mismatched dishes. In bathrooms, reserve natural grasscloth for protected or low-moisture locations; use faux grasscloth on frequently touched or splashed vanity doors.
Common Mistakes to Avoid
- Skipping degreasing or using primer that does not match the substrate
- Painting over hardware or reinstalling doors before the finish cures
- Using ordinary wall paint instead of a harder cabinet enamel
- Expecting natural grasscloth to have invisible seams and uniform color
- Wiping or pressing delicate fibers too aggressively
- Installing natural grasscloth in a wet, greasy, or heavily scrubbed zone
- Cutting all panels before testing the adhesive and completing one sample door
Experience Notes: What a Realistic Cabinet Makeover Feels Like
The first surprise is how little time is spent doing the glamorous part. Painting occupies only a portion of the schedule. The rest involves labeling hinges, scrubbing corners, filling old holes, waiting for primer, moving doors away from curious pets, and discovering that one drawer front has been drilled more often than a practice board. A polished result is built during preparation, not rescued during the final coat.
A realistic project may begin Friday evening with removal and labeling. The doors come off quickly, creating dangerous optimism. Then cleaning reveals how much residue can hide on surfaces that looked respectable five minutes earlier. Saturday becomes the preparation day: degreasing, filling, sanding, vacuuming, masking, and priming. By Saturday night, the cabinets may look worse than before. This is the renovation equivalent of a haircut halfway through. Do not panic.
The first coat often exposes tiny flaws. A filled hole needs another skim. A roller leaves a ridge. A speck of dust lands in the center of the most visible door with the confidence of a celebrity on a red carpet. Light sanding and a careful second coat fix most problems. The useful lesson is that cabinet painting rewards correction. Perfection is not required at every stage, but problems should be fixed before the next layer locks them in.
Grasscloth introduces a different lesson. Material that looks uniform on the roll may show tonal shifts after panels are cut and placed side by side. Instead of fighting that variation, arrange all pieces on the floor and compare them in natural light. Put a strongly textured panel where it appears deliberate and use quieter pieces around it. Preserving the order from the roll often creates a smoother visual transition.
The most nerve-racking moment is the first adhesive application, which is why a sample board matters. It reveals how quickly the paste grabs, whether the paper can be repositioned, and how the paint reacts. On the real door, removable guides help keep the first edge straight. Once the panel is placed, gentle smoothing works better than force. Grasscloth is not a wrestling opponent; pressing harder does not make it respect you.
Complete one test door before cutting every insert. Paint it, cure it, apply the grasscloth, install any trim, and add the hardware. View it in morning and evening light. Open it repeatedly. Examine the edges from standing height. The prototype may reveal that the trim should be narrower, the weave should run differently, or the hardware needs a warmer finish.
Reassembly also requires restraint. Even paint that feels dry can mark when placed face down or tightened aggressively beneath hardware. Use clean hands, soft padding, new bumpers, and moderate screw pressure. Adjust hinges after all doors are installed so the entire row aligns together.
The result is usually more convincing than either treatment alone. Paint makes tired cabinetry fresh and intentional. Grasscloth prevents the makeover from feeling like a basic color swap. Its weave catches shadows, softens broad door surfaces, and gives inexpensive cabinets a custom rhythm. The cabinet still performs the same job; it simply stops apologizing for being there.
Conclusion
Painting cabinets and using grasscloth to update them is a high-impact project built on patient preparation. Clean thoroughly, scuff the old finish, choose compatible primer and enamel, and allow proper curing. Treat grasscloth as a natural textile: plan the panel sequence, expect tonal variation, protect it from moisture, and handle the fibers gently.
The strongest designs use grasscloth selectively. A few recessed door panels, a cabinet back, or an installation behind glass can transform the whole piece without the expense and disruption of cabinet replacement.
Note: Test paint, primer, adhesive, and grasscloth together on a sample board. Product formulas vary, and natural wallcoverings may display visible seams, shading, and fiber irregularities by design.
This article synthesizes guidance from established U.S. paint manufacturers, home-improvement publishers, wallcovering specialists, and design publications, including Sherwin-Williams, Benjamin Moore, The Home Depot, This Old House, Better Homes & Gardens, Bob Vila, Spoonflower, Phillip Jeffries, the Wallcoverings Association, Serena & Lily, Architectural Digest, and Wolf-Gordon. tion>