A good home organization board does not need to look like it escaped from a gray office cubicle in 1998. With the right materials, a simple piece of insulation board can become a lightweight magnetic, bulletin, and mail holding board that keeps your keys, envelopes, school papers, coupons, appointment cards, and “I swear I put it somewhere safe” notes in one tidy place.
The idea behind an insulation to magnetic bulletin mail holding board project is simple: start with a rigid foam insulation panel as a lightweight base, add a surface that can hold pins or magnets, include a pocket or rail for mail, and finish it so it looks intentional rather than like leftover garage material taped to the wall. Done well, it becomes a family command center, entryway organizer, office memo board, or kitchen paper-control station.
Why Use Insulation Board as the Base?
Rigid foam insulation board is popular in home projects because it is lightweight, easy to cut, and available in large sheets. In actual building use, foam boards help resist heat flow by trapping air or gas in their cells. For a craft or organization project, the same qualities make the board easy to handle, especially if you want a large wall panel without hanging a heavy slab of plywood.
However, insulation board is not magic cardboard. It can dent, melt with the wrong adhesive, and may require a protective covering if used in a living space. Foam insulation is also combustible, so it should not be placed near stoves, fireplaces, heaters, or exposed electrical hazards. Think of it as a lightweight core, not as the final finished surface.
Best Design: One Board, Three Jobs
The best version of this project combines three functions: a magnetic zone, a bulletin zone, and a mail holding zone. Each area solves a different type of clutter.
1. Magnetic Section
The magnetic area is perfect for reminders, photos, schedules, appointment cards, and lightweight notes. You can create it in two main ways. The strongest option is to attach a thin piece of galvanized steel or magnetic sheet metal to the board. The easier painted option is magnetic primer, but it usually works best with strong lightweight magnets and several properly applied coats.
Magnetic primer can be useful for a smooth painted look, especially in a home office or kids’ homework area. Still, it does not behave like a refrigerator door. If you want magnets to hold thicker cards, envelopes, or multiple papers, metal sheet is usually the more reliable choice.
2. Bulletin Section
A bulletin area gives you a place for pushpins, tacks, fabric-covered notes, invitations, and little reminders that do not need magnets. Cork tiles, cork rolls, felt tiles, and fabric-wrapped cork are all good choices. Cork is classic because it grips pins well and is easy to replace if it gets worn out. Felt looks softer and more modern, but it may not hold pins as firmly unless there is cork or fiberboard underneath.
3. Mail Holding Section
The mail holding area is where the board becomes genuinely useful. Add a slim wall pocket, wooden ledge, metal basket, elastic strap, or fabric pouch near the bottom. This gives incoming mail a “landing zone” instead of letting it multiply across the kitchen counter like paper rabbits.
For daily life, divide mail into two categories: “action needed” and “file or recycle.” A small two-slot holder works better than one big pocket because one big pocket often becomes a vertical junk drawer with better posture.
Materials You May Need
A practical DIY magnetic bulletin mail holding board can be made with a short list of supplies. Start with a rigid foam insulation panel, foam-safe adhesive, cork or felt tiles, thin magnetic metal sheet or magnetic primer, decorative fabric or wallpaper, a lightweight mail pocket, wall anchors, screws, painter’s tape, a straightedge, and a utility knife.
Foam-safe adhesive matters. Some construction adhesives can damage foam, so choose products specifically labeled for foam board or polystyrene compatibility. Latex-based foam board adhesives are often used because they bond foam to surfaces such as wood, drywall, concrete, brick, or gypsum board without burning through the foam.
If the board will hang in a high-traffic entryway, consider adding a thin plywood backing or wood frame. The frame improves durability, keeps edges from crumbling, and makes the finished board look more like décor and less like a science fair project that got promoted.
Step-by-Step: Turning Insulation Board Into a Magnetic / Bulletin / Mail Holding Board
Step 1: Choose the Right Size
Before cutting anything, decide where the board will live. Popular spots include the kitchen wall, mudroom, home office, laundry room, hallway, garage entry, or near the front door. For a small apartment, a 24-by-36-inch board may be enough. For a family command center, 36-by-48 inches gives more room for calendars, school papers, and mail pockets.
Step 2: Plan the Layout
Sketch three zones before you glue. Put the magnetic area at eye level, the bulletin area beside it or above it, and the mail holder lower down where hands can easily drop envelopes. If children will use the board, place their section within reach. If adults are using it for bills, keys, or schedules, keep important items high enough to avoid accidental bumps.
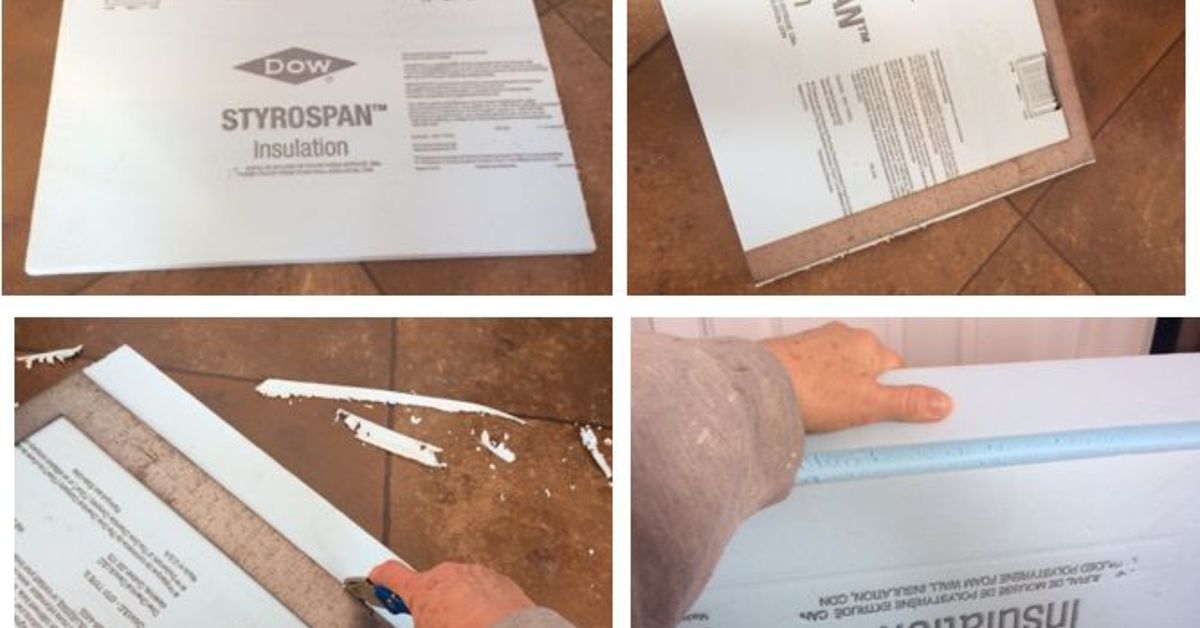
Step 3: Cut the Insulation Board
Use a straightedge and a sharp utility knife to score the foam board slowly. Several light passes are better than one dramatic slice. Work on a protected surface, and keep the cut line clean. If edges crumble, cover them later with wood trim, fabric tape, or a simple frame.
Step 4: Add a Backing or Frame
Foam board alone is lightweight but not very strong. A thin wood frame around the edges improves the appearance and protects the corners. For a larger board, a plywood backing provides extra strength and gives screws something more substantial to grip. This is especially helpful if you plan to add mail pockets, hooks, or small baskets.
Step 5: Install the Magnetic Surface
For the strongest magnetic section, attach a thin galvanized steel sheet to the planned area. Use an adhesive appropriate for both the metal and the foam-backed surface, and make sure the metal edges are smooth or covered with trim. If using magnetic primer instead, apply it according to the product directions, stir thoroughly, use enough coats, and topcoat only with compatible paint. A regular latex or chalkboard paint topcoat is usually a better choice than a dry-erase coating over magnetic primer because heavy coatings can weaken magnet performance.
Step 6: Add Cork, Felt, or Fabric
For the bulletin section, attach cork tiles or cork roll with compatible adhesive. If you want a softer designer look, cover cork with fabric before mounting it. Pull the fabric tight around the edges and secure it on the back if you have a backing board. Neutral linen, black felt, warm cork, or patterned fabric can all work depending on the room style.
Step 7: Attach the Mail Holder
A mail pocket can be wood, metal, acrylic, or fabric. Choose a shallow design so mail is visible. Deep pockets hide envelopes too well, which is how birthday cards, parking tickets, and permission slips go to live in the paper underworld. If the holder has weight, screw it into a frame or backing rather than relying on foam alone.
Step 8: Mount the Board Securely
Use proper wall anchors for the wall type and weight of the board. Drywall, plaster, brick, and wood studs all require different fasteners. If children are in the home, secure the board carefully and avoid placing heavy baskets or breakable items where they can fall. A lightweight board is safer than a heavy one, but secure mounting still matters.
Design Ideas for Different Rooms
Kitchen Command Center
In the kitchen, create a magnetic calendar area, a cork section for meal plans, and a two-slot mail holder for bills and school papers. Add a small hook rail nearby for keys or reusable shopping bags. Keep the color palette simple so the board does not make the kitchen feel visually busy.
Entryway Mail Station
For an entryway, make the mail pocket the star. Add labels such as “Open,” “File,” and “Outgoing.” A magnetic strip can hold reminders, while a cork section can display event tickets, invitations, or a weekly checklist. This setup stops the classic problem of walking in, dropping mail somewhere random, and discovering an overdue notice under a pizza menu three weeks later.
Home Office Organizer
In a home office, use a larger magnetic section for project notes, deadlines, and visual planning. A bulletin section can hold receipts, business cards, or inspiration images. The mail pocket can become an inbox for paperwork that needs scanning or filing.
Kids’ Homework Board
For a homework zone, use bright fabric, large labels, and strong magnets. Add a pocket for worksheets and a cork area for spelling lists or school calendars. Keep the design simple enough that kids can actually use it without needing a household operations manual.
Common Mistakes to Avoid
The first mistake is using the wrong adhesive. Foam board can react badly to some solvents, so always check compatibility before applying glue across the whole project. Test a small hidden area first.
The second mistake is expecting magnetic paint or primer to hold heavy items. Magnetic primer creates an attractive surface for basic magnets, but it is not the same as sheet metal. If magnet strength matters, use metal.
The third mistake is skipping edge protection. Foam edges can dent easily, especially in busy rooms. Wood trim, fabric binding, or even painted molding can make the board look finished and last longer.
The fourth mistake is making one giant catch-all pocket. Mail organization works best when categories are visible. Two or three shallow sections beat one deep pocket almost every time.
Safety and Practical Notes
If you are working in a home built before 1978 and plan to sand, drill, scrape, or disturb painted surfaces, be aware that older paint may contain lead. Use lead-safe work practices and avoid creating dust. Also, do not place foam insulation board near heat sources or open flames. Keep sharp tools away from children, cut on a stable surface, and ventilate when using paint, primer, or adhesive.
This project is best treated as a decorative organizer, not as a structural building installation. If you need actual thermal insulation for a wall, garage, basement, or attic, follow building codes and manufacturer instructions. For a mail holding board, your priorities are light weight, safe mounting, clean design, and everyday usability.
Maintenance: Keep the Board Useful
Once the board is finished, give it a weekly reset. Remove expired coupons, old flyers, outdated school notices, and random mystery papers. Wipe the magnetic surface with a soft cloth. Replace bent pins. Empty the mail holder before it becomes a paper lasagna.
A good board should make life easier, not become another chore. The trick is to give every paper a short-term home and a next step. Mail should be opened, recycled, filed, paid, or acted on. Notes should be updated. Calendars should be current. Magnets should hold reminders, not ancient receipts from a sandwich you barely remember.
Real-Life Experience: What It Feels Like to Use This Board Every Day
The best thing about an insulation to magnetic bulletin mail holding board is not the craft itself. It is the tiny daily relief of knowing where things go. Before using a board like this, many homes have a “paper zone” that is not officially declared but somehow controls the entire household. It might be the corner of the counter, the top of the microwave, the dining table, or the mysterious chair that collects backpacks, envelopes, and half-opened packages. Once a dedicated board is installed, the paper chaos finally has a border.
In practice, the magnetic section becomes the quick-glance area. This is where the most urgent items belong: tomorrow’s appointment, the school picture form, the invitation with the address, or the reminder to return library books. Strong magnets are worth buying because weak magnets slide down the board in slow motion like they are quitting the job. A steel sheet performs better than magnetic primer when the board needs to hold several papers at once.
The bulletin section is better for items that stay a little longer. A favorite postcard, a monthly lunch menu, a chore chart, a recipe card, or a small checklist feels at home there. Cork covered with fabric looks polished, but plain cork is easier to use heavily. If the board is for a busy family, function should win over perfection. A gorgeous board that no one wants to touch is just wall jewelry.
The mail holder is the true test. At first, everyone may still drop mail on the counter out of habit. The fix is to place the board exactly where mail naturally enters the house. If the mailbox is near the front door, put the board near the front door. If everyone enters through the garage, install it by the garage entry. Organization works best when it follows behavior instead of trying to lecture it into submission.
Labeling helps more than expected. A pocket marked “To Do” catches bills, forms, and reply envelopes. A pocket marked “To File” catches records and receipts. A tiny “Outgoing” slot prevents stamped envelopes from disappearing. The labels do not need to be fancy. In fact, simple labels usually work better because no one has to decode them while carrying groceries, a backpack, and a cup of coffee.
After a few weeks, the board often becomes a household habit. People stop asking, “Where is the permission slip?” because the answer is visible. Keys stop wandering. Coupons are easier to use before they expire. The board will not solve every organizational problem, but it removes a surprising amount of friction from daily routines.
The most satisfying part is that the project can be customized endlessly. A renter can make a smaller lightweight version with removable mounting options. A homeowner can build a framed version that looks built-in. A parent can create a colorful homework station. A minimalist can make a clean black-and-white office board. The core idea stays the same: a lightweight base, a magnetic surface, a pin-friendly area, and a mail pocket that keeps paper from staging a coup.
Conclusion
Turning insulation board into a magnetic, bulletin, and mail holding board is a smart DIY project for anyone who wants better home organization without buying a bulky office-style board. The key is to use foam board as a lightweight core, protect it with durable surfaces, choose foam-safe adhesives, add a reliable magnetic layer, and mount the finished piece securely.
Whether you build it for a kitchen command center, entryway mail station, home office, or kids’ homework wall, the finished board can bring order to the everyday paper storm. And honestly, anything that keeps mail off the counter deserves a small round of applause.
Note: This article is written for web publication and synthesizes practical DIY, home organization, insulation, adhesive, paint, and safety guidance from reputable U.S.-based references without adding source links inside the article.