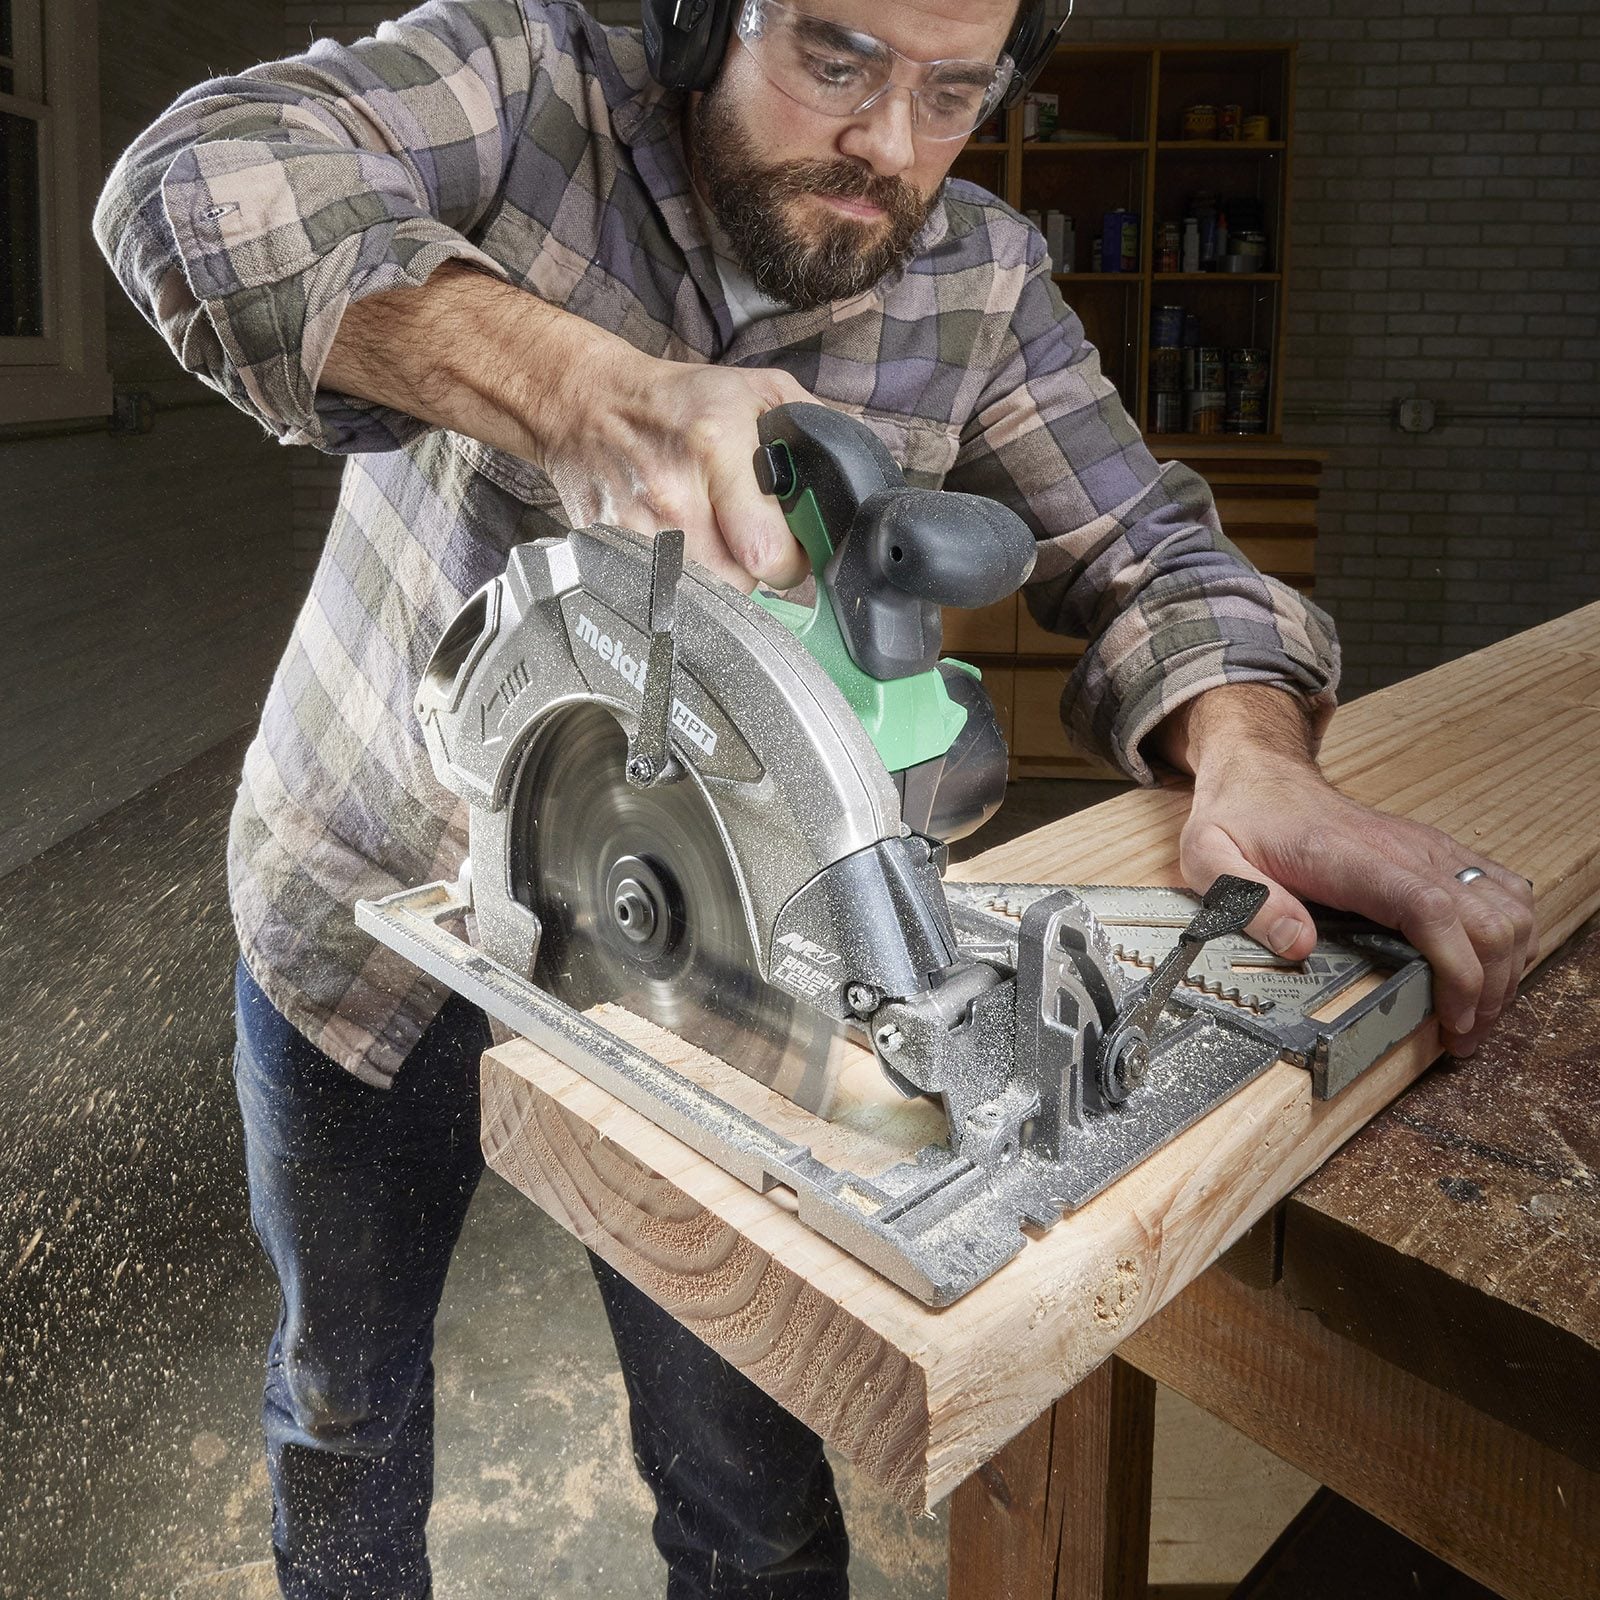

A circular saw can turn a full sheet of plywood into cabinet parts, shorten framing lumber, trim a door, or build a backyard deck before lunch. It can also turn a perfectly good board into modern art if you rush the setup. The difference usually comes down to blade selection, workpiece support, accurate adjustments, and a calm cutting technique.
This complete guide explains how to use a circular saw safely, make straight and accurate cuts, prevent kickback, choose the correct blade, and avoid the mistakes that frustrate first-time users. Whether you own a corded sidewinder or a powerful cordless model, the same fundamentals apply: prepare carefully, hold the tool securely, and let the blade do the work.
What Is a Circular Saw?
A circular saw is a handheld power tool that uses a rapidly rotating round blade to cut wood, plywood, composite panels, plastic, metal, masonry, and other materials. The material you can cut depends on the saw’s specifications and the blade installed.
Most general-purpose circular saws use a 7-1/4-inch blade, although compact cordless models often use 5-3/8-inch or 6-1/2-inch blades. A larger blade generally provides greater cutting depth, while a smaller saw may feel lighter and easier to control.
Main Parts You Should Know
Before pulling the trigger, become familiar with the tool’s main components:
- Blade: The rotating cutting component, selected according to the material and desired finish.
- Shoe or baseplate: The flat metal plate that rests on the workpiece and stabilizes the saw.
- Upper blade guard: The fixed housing covering the upper portion of the blade.
- Lower blade guard: The spring-loaded guard that retracts as the saw enters the material and closes when the saw leaves it.
- Depth adjustment: A lever or knob that controls how far the blade extends below the shoe.
- Bevel adjustment: The mechanism that tilts the shoe for angled cuts.
- Front and rear handles: The gripping points used to guide and control the saw with both hands.
- Cut-line notches: Marks on the front of the shoe that indicate the approximate blade path at common bevel settings.
- Spindle lock: A button that prevents the arbor from rotating while the blade is changed.
Portable circular saws should have functional upper and lower guards, and the lower guard should automatically return to its protective position when the tool leaves the workpiece. Never tie, wedge, tape, or otherwise defeat the guard.
Choose the Correct Circular Saw Blade
The saw supplies the power, but the blade determines how efficiently and cleanly the material is cut. Using the wrong blade is like trying to slice a tomato with a garden shovel: technically ambitious, practically disappointing.
Framing and General-Purpose Blades
A 24-tooth carbide-tipped blade cuts construction lumber quickly. It is a practical choice for framing, decking, fence boards, and projects where speed matters more than a furniture-quality edge.
Fine-Finish and Plywood Blades
Blades with approximately 40 to 60 teeth generally produce cleaner crosscuts in plywood, veneered panels, trim, and finished lumber. More teeth create a smoother edge, although the cut may progress more slowly.
Material-Specific Blades
Plastic, aluminum, steel, fiber cement, and masonry require blades specifically rated for those materials. Confirm that the blade diameter, arbor size, maximum speed, tooth design, and application are compatible with your saw. Never install a blade merely because it fits on the arbor.
Check the Blade Direction
On a standard handheld circular saw, the teeth at the bottom of the blade should point toward the front of the tool. Match the direction arrow on the blade with the rotation arrow on the saw guard. An incorrectly installed blade will not improve cutting performance, no matter how sternly you stare at it.
A sharp, suitable blade reduces resistance and is less likely to bind than a dull or inappropriate blade. For many woodworking jobs, a coarse blade works well for fast ripping, while a higher-tooth-count blade improves the finish on plywood and crosscuts.
Circular Saw Safety Checklist
A circular saw is manageable when treated with respect and unpredictable when treated like a loud kitchen appliance. Complete this checklist before every cutting session.
Wear Appropriate Protective Equipment
- Wear safety glasses with side protection.
- Use hearing protection during prolonged or repeated cutting.
- Wear a suitable dust mask or respirator when the material produces hazardous dust.
- Avoid loose clothing, jewelry, dangling drawstrings, and unsecured long hair.
- Wear sturdy footwear and maintain stable footing.
Gloves can be useful while carrying rough lumber, but bulky gloves may reduce trigger control or snag near moving equipment. Follow the tool manufacturer’s recommendations for the specific operation.
Inspect the Saw
Disconnect the power cord or remove the battery before inspecting, adjusting, cleaning, or changing the blade. Check that:
- The blade is sharp, undamaged, correctly installed, and firmly secured.
- The lower guard moves freely and snaps closed immediately.
- The shoe is flat and securely attached.
- The depth and bevel locks tighten properly.
- The power cord has no cuts, exposed conductors, or damaged plugs.
- The battery is locked into place and has no visible damage.
- The handles are dry and free of oil, dust buildup, or moisture.
Inspect the Material
Look for nails, screws, staples, concrete residue, and hidden hardware. Do not assume reclaimed lumber is metal-free simply because the visible side looks innocent. Verify that the blade is designed to handle any embedded material you cannot remove.
Prepare the Work Area
Keep the floor clear, provide adequate lighting, and prevent children or bystanders from entering the cutting zone. Arrange cords and vacuum hoses so they cannot cross the blade path or catch behind the saw.
Cutting fiber-cement products and other silica-containing materials requires material-specific dust controls. NIOSH guidance includes using an appropriate dust-collecting saw, a compatible blade, and effective vacuum extraction rather than relying on an ordinary woodworking setup.
How To Use a Circular Saw Step by Step
Step 1: Measure and Mark the Cut
Measure carefully and place a clear pencil line across the workpiece. Mark the waste side with an “X” so you remember which side of the line can lose material to the blade’s kerf.
For a square crosscut, use a speed square or framing square to draw the line. For long plywood cuts, use a chalk line, straightedge, track, or shop-made guide.
Step 2: Set the Blade Depth
Disconnect the saw from power. Loosen the depth adjustment, place the shoe on the workpiece, and adjust the blade so it extends approximately 1/8 to 1/4 inch below the material. Tighten the depth lever firmly and verify that it cannot slip.
Exposing excessive blade below the board does not provide “extra cutting.” It increases the amount of unguarded blade, can make the saw harder to control, and may contribute to binding or kickback.
Step 3: Set the Bevel Angle
For a standard square cut, set the bevel scale to zero degrees. Use a square to check the blade against the shoe if accuracy is important. For a bevel cut, loosen the bevel lock, tilt the shoe to the required angle, and retighten the adjustment securely.
Make a test cut whenever a precise angle is required. The printed scale on a hardworking saw may be close enough for framing but not necessarily close enough for a seamless cabinet joint.
Step 4: Support and Clamp the Workpiece
Support the material so the blade will not strike the bench, floor, sawhorse, or anything else hiding underneath. The main portion of the workpiece should remain stable, while the waste piece should be able to separate without closing the kerf around the blade.
When cutting a board, place the saw’s motor and most of the shoe over the supported section rather than balancing the tool on the small offcut. Clamp the workpiece whenever movement is possible. Never hold a small board with one hand while operating the saw with the other.
Correct support is one of the most important ways to prevent the kerf from pinching the blade. Manufacturer manuals and practical woodworking guidance consistently warn that a pinched, twisted, or misaligned blade can produce sudden kickback toward the operator.
Step 5: Position Your Body
Stand slightly to the side of the blade’s path instead of directly behind the saw. Keep balanced footing and make sure you can complete the entire cut without stretching, twisting, or changing your grip halfway through.
Hold the rear handle with your dominant hand and the front handle with the other. Keep both hands on the tool during the cut and away from the blade area underneath the material.
Step 6: Align the Saw
Rest the front of the shoe on the workpiece while keeping the blade clear of the material. Align the appropriate cut-line notch with your mark. Remember that the blade has width, so position it on the waste side rather than cutting through the center of a precision line.
For greater accuracy, clamp a straight board or manufactured guide to the workpiece. Measure the distance from the blade to the edge of the saw’s shoe and offset the guide by that amount.
Step 7: Start the Blade Before Entering the Material
Press the safety lock if your saw has one, squeeze the trigger, and allow the blade to reach full speed. Then move the saw forward smoothly into the workpiece. Starting with the teeth already touching the material can cause a rough entry or unexpected movement.
Step 8: Guide the Saw Through the Cut
Keep the shoe flat against the material. Watch the cut-line indicator or blade path without placing your face close to the tool. Push at a steady rate and listen to the motor.
If the motor slows dramatically, the saw begins to wander, or you feel increasing resistance, do not force it. Release the trigger, hold the saw still until the blade stops, remove it carefully, and identify the cause. The blade may be dull, the kerf may be closing, the guide may be misaligned, or the material may be unsupported.
Step 9: Complete the Cut Safely
Continue guiding the saw until the blade completely exits the material. Release the trigger and keep both hands on the tool until the blade stops rotating. Do not place the saw on a bench while the blade is coasting unless the lower guard has fully closed and the manual permits it.
Wait before touching the blade. After several cuts, carbide teeth and the blade plate may be hot enough to provide a memorable but unnecessary lesson.
These general operating steps align with major U.S. home-improvement guides and manufacturer instructions, but the manual supplied with your particular saw always takes priority.
How To Make Straight Circular Saw Cuts
Use a Speed Square for Crosscuts
Place the lip of a speed square against the board’s edge and align its straight side with the cut mark. Hold or clamp it securely, then guide the saw’s shoe along the square. Confirm that the motor housing and blade guard will clear the square before starting.
Clamp a Straightedge for Long Cuts
A straight board, aluminum level, cutting track, or factory-made saw guide can produce accurate plywood cuts. Test the straightedge before trusting it; a bowed “straight” board is merely a curve with confidence.
Create a Zero-Offset Guide
A shop-made plywood guide can be trimmed by the saw during its first use. The trimmed edge then shows the exact future cut location, eliminating repeated offset calculations. Make one for crosscuts and another long enough for sheet goods.
Make a Test Cut
Use scrap material to confirm the blade position, bevel angle, guide offset, and finished-edge quality. A thirty-second test cut can prevent a thirty-minute conversation with yourself about why the expensive plywood is suddenly two inches too short.
Crosscuts, Rip Cuts, Bevel Cuts, and Plywood Cuts
Crosscuts
A crosscut runs across the wood grain. Use a square or crosscut guide, keep the board stable, and allow the waste end to fall away without pulling fibers from the finished piece.
Rip Cuts
A rip cut runs parallel to the grain or along the length of a panel. Use a rip fence, straightedge, or cutting track. Freehand ripping is difficult for beginners because even a small steering correction can twist the blade inside the kerf.
Bevel Cuts
A bevel cut is made with the blade tilted relative to the shoe. Beveling reduces the saw’s maximum cutting depth and changes the blade’s relationship to the cut-line notch, so confirm both settings on scrap before cutting the actual workpiece.
Plywood and Finished Panels
Because most handheld circular saw blades rotate upward through the material, the top face usually experiences more tear-out than the bottom face. Place the best face down when practical. A fine-finish blade, painter’s tape over the cut line, full panel support, and a straight guide can further improve the edge.
What Causes Circular Saw Kickback?
Kickback occurs when the blade becomes pinched, bound, twisted, stalled, or misaligned. The rear teeth can climb out of the kerf, causing the tool to move suddenly toward the operator.
Common causes include:
- Supporting the workpiece so the kerf closes during the cut.
- Changing direction while the blade is buried in the material.
- Using a dull, damaged, dirty, or incorrect blade.
- Setting the blade unnecessarily deep.
- Forcing the saw faster than it can cut.
- Allowing the shoe to lift away from the workpiece.
- Beginning the cut with the blade touching the material.
- Using a bent guide or allowing clamps to obstruct the motor.
If the blade binds, release the trigger and hold the saw firmly in place until the blade stops. Do not pull a rotating blade backward through the kerf. Correct the support, alignment, blade condition, or cutting setup before restarting.
Common Circular Saw Mistakes
- Cutting without checking underneath: This can damage the bench, blade, floor, wiring, plumbing, or another object beneath the material.
- Using one hand: Two-handed control improves stability and keeps the free hand away from the blade.
- Forcing the saw: Excessive pressure can overheat the blade, overload the motor, and pull the cut away from the guide.
- Watching only the pencil line: Also monitor the shoe, guide clearance, cord, offcut, and body position.
- Allowing the cutoff to support the saw: Keep the majority of the shoe on the stable, supported side.
- Ignoring blade condition: Missing carbide tips, pitch buildup, warping, or dull teeth reduce cut quality and control.
- Making unsupported advanced cuts: Plunge cuts and other nonstandard operations require specific tools, manufacturer-approved procedures, and additional training. Beginners should use a jigsaw, track saw, or another safer method for interior openings.
Circular Saw Maintenance
Disconnect the power before maintenance. Brush or vacuum sawdust from the guards, shoe, vents, and adjustment mechanisms. Do not direct compressed air into areas where it may force dust deeper into the motor unless the manufacturer specifically approves the method.
Check the lower guard frequently, clean resin from blades according to the blade manufacturer’s instructions, and replace damaged blades immediately. Inspect cords, plugs, battery contacts, fasteners, and adjustment levers. Store the saw in a dry location with the blade guard closed.
If the tool vibrates, produces unusual sounds, smells hot, sparks excessively, or develops inconsistent speed, stop using it. Diagnose the problem according to the manual or have the saw inspected by a qualified service technician.
Frequently Asked Questions
How deep should a circular saw blade be set?
For a typical through-cut, set the blade approximately 1/8 to 1/4 inch deeper than the material. Follow your saw manufacturer’s instructions when they specify a different procedure.
Which side of the line should I cut?
Keep the blade kerf on the waste side of the line. The edge of the blade, not its center, should follow the boundary of the finished piece.
Why does my circular saw keep wandering?
A wandering cut may result from freehand steering, a dull blade, excessive pushing pressure, a loose shoe, poor visibility, or a blade that is not parallel to the baseplate. Use a straight guide and make a test cut after checking the saw.
Can a circular saw cut metal?
Some circular saws can cut specific metals when equipped with an approved metal-cutting blade. Confirm compatibility in the saw and blade manuals, control sparks and hot chips, remove combustible materials, and use appropriate protective equipment.
Should I push or pull a circular saw?
Standard handheld circular saws are designed to be pushed forward through the workpiece. Do not pull a spinning blade backward through a partially completed cut.
Conclusion
Learning how to use a circular saw begins with disciplined setup rather than fearless trigger pulling. Select the proper blade, disconnect power before adjustments, expose only the necessary cutting depth, support the workpiece correctly, and keep both hands on the tool. Start the blade before entering the material, guide the saw without forcing it, and wait for the blade to stop before setting the tool down.
Accuracy improves quickly when you use a speed square, straightedge, rip fence, or zero-offset guide. Safety improves when you inspect the lower guard, maintain a sharp blade, stand outside the kickback path, and stop whenever the saw behaves differently than expected. With those habits in place, a circular saw becomes one of the most useful and versatile tools in a home workshop.
Experience-Based Lessons From Real Circular Saw Projects
The most valuable circular saw lessons often appear during ordinary projects rather than dramatic workshop adventures. Consider a homeowner cutting several 2-by-6 boards for a small deck landing. The first board is marked carefully, but the cut drifts because the operator watches the pencil line while unconsciously steering the back of the saw. On the next board, a speed square is used as a guide. The result is straighter, faster, and less stressful. The lesson is simple: skill matters, but a five-dollar guide can make skill’s job much easier.
Sheet goods provide another common learning experience. A full plywood panel is heavy, flexible, and inconvenient to balance across two narrow sawhorses. If the panel sags as the cut progresses, the kerf can close and pinch the blade. Better support changes the entire operation. With the panel stabilized across a suitable cutting surface and a straight guide clamped in place, the saw travels smoothly while the pieces remain controlled. The cut suddenly feels less like wrestling a dining table and more like following a road.
Blade choice also becomes obvious through experience. A coarse framing blade may race through studs but leave visible splinters across cabinet-grade plywood. Switching to a sharp, higher-tooth-count blade and placing the finished face downward produces a noticeably cleaner edge. Adding a guide reduces side-to-side corrections, which further limits tear-out. The project does not require a more powerful saw; it requires a blade and setup appropriate for the finish.
Another frequent lesson comes from trying to save time. A user may leave the blade at maximum depth after cutting thick lumber and then move directly to thin plywood. The saw feels more aggressive, more teeth are exposed below the panel, and steering becomes less comfortable. Resetting the blade to extend only slightly beneath the plywood improves control. The adjustment takes less than a minute and makes every following cut easier.
Cords and vacuum hoses deserve attention as well. During a long rip cut, a cord can catch on the corner of the sheet and pull against the saw. An inexperienced operator may respond by twisting the tool or tugging harder. A better approach is to stop before the obstruction occurs. Route the cord over a shoulder only when the manufacturer and work setup allow it, position it behind the starting point, or have it supported safely away from the blade path. Cordless saws remove that particular problem, but battery weight, charge level, and balance introduce different considerations.
Finally, experienced users learn to listen. A healthy saw at full speed has a consistent sound. When the pitch drops, the saw is communicating that something has changed. The blade may be dull, the feed rate may be excessive, or the material may be pinching the kerf. Releasing the trigger and checking the setup is not an admission of defeat. It is the correct response. The best circular saw technique is not bravado; it is the habit of noticing small problems before they become large ones.