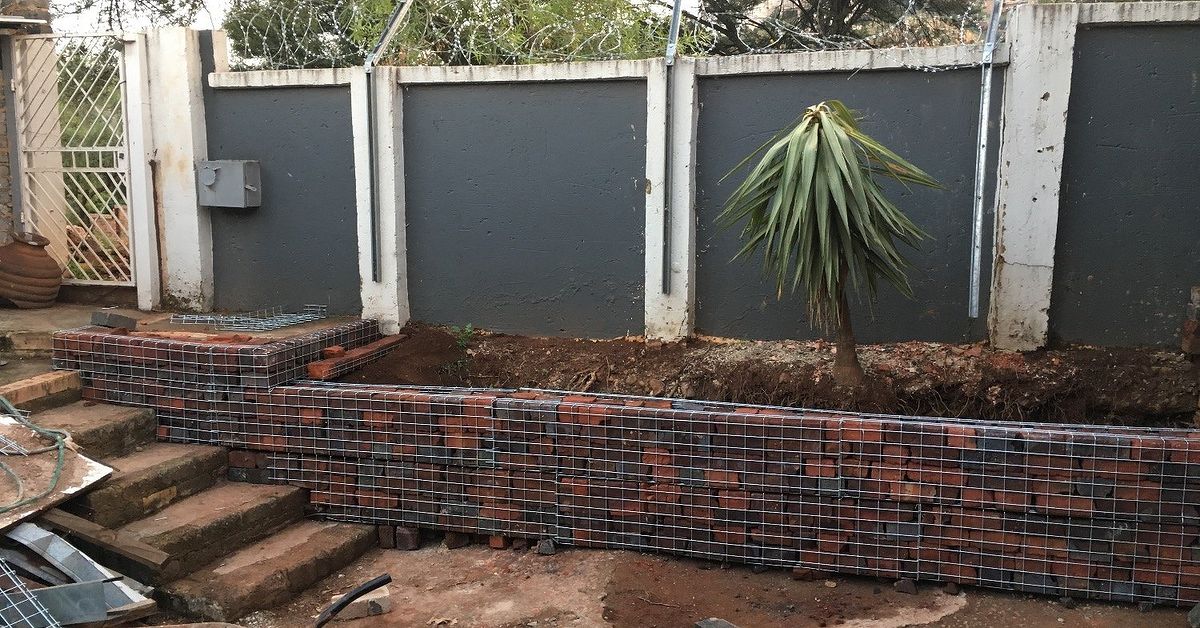

A gabion retaining wall looks like something assembled by a landscape architect, a civil engineer, and a very organized squirrel. In reality, a small residential gabion wall can be surprisingly approachable: prepare a stable base, assemble wire baskets, connect them securely, fill them with durable stone, and manage the soil and water behind the wall.
The word simple, however, should not be confused with careless. A gabion may be a basket full of rocks, but once those rocks begin holding back hundreds or thousands of pounds of soil, they have officially graduated from garden decoration to structure. This guide explains how to build a low, straightforward gabion retaining wall while recognizing when professional design is necessary.
What Is a Gabion Retaining Wall?
A gabion retaining wall is built from wire-mesh baskets filled with stone. The filled baskets act as heavy gravity units that resist pressure from the retained soil. Multiple baskets can be tied together so the finished structure behaves more like one connected mass than a collection of unrelated rock cages.
Gabions have several useful characteristics. They are flexible enough to tolerate modest ground movement, their open stone structure allows water to pass through, and the visible rock creates a natural appearance. They can also use locally available stone when that material is durable and properly sized for the mesh.
Permeability is a major advantage, but it does not make drainage planning optional. Fine soil can migrate into or through the rock voids, surface runoff can wash out the backfill, and saturated clay can exert substantial pressure. A well-built wall therefore combines permeable baskets with filter fabric, suitable backfill, a stable foundation, and controlled surface drainage.
Choose a Realistically Simple Project
A good first project might be a wall 18 to 24 inches high and 8 to 12 feet long, holding back a modest garden bed with level ground above it. A poor first project is a six-foot wall beneath a sloping driveway during the rainy season. That is not a weekend project; that is an engineering exam with consequences.
Before proceeding, confirm that:
- The ground above the wall is relatively level.
- No building, driveway, fence footing, pool, or heavy equipment will load the retained soil.
- The wall is not in a stream, drainage channel, wetland, floodplain, or protected area.
- The foundation soil is firm and does not contain uncontrolled fill, peat, or deep organic material.
- Water does not continually seep from the slope.
- The project complies with local zoning, setback, grading, and permit requirements.
Contact 811 before excavation and wait for all affected utilities to respond. Private lines such as landscape lighting, irrigation, propane piping, or power to an outbuilding may not be included in ordinary utility marking, so locate those separately.
Materials and Tools
Primary materials
- Galvanized, coated, or otherwise corrosion-resistant gabion baskets rated for the intended application
- Manufacturer-approved lacing wire, spiral binders, clips, or ring fasteners
- Internal diaphragms, cross-ties, or stiffeners supplied for the baskets
- Hard, durable gabion stone sized for the mesh openings
- Nonwoven geotextile filter fabric suitable for drainage and soil separation
- Compactable crushed aggregate for the leveling pad
- Clean, free-draining granular backfill when required
- Perforated drainpipe and outlet fittings where site drainage calls for them
Useful tools
- Shovel, spade, rake, mattock, and wheelbarrow
- Tape measure, stakes, mason’s string, and marking paint
- Long level, line level, and straight board
- Hand tamper or rented plate compactor
- Heavy gloves, safety glasses, sturdy boots, and long sleeves
- Pliers, wire cutters, fencing tool, or the fastener tool recommended by the basket supplier
- Small pry bar for adjusting face stones
Gabion wire ends are sharp, stone is heavy, and pinched fingers are extremely persuasive teachers. Wear appropriate protection and use mechanical equipment or additional workers when moving bulk rock.
How Much Stone Will You Need?
Calculate the internal volume of the baskets by multiplying length, width, and height. A basket system totaling 10 feet long, 2 feet deep, and 2 feet high has a volume of 40 cubic feet:
10 × 2 × 2 = 40 cubic feet
Divide by 27 to convert cubic feet to cubic yards:
40 ÷ 27 = approximately 1.48 cubic yards
Add a reasonable allowance for settlement, grading variations, and stone selection. Confirm the order with the quarry or landscape supplier because stone is commonly sold by weight, and the weight per cubic yard varies by rock type, grading, moisture, and void space.
Do not underestimate the load. Even a small gabion wall may contain several tons of stone. Confirm that delivery equipment can reach the site without damaging utilities, septic components, pavement, lawns, or your neighbor’s prize hydrangeas.
Choosing the Correct Gabion Stone
The rock must be larger than the basket openings so it cannot escape. Many common gabion systems specify stone in roughly the 4- to 8-inch range, but the correct size depends on the exact mesh and manufacturer’s instructions.
Choose hard, durable stone that will resist weathering. Dense angular or irregular rock generally packs and interlocks better than uniformly rounded cobbles. Avoid soft shale, crumbly stone, highly fractured material, and pieces that break apart easily when struck.
For an attractive face, reserve flatter or more visually appealing pieces for the visible side of the basket. Less glamorous stone can fill the interior. This is essentially geological stage makeup: the audience sees the front row, not what is happening backstage.
How to Build a Simple Gabion Retaining Wall
Step 1: Plan the Alignment and Finished Grades
Mark the front and back of the proposed wall with stakes and string. Establish the finished top elevation and check the line from several viewing angles. Gabions tolerate rustic stone, but a wandering wall line still looks like a wandering wall line.
Plan where runoff will go. The finished grade above the wall should not funnel roof water, driveway runoff, or concentrated drainage toward the back of the baskets. Provide a stable outlet for any drainpipe rather than allowing it to discharge where it can erode the wall’s toe.
Step 2: Excavate the Base
Remove grass, roots, topsoil, soft material, and organic debris. Excavate a level trench wide enough for the entire basket depth plus working room. Do not balance a wide basket on a narrow strip of compacted gravel.
The foundation should rest on firm, undisturbed soil or properly compacted structural fill. If the excavation exposes soft pockets, uncontrolled fill, flowing water, or soil that pumps underfoot, stop and obtain professional advice.
Keep excavated soil and stone away from the edge of deeper excavations. Do not enter an unsupported trench that presents a cave-in hazard. Rain can quickly change stable-looking soil into something much less cooperative.
Step 3: Construct a Compacted Leveling Pad
For a low landscape wall, a common approach is a compacted crushed-stone pad approximately 4 to 6 inches thick, subject to soil conditions and the basket supplier’s requirements. Place the aggregate in manageable layers, moisten it lightly if appropriate, and compact it thoroughly.
Check the pad from end to end and from front to back. The base must be smooth and level unless an engineered plan intentionally specifies a batter or stepped foundation. A one-inch error at the bottom has an annoying habit of becoming much more noticeable at the top.
Step 4: Install Geotextile Separation Fabric
Place suitable geotextile where fine soil would otherwise contact the stone-filled baskets. The fabric normally separates the retained soil from the gabion rock while allowing water to pass. It may also be required beneath the wall when foundation soil could migrate upward into the base stone.
Overlap seams according to the fabric manufacturer’s directions and avoid puncturing the material. Do not use ordinary plastic sheeting, which can trap water rather than filter it.
Step 5: Assemble the Empty Gabion Baskets
Unfold each basket on a flat surface. Raise the side panels, end panels, and internal diaphragms, then connect every required seam using the supplied lacing wire or approved fasteners.
Follow the manufacturer’s pattern and spacing. Many woven-wire systems use alternating single and double lacing loops, while welded-wire cages may use spirals or clips. Do not substitute random household wire, zip ties, or the optimistic belief that gravity will finish the fastening later.
Install all diaphragms. These internal partitions help the basket retain its shape and limit stone movement.
Step 6: Position, Align, and Connect the Baskets
Place the empty units on the prepared pad. Align the faces with the string line and connect adjacent baskets along all touching edges before filling. When baskets are stacked, the upper course must also be secured to the course below.
Brace or temporarily stake the faces if necessary to maintain alignment. Confirm dimensions and levels now. An empty basket is easy to adjust; a basket containing a ton of stone has strong opinions about remaining where it is.
Step 7: Fill the Baskets in Even Lifts
Fill the cells gradually, generally in lifts no deeper than about 12 inches. Keep neighboring cells at similar levels so one side is not forced outward while the adjacent compartment remains empty.
Hand-place larger face stones against the visible mesh. Arrange them tightly with their broad sides facing outward, then fill behind them with well-graded stone. Minimize large voids without crushing or forcing undersized fragments through the mesh.
Do not dump rock from excessive height. Heavy stone can deform panels, damage protective coatings, bend diaphragms, or turn a neat rectangular basket into a wire potato.
Step 8: Add Cross-Ties and Stiffeners
Install internal bracing at the elevations and spacing specified by the basket manufacturer. Cross-ties connect the front face to the back or side panels, limiting bulging as the rock is placed.
This step is particularly important for taller baskets and exposed faces. Add the bracing during filling; it is difficult to thread a stiffener through a basket after the interior has become a three-dimensional stone puzzle.
Step 9: Close and Secure the Lids
Fill the baskets evenly and accommodate the supplier’s recommended allowance for minor settlement. Fold the lids into position and lace or fasten every edge, end, and diaphragm connection securely.
Pull the lid tight enough to close properly without distorting the mesh. Cut or turn sharp wire ends inward so they do not become permanent traps for hands, clothing, pets, or garden hoses.
Step 10: Backfill Carefully
Keep the geotextile between the soil and the gabion stone. Place suitable backfill in thin, controlled lifts and compact it without pushing the baskets out of alignment. Avoid running heavy compactors directly against the back of a small wall unless the design and equipment are appropriate.
Where clay, seepage, a long wall, or concentrated water creates additional drainage concerns, an engineered drainage zone and perforated pipe may be needed. The pipe must slope to a dependable, maintainable outlet.
Step 11: Shape the Final Grade
Grade the soil above the wall so surface water moves away from vulnerable areas and does not flow behind the baskets. Stabilize exposed soil with mulch, stone, erosion-control material, or vegetation appropriate for the site.
Avoid planting large woody species directly in the baskets. Expanding trunks and roots can distort the mesh, while an uprooted shrub or tree may damage the wall.
Common Gabion Wall Mistakes
Using undersized rock
Small stone escapes through the mesh, settles excessively, and allows the basket to deform. Match the fill to the opening size rather than buying whichever rock happens to be discounted.
Skipping the geotextile
A wall can remain standing while the soil behind it slowly disappears into the rock voids. Filter fabric helps prevent internal erosion and settlement behind the wall.
Filling the full basket at once
Uneven filling encourages bulging and twists the mesh. Work in shallow, balanced lifts and install the specified bracing as you go.
Building on topsoil
Topsoil contains organic matter and compresses unpredictably. Remove it and construct the wall on a firm, properly prepared foundation.
Assuming permeability solves every water problem
Gabions relieve pressure better than a solid wall face, but they cannot compensate for uncontrolled roof drainage, groundwater springs, eroding outlets, or saturated weak soil.
Making a narrow wall taller
A gabion gravity wall depends heavily on its mass and geometry. Do not stack narrow landscape cages to create a tall retaining structure without an engineered design.
Inspection and Maintenance
Inspect the wall after major storms and at least once or twice a year. Look for:
- Bulging or leaning basket faces
- Broken, loose, or corroded wire
- Missing or displaced stone
- Settlement at the foundation
- Soil loss behind or beneath the wall
- Erosion at the ends or toe
- Blocked drainage outlets
- Large plants establishing inside the cages
Repair small wire defects with compatible materials approved by the basket supplier. Replace missing stone and correct the water source that caused the loss. Movement, continuing settlement, significant corrosion, or erosion beneath the first course deserves professional evaluation rather than cosmetic patching.
Practical Field Lessons: What First-Time Builders Usually Discover
The most common surprise in gabion wall construction is not the wire assembly. It is the sheer volume and weight of the stone. On paper, 1.5 cubic yards may look like a modest number. On the driveway, it looks like a small geological event. Successful builders plan the delivery location, wheelbarrow route, equipment access, and labor before the truck arrives. Moving the same rock twice is an excellent workout and a terrible project-management strategy.
Another practical lesson is that the finished appearance is determined during filling, not after it. Randomly dumping stone into the baskets may produce a structurally dense fill, but the face often becomes lumpy and visually chaotic. Taking time to hand-place the front layer creates a flatter surface and makes inexpensive local stone look intentional. The interior can be packed more quickly, provided the stone remains properly sized and the voids are controlled.
Base preparation also consumes more time than beginners expect. Excavating a trench is straightforward; producing a consistently level, compacted pad is slower. Builders commonly check the line in one direction and forget the basket depth. The result is a wall that is level from left to right but tips forward or backward. Checking both directions after every stage of aggregate placement prevents a long afternoon of removing and resetting filled cages.
Wire assembly rewards patience. Gloves protect hands, but thick gloves can make small fasteners difficult to manipulate. A practical setup is to use close-fitting cut-resistant gloves for lacing and heavier work gloves for handling stone. Precutting manageable lengths of lacing wire can speed assembly, although the exact lengths and fastening pattern should follow the basket instructions. Very long pieces tend to kink, tangle, and develop a personal vendetta against the installer.
Builders also learn that the string line is useful until the baskets begin to bulge toward it. Temporary bracing, careful face-stone placement, and correctly timed cross-ties matter more than repeatedly pushing the mesh back by hand. Once a compartment is overfilled, correction may require unloading part of it. Filling each cell in balanced lifts is slower for the first few minutes and dramatically faster over the whole project.
Drainage problems often appear beyond the baskets rather than through them. Water running around an unprotected wall end can remove soil behind an otherwise healthy structure. Runoff pouring over the top can carve channels in the backfill. Good projects therefore extend geotextile properly, protect the wall ends, establish vegetation or erosion control promptly, and shape the upper grade before the first storm tests the work.
Finally, experienced installers know when a “simple wall” has stopped being simple. Unexpected seepage, soft foundation soil, a nearby structure, deeper excavation, or a slope that continues upward behind the wall changes the problem. Pausing for professional advice may feel inconvenient, but it is cheaper than rebuilding a failed wall while explaining to the family why half the garden is now in the neighbor’s yard.
A successful simple gabion retaining wall is not created by one clever trick. It comes from a sequence of ordinary tasks completed carefully: verify the site, prepare the foundation, separate soil from stone, connect every basket, fill evenly, brace the faces, manage water, and inspect the wall over time. Do those things well, and the finished structure can look rugged, deliberate, and pleasantly permanent.