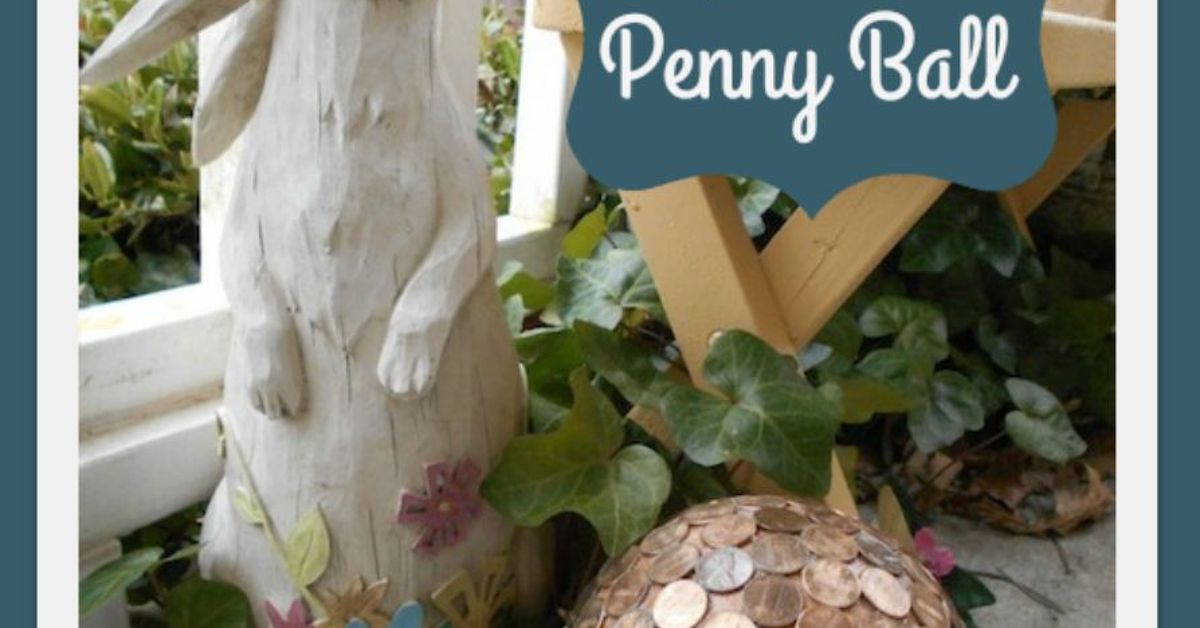

If your garden needs a little sparkle but your wallet is giving you the silent treatment, DIY penny balls may be the charming, coppery solution. These handmade garden ornaments turn ordinary pennies, thrifted bowling balls, foam spheres, or old glass globes into reflective yard art that looks far more expensive than it actually is. Think of them as garden jewelry: shiny enough to catch the sun, sturdy enough to survive the season, and quirky enough to make guests say, “Wait, are those actual pennies?”
A penny ball is exactly what it sounds like: a round object covered with pennies and sealed for outdoor display. It can sit among hostas, perch on a birdbath base, glow beside a walkway, or become the unexpected star of a container garden. The project is budget-friendly, beginner-friendly, and satisfyingly repetitive in the way only a good weekend craft can be. By the end, you may not have achieved inner peace, but you will have glued several hundred pennies to a sphere, which is basically the suburban version of meditation.
What Are DIY Penny Balls?
DIY penny balls are decorative garden spheres made by attaching pennies to a round base. The base can be a recycled bowling ball, a foam craft ball, a plastic globe, a concrete sphere, or even a sturdy old light fixture. The pennies create a warm copper finish that changes beautifully over time. Freshly cleaned pennies look bright and rosy; weathered pennies develop darker brown tones and, eventually, a natural patina.
Gardeners love this project because it combines three great things: upcycling, outdoor décor, and the chance to finally do something with that jar of coins sitting in the laundry room. A penny garden ball also adds texture and visual movement. When sunlight hits the curved surface, each coin catches light at a slightly different angle, creating a subtle shimmer that feels more handcrafted than store-bought.
Why Penny Balls Work So Well in Garden Design
Round shapes are powerful in landscape design. Gardens are often filled with vertical stems, flat leaves, straight fences, square patios, and rectangular raised beds. A sphere breaks up all those lines. It gives the eye a place to rest, then encourages it to move around the space. That is why gazing balls, stone orbs, and globe-shaped planters have remained popular for years.
A penny ball adds another layer: color. Copper tones pair beautifully with green foliage, purple flowers, terracotta pots, gray stone, and weathered wood. In a cottage garden, it feels whimsical. In a modern garden, it adds warmth. In a vegetable garden, it says, “Yes, I grow tomatoes, but I also have artistic range.”
There is also a popular garden rumor that copper helps deter slugs and snails. Copper barriers can be used around pots and planters, though results vary depending on the amount of copper, moisture, and how the barrier is placed. A penny ball should be treated mainly as garden art, not as a guaranteed pest-control system. If it scares one slug into making better life choices, wonderful. If not, it still looks fabulous.
Best Bases for a Penny Garden Ball
Bowling Ball
A used bowling ball is the classic base for a DIY penny ball. It is heavy, weather-resistant, and already perfectly round. The weight keeps it from rolling away during storms, which is helpful unless you want your garden ornament to become a copper bowling missile. Look for old bowling balls at thrift stores, garage sales, online marketplaces, or from friends who once believed they were joining a bowling league “for real this time.”
Foam Ball
A foam ball is lighter and easier to handle, making it a good choice for smaller projects or covered patios. However, foam needs a protective coating before going outdoors. Without sealing, moisture and sunlight can damage it. Use foam only for small penny balls or displays that will not sit directly in wet soil.
Plastic or Acrylic Globe
An old light globe or plastic garden orb can work well if it is sturdy. The surface should be cleaned and lightly scuffed with sandpaper so adhesive can grip. Avoid thin plastic that flexes too much, because pennies may pop off when the material expands and contracts.
Concrete Sphere
Concrete gives a penny ball a premium feel and excellent stability. It is also heavy, so choose its final location before you decorate it unless your weekend plans include regrettable lifting.
Materials You Will Need
- One round base, such as a bowling ball or sturdy garden sphere
- Enough pennies to cover the surface
- Outdoor-rated adhesive or clear silicone sealant
- Mild dish soap and water
- Vinegar and salt for cleaning pennies, optional
- Fine-grit sandpaper
- Disposable gloves
- Small bowl, towel, or flowerpot to hold the ball steady
- Clear outdoor sealant or spray topcoat, optional
- Drop cloth or cardboard to protect your work surface
For a standard bowling ball, expect to use several hundred pennies. The exact number depends on the size of your base and how tightly you place the coins. Smaller gaps create a polished mosaic effect, while wider gaps create a more rustic handmade look.
Choosing the Right Pennies
Modern U.S. pennies are mostly zinc with a thin copper coating, while older pennies contain much more copper. For garden art, either type can work visually, especially if you simply want a copper-colored finish. If you plan to clean the coins aggressively, remember that modern pennies have only a thin copper surface. Scrubbing too hard can expose the zinc underneath, which creates a duller, silvery patch.
Before gluing, sort through your pennies and remove collectible coins, unusual dates, wheat pennies, or anything that looks special. Most ordinary pennies are perfect for crafting, but it is worth checking before you permanently attach a small piece of history to a bowling ball named “Earl.”
Should You Clean the Pennies First?
That depends on the look you want. Clean pennies create a bright, shiny, almost rose-gold effect. Uncleaned pennies create a more aged, rustic finish. Mixing clean and dark pennies can create a beautiful speckled look, especially in cottage gardens or woodland borders.
To clean pennies naturally, stir a spoonful of salt into a small bowl of vinegar. Add the pennies and let them sit briefly, then rinse thoroughly and dry completely. The vinegar-and-salt mixture helps remove copper oxide, which is the dull coating that forms as copper reacts with air. Do not leave pennies soaking for too long, and do not skip rinsing. Residue left on the coins can interfere with adhesive.
If you prefer patina, skip the cleaning. Weather will do the decorating for you, slowly and for free, which is the garden’s favorite price.
Step-by-Step: How to Make DIY Penny Balls for Your Garden
Step 1: Clean the Base
Wash the ball with warm water and mild dish soap. Remove dirt, oil, dust, wax, or residue. If you are using a bowling ball, pay attention to the finger holes and any slick areas. Dry the surface completely before moving forward.
Step 2: Lightly Sand the Surface
Use fine-grit sandpaper to rough up glossy surfaces. You are not trying to carve a masterpiece; you just want to give the adhesive something to grip. Wipe away sanding dust with a damp cloth and let the ball dry again.
Step 3: Plan Your Pattern
You can glue every penny heads-up, alternate heads and tails, create spirals, make rows, or embrace chaos like a raccoon with a craft budget. A simple overlapping pattern works well because it follows the curve of the ball and reduces visible gaps. Start at the top center and work outward in rings.
Step 4: Glue in Small Sections
Place the ball in a towel-lined bowl or flowerpot to keep it steady. Apply a small amount of outdoor adhesive to the back of each penny, press it onto the ball, and hold briefly. Work in small sections so coins do not slide while the adhesive sets. Rotate the ball only after the section is stable.
Outdoor-rated silicone sealants, marine adhesives, and strong flexible craft adhesives are popular choices because they can handle moisture and temperature changes better than ordinary school glue. This is not the moment for bargain glue that gives up when the humidity rises. Your pennies deserve commitment.
Step 5: Deal With the Bottom
You do not have to cover the entire underside if it will never be visible. Leaving a small uncovered area can help the ball sit flat on a stand. If you use a bowling ball, you can also leave one finger hole open and place it over a dowel or short metal rod for extra stability in the garden.
Step 6: Let It Cure Fully
Follow the adhesive manufacturer’s cure time. Many products feel dry before they are fully cured. Resist the urge to rush the ball outdoors. A penny ball that has not cured properly may shed coins like a copper porcupine.
Step 7: Seal the Finished Ball
A clear outdoor sealant can help slow oxidation and protect the surface. Use a product intended for exterior use and apply it in thin, even coats. If you love the natural weathered look, sealing is optional. Just know that rain, sun, and soil contact will gradually darken the pennies.
Where to Display Penny Balls in the Garden
Placement can turn a simple craft into a design feature. Set a penny ball where it catches morning or late-afternoon sunlight. Harsh midday sun can be too bright, while soft angled light makes the copper glow.
- Place one at the center of a birdbath base for a classic gazing-ball effect.
- Nestle a small penny ball among groundcovers or ornamental grasses.
- Use two or three different sizes near a pathway for a sculptural look.
- Set one beside a container garden to echo terracotta and bronze tones.
- Display a sealed penny ball on a covered porch as seasonal décor.
If your garden has a lot of green foliage, copper will stand out beautifully. If your space already includes warm colors, such as brick, rusted metal, or cedar, a penny ball will feel like it belongs there.
Design Ideas and Creative Variations
The Classic Copper Globe
Use pennies of similar color and place them in neat rows. This creates a clean, polished finish that resembles a handmade copper mosaic.
The Ombre Penny Ball
Sort pennies by color, from shiny copper to deep brown. Place lighter coins at the top and darker coins near the bottom for a subtle gradient.
The Mixed-Metal Look
Add a few nickels, brass washers, or copper discs for variation. Keep the design balanced so it looks intentional rather than like your junk drawer exploded politely.
The Mini Penny Ball Set
Make several small foam or plastic penny balls and display them in a shallow planter, large bowl, or garden bed. Grouped objects often look more designer than a single item.
The Rustic Patina Ball
Use uncleaned pennies and skip the glossy sealant. Over time, the ball will darken and blend into the garden with an antique finish.
Common Mistakes to Avoid
The first mistake is using the wrong adhesive. Indoor craft glue may work for a photo frame, but it usually cannot handle rain, heat, freezing temperatures, and direct sun. Choose flexible, waterproof, outdoor-rated products.
The second mistake is gluing too many pennies at once. Gravity is patient and cruel. If the coins slide, your neat rows can become a copper landslide. Work slowly, let each section set, and rotate the ball gradually.
The third mistake is sealing too soon. Adhesive needs time to cure before a topcoat traps moisture or fumes. Follow the label directions even if your creative soul is impatient.
The fourth mistake is placing the finished ball directly in soggy soil. Constant moisture can weaken adhesive and speed corrosion. Use a stand, stone base, saucer, or gravel bed to improve drainage.
Maintenance Tips for Outdoor Penny Balls
Once your penny ball is outside, maintenance is simple. Wipe it occasionally with a damp cloth to remove dust, pollen, and bird commentary. Check for loose pennies after storms or seasonal temperature swings. If a coin falls off, clean the spot, let it dry, and reattach it with the same outdoor adhesive.
If you sealed the ball and want to keep it shiny, reapply clear outdoor sealant as needed. If you prefer a natural look, allow the pennies to age. Patina is not failure; it is the garden doing its slow little art project.
Budget Breakdown
A DIY penny ball can be surprisingly affordable. The biggest cost is usually adhesive, not the pennies. If you already have spare change and find a thrifted bowling ball, the project may cost less than a basic store-bought garden ornament.
- Used bowling ball: free to $10
- Pennies: roughly $3 to $8, depending on size
- Outdoor adhesive or silicone: $6 to $18
- Clear sealant: $6 to $15
- Stand or base: free to $20, depending on creativity
For the stand, look around before buying anything. Old plant saucers, metal candleholders, birdbath bases, thrifted bowls, and sturdy flowerpots can all work. The best DIY projects often begin with the sentence, “I was about to throw this away, but now it has a destiny.”
Safety and Practical Notes
Work outdoors or in a well-ventilated area when using adhesives and sealants. Wear gloves, protect your work surface, and keep children and pets away from wet adhesive. Many outdoor adhesives are strong because they contain chemicals that should be handled with care.
Also, do not use valuable collectible coins. Once glued and sealed, pennies are difficult to remove without damage. Ordinary circulated pennies are best for this project.
Personal Experience: What Making DIY Penny Balls Teaches You
The first thing you learn while making a penny ball is that a sphere is much more dramatic than it looks. A flat mosaic is polite. A round mosaic has opinions. The pennies want to slide, the ball wants to roll, and your fingers will somehow find adhesive even if you are wearing gloves. This is why the towel-in-a-bowl trick is not optional; it is a relationship counselor for you and your project.
When I made my first penny-style garden ball, I started with the kind of confidence only a person who has watched three tutorials can have. I cleaned the pennies, lined them up like tiny copper soldiers, and imagined a flawless designer orb sparkling in the sunlight. Ten minutes later, I had six pennies attached, two pennies stuck to my glove, and one penny on the floor wearing a small hat of glue. The lesson was immediate: slow down.
Working in small sections made everything easier. Instead of trying to cover the entire ball in one heroic session, I treated it like a series of little neighborhoods. I glued one ring of pennies, let it set, rotated the ball, and continued. The rhythm became relaxing. Press, hold, adjust, repeat. It is the kind of project that pairs well with iced tea, a podcast, and the firm acceptance that dinner may be leftovers.
The second lesson was that imperfect spacing is not the end of the world. In fact, slight irregularities make the finished penny ball look handmade in the best way. Store-bought garden décor can be beautiful, but it often lacks personality. A DIY penny ball has fingerprints, tiny gaps, color variations, and evidence that a real human made it while muttering at gravity.
Placement mattered more than expected. When the ball sat in full shade, it looked interesting but quiet. When I moved it near a patch of ornamental grass where late-afternoon sun could hit it, the copper came alive. The grasses softened the hard round shape, and the penny surface reflected warm light without looking flashy. It became one of those small garden details people noticed slowly, which is the best kind of garden surprise.
I also learned that weather changes the project in a good way. The penny ball looked bright at first, almost too new, like it had dressed up for its first day of school. After a few weeks outside, the shine mellowed. Some coins darkened faster than others. The result felt richer and more natural, especially next to terracotta pots and mulch. If you love perfection, seal it well. If you love character, let the garden have a vote.
One practical tip from experience: keep extra pennies and adhesive on hand after the project is finished. A coin may loosen during the first few weeks, especially if the ball experiences heavy rain or heat. Reattaching one penny is easy. Finding the exact motivation to go back to the store for one missing supply is harder.
The best part of making DIY penny balls is that they invite conversation. People ask how many pennies you used, how long it took, whether it was difficult, and whether copper really deters slugs. The honest answers are: a lot, longer than expected, not difficult but slightly sticky, and maybe do not fire your slug-control plan just yet. But as garden art, penny balls absolutely earn their keep.
In the end, a penny ball is more than a craft. It is a reminder that gardens do not need to be decorated only with expensive planters and perfect sculptures. Sometimes the most memorable pieces come from leftover change, a recycled ball, patient hands, and a willingness to let something ordinary become unexpectedly delightful.
Conclusion
DIY penny balls for your garden are affordable, creative, and full of personality. They transform spare change into outdoor art, add warm copper tones to planting beds, and give old bowling balls or unused spheres a second life. With the right base, outdoor adhesive, patient gluing, and thoughtful placement, you can create a garden ornament that looks charming in every season.
Whether you prefer a shiny copper globe, a rustic weathered orb, or a set of small penny accents tucked among plants, this project is flexible enough for any garden style. It is simple, but not boring. Budget-friendly, but not cheap-looking. And best of all, it proves that even the humble penny can still make a big impressionespecially when it stops hiding in a jar and starts showing off in the flower bed.