
Some Halloween decorations shout. Others cackle softly from the porch ceiling and make neighbors stop mid-sidewalk with that wonderful “Wait… how is that floating?” look. That is the magic of DIY floating witches: they are spooky, whimsical, surprisingly affordable, and dramatic enough to make your entryway look like it has been politely invaded by a small coven with excellent scheduling skills.
Whether you want floating witch hats glowing above your front porch, full-body witches hovering from tree branches, or a circle of mysterious figures drifting over the yard, this project is flexible enough for beginners and fun enough for serious Halloween decorators. You do not need professional props, expensive animatronics, or a fog machine powerful enough to concern the neighbors. With lightweight materials, clear fishing line, battery-operated lights, black fabric, and a little creative staging, you can build a Halloween display that feels magical without turning your weekend into a construction documentary.
This guide walks through the best materials, design ideas, step-by-step instructions, safety tips, styling tricks, and real-world lessons learned from making floating witches that actually look good after sunset. Grab your witch hats. The coven is about to take flight.
What Are DIY Floating Witches?
DIY floating witches are Halloween decorations designed to look as if witches, witch hats, cloaks, candles, or magical figures are suspended in midair. The floating illusion usually comes from clear fishing line, transparent hanging cord, removable ceiling hooks, porch hooks, tree branches, or other nearly invisible supports. The result is simple but effective: objects appear to hover, especially at night when battery lights or soft spotlights hide the hanging hardware.
The most popular version is the floating witch hat display. Several black witch hats are hung at different heights across a covered porch, often with LED tea lights or votive candles inside. At night, the hats glow like enchanted lamps. The second version is a floating full-body witch, made with black fabric, a hat, lightweight stuffing, and sometimes a broom or faux hands. A third option is a “witch circle,” where multiple floating forms are arranged in a ring under a tree, along a walkway, or around a yard feature.
What makes this project so appealing is its balance of impact and effort. From the street, floating witches look like a carefully designed Halloween scene. Up close, they are basically hats, string, fabric, and clever spacing. In other words, Halloween sorcery with a craft-store receipt.
Why Floating Witches Work So Well for Halloween Decor
Floating witches create movement, mystery, and vertical interest. Many Halloween displays stay close to the ground: pumpkins on steps, skeletons on chairs, tombstones in the lawn. Those are great, but adding decorations overhead instantly makes a porch or yard feel more immersive. Guests do not just look at the display; they walk through it.
The floating effect also works beautifully with low lighting. Clear line almost disappears after dusk, while black hats and cloaks blend into shadows. When you add warm LED lights, the decorations feel less like craft supplies and more like a scene from a friendly haunted village. The look can lean cute, spooky, elegant, rustic, or full-on “the neighborhood kids will absolutely remember this house.”
Another advantage is budget. Most supplies are reusable. Witch hats, fishing line, removable hooks, battery lights, faux candles, black tulle, cheesecloth, and lightweight fabric can be packed away and brought out next Halloween. If one hat gets bent or one line tangles into a tiny transparent spaghetti monster, replacement costs are usually low.
Materials You Need for DIY Floating Witches
The exact supply list depends on the style you choose, but the basics are simple. For floating witch hats, gather black witch hats, clear fishing line or transparent nylon cord, removable outdoor hooks or small ceiling hooks, battery-operated LED tea lights, scissors, a needle, washers or beads, and optional ribbon or black tulle.
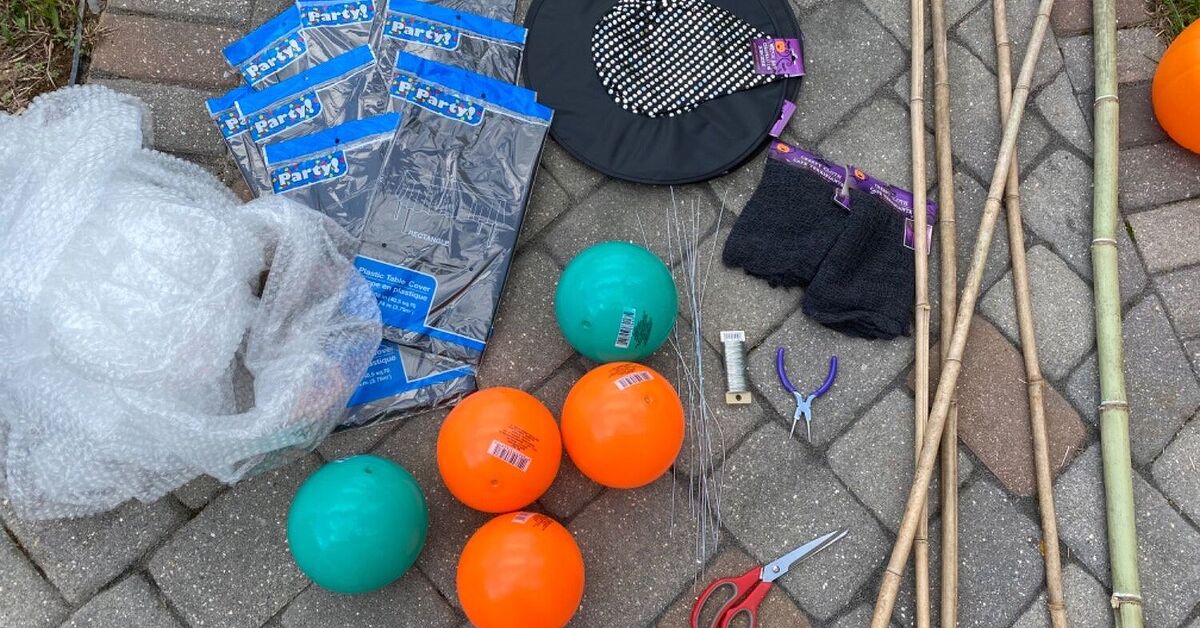
For full floating witches, you may also want black fabric, lightweight cloaks, foam balls, pool noodles, wire, zip ties, faux hair, broom props, plastic tablecloths, and weather-resistant clips. For outdoor displays, choose materials that can handle a little wind and moisture. Covered porches are ideal because they protect paper, fabric, and battery lights from direct rain.
Recommended Supply List
- 6 to 10 lightweight witch hats
- Clear fishing line or transparent hanging cord
- Battery-operated LED tea lights or votive candles
- Outdoor-rated removable hooks or screw-in hooks
- Small washers, beads, or buttons to stop the line from slipping
- Black tulle, gauze, or lightweight fabric for extra movement
- Scissors, large sewing needle, and measuring tape
- Optional: remote-control tea lights for easier nightly use
One important note: use battery-operated candles, not real flames. Floating fabric and open flame are not spooky in the fun way. LED lights give the glow without the drama of calling someone’s uncle who owns a fire extinguisher.
Choosing the Best Location
The best place for DIY floating witches is a covered front porch, pergola, entryway, hallway, tree canopy, or covered patio. You need overhead anchor points and enough space for the decorations to hang without bumping into people’s faces. A witch hat hovering dramatically is charming. A witch hat smacking a guest in the forehead is more slapstick than spooky.
For porches, place hats at staggered heights along the walkway or above the steps. For trees, choose sturdy branches and use longer line to create an airy, drifting effect. For indoor displays, hang hats in a hallway, over a dining table, or above a party snack station. Floating witches also look fantastic above a candy table, especially when paired with black candles, potion bottles, pumpkins, and a cauldron bowl full of treats.
Spacing Tips
Do not hang every witch at the same height. The display looks more magical when the hats or figures appear to be drifting naturally. Try alternating short, medium, and long line lengths. Leave enough distance between each decoration so they can sway slightly without tangling. Odd numbers often look better than even numbers, so groups of 5, 7, or 9 hats tend to feel more natural.
How to Make Floating Witch Hats
This is the easiest and most popular version of DIY floating witches. It is beginner-friendly, fast, and highly photogenic. You can finish a small porch display in an afternoon, and the effect at night is worth every minute.
Step 1: Measure Your Hanging Line
Cut a length of fishing line for each hat. A good starting point is 3 to 5 feet per hat, depending on your ceiling height. It is better to cut the line too long than too short because you can always adjust it later. Tie a loop at the top end for hanging.
Step 2: Thread the Line Through the Hat
Use a large needle or carefully make a tiny opening at the top point of the witch hat. Thread the fishing line through the top so it runs down into the inside of the hat. The line should be centered enough to keep the hat hanging straight. If the hat tilts slightly, do not panic. A little tilt can make it look more natural, like the witch parked it mid-flight and went inside for snacks.
Step 3: Add a Stopper
To keep the candle from pulling up into the very tip of the hat, tie the line around a small washer, bead, or button inside the hat. This creates a stopper. The light should hang lower inside the hat so the glow spreads through the opening instead of hiding at the top.
Step 4: Attach the LED Light
Tie the lower end of the fishing line around the “flame” or handle area of a battery-operated tea light or votive. Make sure the knot is secure. If your lights have a small hanging loop, use that instead. Remote-control lights are especially convenient because you can turn the entire display on without poking each hat like a Halloween elevator button.
Step 5: Hang the Hats
Attach outdoor-rated removable hooks or small ceiling hooks to your porch ceiling. Hang each hat from its loop and adjust the height. Step back often. The best displays are balanced but not perfectly symmetrical. Think “enchanted flight pattern,” not “military hat inspection.”
Step 6: Test the Display at Night
Turn on the lights and check the effect after dark. This is when the magic happens. If the hats look too dim, try brighter LED votives. If the line is visible, adjust nearby lighting or move the hats slightly deeper into shadow. If one hat spins wildly in the wind, shorten the line or add a tiny weight inside.
How to Make Full-Body Floating Witches
If you want a more dramatic look, create floating witch figures instead of just hats. These work especially well in trees, covered patios, or large porch corners. The key is to keep the structure lightweight and the silhouette clear.
Step 1: Build a Lightweight Head and Shoulder Shape
Use a foam ball for the head and a small piece of pool noodle, wire, or crumpled plastic bags for the shoulders. The structure does not need detailed features because it will be covered with fabric. The goal is simply to give the cloak enough shape so it does not collapse into a sad black pillowcase.
Step 2: Add the Hat
Place a witch hat over the foam head. Secure it with hot glue, tape, or a few stitches. If the figure will hang outdoors, reinforce the hat with a zip tie or a small hidden clip so it does not fly away during the first enthusiastic October breeze.
Step 3: Create the Cloak
Drape black fabric, tulle, gauze, or a plastic tablecloth over the shoulders. Cut ragged edges into the bottom for a floating, wind-torn look. Layering two materials works well: a solid black inner layer creates darkness, while sheer tulle on top adds movement.
Step 4: Attach the Hanging Line
Run fishing line through the top of the hat and anchor it into the foam head or shoulder structure. Use a second hidden line at the back if the figure turns too much. Two-point hanging gives you more control over the direction the witch faces.
Step 5: Add Optional Details
A small broom, faux hands, striped socks, black ribbon, or a glowing pendant can add personality. Keep details lightweight. Heavy accessories make hanging harder and increase the chance that your witch will slowly droop like she has had a very long broom commute.
Creative DIY Floating Witch Ideas
Once you know the basic technique, you can customize the project in dozens of ways. Start simple, then add layers until your porch has just the right amount of Halloween mischief.
Glowing Witch Hat Pathway
Hang witch hats along a porch walkway or entry path, each with an LED tea light inside. Stagger the heights so guests feel like they are walking through a floating spell. Pair the hats with pumpkins on the steps and a simple black wreath on the door.
Floating Witch Circle
Create several full-body floating witches and hang them in a loose circle under a large tree. Add a cauldron prop or pumpkin pile in the center. This setup is excellent for front yards because the scene reads clearly from the street.
Floating Hats With Candles
For a magical indoor party look, hang witch hats and separate floating LED candles together. Use clear line for both. The combination feels enchanted, cozy, and just theatrical enough to make your snack table look like it has a backstory.
Minimalist Black-and-White Porch
Use black hats, white pumpkins, black lanterns, and warm white lights. This version feels stylish but still playful. It is a great option if you want Halloween decor that looks polished without becoming so serious that it forgets it is supposed to be fun.
Colorful Whimsical Witches
Not every witch needs to be black and spooky. Try purple, green, orange, or even pink hats for a cheerful Halloween display. Add ribbons around the hat bands and use colored LED lights for a party-friendly mood.
Safety Tips for Outdoor Floating Witches
Halloween decorations should be fun, not hazardous. Keep walkways clear so guests and trick-or-treaters do not have to dodge hanging lines, loose cords, or low decorations. Hang hats high enough that adults can walk underneath comfortably. If children will be visiting, avoid placing small loose parts where they can be grabbed.
Use outdoor-rated hooks and materials when decorating outside. If you include electrical lighting, choose outdoor-rated cords and lights, and keep plugs away from wet areas. For most floating witch projects, battery-operated LED candles are the easiest and safest option. They avoid cord clutter, reduce setup time, and make the decorations easier to place anywhere.
Be careful when using ladders. Set the ladder on stable ground, avoid overreaching, and have someone nearby if you are working overhead. A floating witch display is impressive, but not impressive enough to justify balancing on one foot while arguing with gravity.
How to Make Floating Witches Look Expensive
The secret to a high-end Halloween look is restraint, repetition, and lighting. Instead of using one random hat, use several similar hats. Instead of mixing every color in the Halloween aisle, choose a palette: black and warm white, black and purple, black and orange, or black and silver. Repetition makes inexpensive materials look intentional.
Lighting matters more than almost anything else. Soft warm lights inside hats create a cozy glow. A small spotlight aimed at a floating witch circle can create dramatic shadows. Avoid harsh overhead lighting that reveals every hook and line. The goal is to let the illusion breathe.
Texture also helps. Add gauze, tulle, velvet ribbon, burlap, dried branches, faux cobwebs, or matte pumpkins. These materials photograph well and make the display feel layered. Just do not overdo the cobwebs unless you enjoy removing fake spider strands from your sleeves until Thanksgiving.
Common Mistakes to Avoid
The first mistake is hanging everything too low. Low decorations can block the walkway and break the illusion. Keep hats and figures overhead, then use ground decor like pumpkins or lanterns to fill the lower space.
The second mistake is using line that is too thick or too shiny. Clear fishing line works because it nearly disappears, especially at night. Thick cord may be easier to handle, but it can ruin the floating effect.
The third mistake is ignoring wind. Lightweight hats can spin, flip, or drift into each other. If your porch is breezy, use shorter line, add small interior weights, or secure each hat with a second stabilizing line. For full-body witches, test the display before Halloween night so you can fix any awkward spinning.
The fourth mistake is relying only on daylight styling. Floating witches are usually best after dark, so test them at night. Adjust the glow, shadows, and spacing when the display is actually doing its Halloween job.
DIY Floating Witches for Small Spaces
You do not need a huge porch to enjoy this project. Apartment balconies, small entryways, stair landings, and indoor hallways can all work. Use three floating hats instead of nine. Hang mini witch hats above a console table. Create one dramatic floating witch in a corner with black fabric and a glowing lantern below.
For renters, removable hooks are your best friend. Look for options rated for the weight of your decorations and suitable for the surface you are using. Always test in a hidden spot first, especially on painted ceilings or delicate trim.
If you have no ceiling or overhead structure, use a freestanding shepherd’s hook, garden arch, curtain rod, or tension rod indoors. The illusion still works as long as the support is not the star of the show.
Budget-Friendly Tips
DIY floating witches can be very affordable if you shop smart. Reuse hats from old costumes, check discount stores for seasonal supplies, and save battery lights from other holidays. Black plastic tablecloths can become cloaks. Old sheer curtains can become ghostly fabric layers. Cardboard can become broom shapes or decorative signs.
Before buying new materials, look around your home. Buttons, washers, beads, ribbon scraps, twist ties, and leftover craft wire are useful for securing line and shaping fabric. The best Halloween DIY projects often start with the sentence, “I’m not sure why I saved this, but today it becomes a witch.”
How to Store Floating Witches for Next Year
Good storage keeps your decorations from turning into a tangled mystery box. Remove batteries from LED lights before packing them away. Coil fishing line around small cardboard pieces or label each line by length. Stack witch hats carefully so the brims do not crush. Store fabric cloaks flat or loosely folded.
If you made full-body witches, detach delicate accessories and pack them separately. Use labeled bags for hooks, beads, washers, and lights. Next year, you will thank yourself when setup takes minutes instead of an entire evening of muttering at invisible line.
Real Experience: What I Learned Making DIY Floating Witches
The first time I made DIY floating witches, I underestimated two things: wind and confidence. The project looked incredibly simple online. Hat, line, light, hook. Done. In reality, the first hat spun like it had just received dramatic news, the second one tilted so far sideways it looked seasick, and the third somehow tangled with a porch plant that had no business getting involved.
The biggest lesson was to test everything before committing to the final layout. I originally hung all the witch hats at the same height because it seemed neat. It was neat, yes, but it also looked like a row of hats waiting at a very strange bus stop. Once I varied the heights, the whole display changed. Suddenly the hats looked like they were floating through the porch, not reporting for duty.
The second lesson was that lighting makes or breaks the project. During the day, the hats looked cute but not magical. At night, with warm LED lights glowing inside, they became the main attraction. I tried cool white lights first, but they looked a little too sharp and modern. Warm lights gave the display a softer, candlelit look that felt more Halloween and less emergency hallway.
I also learned that remote-control tea lights are worth it. Turning on each individual light is fine the first night. By the fourth night, it feels like you are personally clocking in every tiny witch employee. A remote makes the display easier to use, which means you are more likely to enjoy it throughout the season instead of leaving it dark because you are tired.
For the full-body witch version, lightweight fabric was the hero. Heavy fabric looked better in my hands but worse in the air. It pulled the figure down and made the shape look bulky. Thin black fabric with a layer of tulle moved better and created a more ghostly silhouette. Cutting uneven strips at the bottom helped a lot. Straight edges looked too clean, while ragged edges made the witch feel like she had actually been flying around after midnight.
Spacing was another surprise. I thought more decorations would automatically look better, but overcrowding made the scene messy. The best arrangement left breathing room between the hats and figures. Negative space helped the floating illusion. It gave each witch a moment to be noticed, which sounds very generous considering they are imaginary porch guests.
One practical trick that saved the setup was labeling the lines by length before storing them. The first year, I tossed everything into one bin and created a clear fishing-line nest that could have qualified as a Halloween decoration by itself. The next year, I wrapped each line around a small piece of cardboard and wrote “short,” “medium,” or “long.” Setup became much faster.
Another experience-based tip: take photos from the street, not just from the porch. A display can look balanced up close but uneven from where most people will see it. I adjusted several hats after checking photos from the sidewalk. This helped me place the brightest hats near the entry and the darker ones toward the edges.
Finally, I learned not to chase perfection. Halloween decor is supposed to be fun. A slightly crooked hat can look charming. A gently spinning witch can feel alive. A display that makes people smile is better than one that looks technically perfect but has no personality. DIY floating witches work because they are playful, mysterious, and a little ridiculous in the best possible way. They turn an ordinary porch into a tiny haunted stage, and for a few weeks in October, that is exactly the kind of magic a home deserves.
Conclusion
DIY floating witches are one of the most rewarding Halloween projects because they deliver big atmosphere without demanding expert skills or a giant budget. With simple materials like witch hats, clear fishing line, LED tea lights, hooks, and black fabric, you can create a display that feels magical from the sidewalk and delightful up close.
Start with floating witch hats if you want an easy win. Add glowing candles, stagger the heights, and test the look at night. If you want more drama, build full-body floating witches with lightweight cloaks and spooky silhouettes. Keep safety in mind, use battery-operated lights, secure everything well, and give your decorations enough space to move naturally.
The best part is that this project is endlessly customizable. Cute, creepy, elegant, colorful, rustic, or theatricalyour floating witches can match your home’s personality. And if one hat spins a little too much? Congratulations. Your witch has flair.