
A standing back flip from the groundoften called a standing back tuckis one of those skills that looks like pure superhero business. One second you are standing still, the next you are rotating backward through the air, and then, with enough practice, you land on your feet like gravity just sent you a polite apology.
But let’s be clear before anyone starts launching themselves in the living room: a standing back flip is an advanced tumbling skill. It should be learned with a qualified gymnastics, cheer, martial arts tricking, or tumbling coach, on proper mats, with spotting equipment when needed. Back flips involve the head, neck, spine, knees, ankles, and confidenceall things you probably want to keep in working condition.
This guide explains how to do a standing back flip from the ground in 14 progressive steps. It is written for educational purposes and for athletes who already have basic body control, jumping strength, safe landing habits, and access to supervised training. Think of this as your roadmap, not your permission slip to try a back tuck on concrete. Concrete is not impressed by ambition.
What Is a Standing Back Flip?
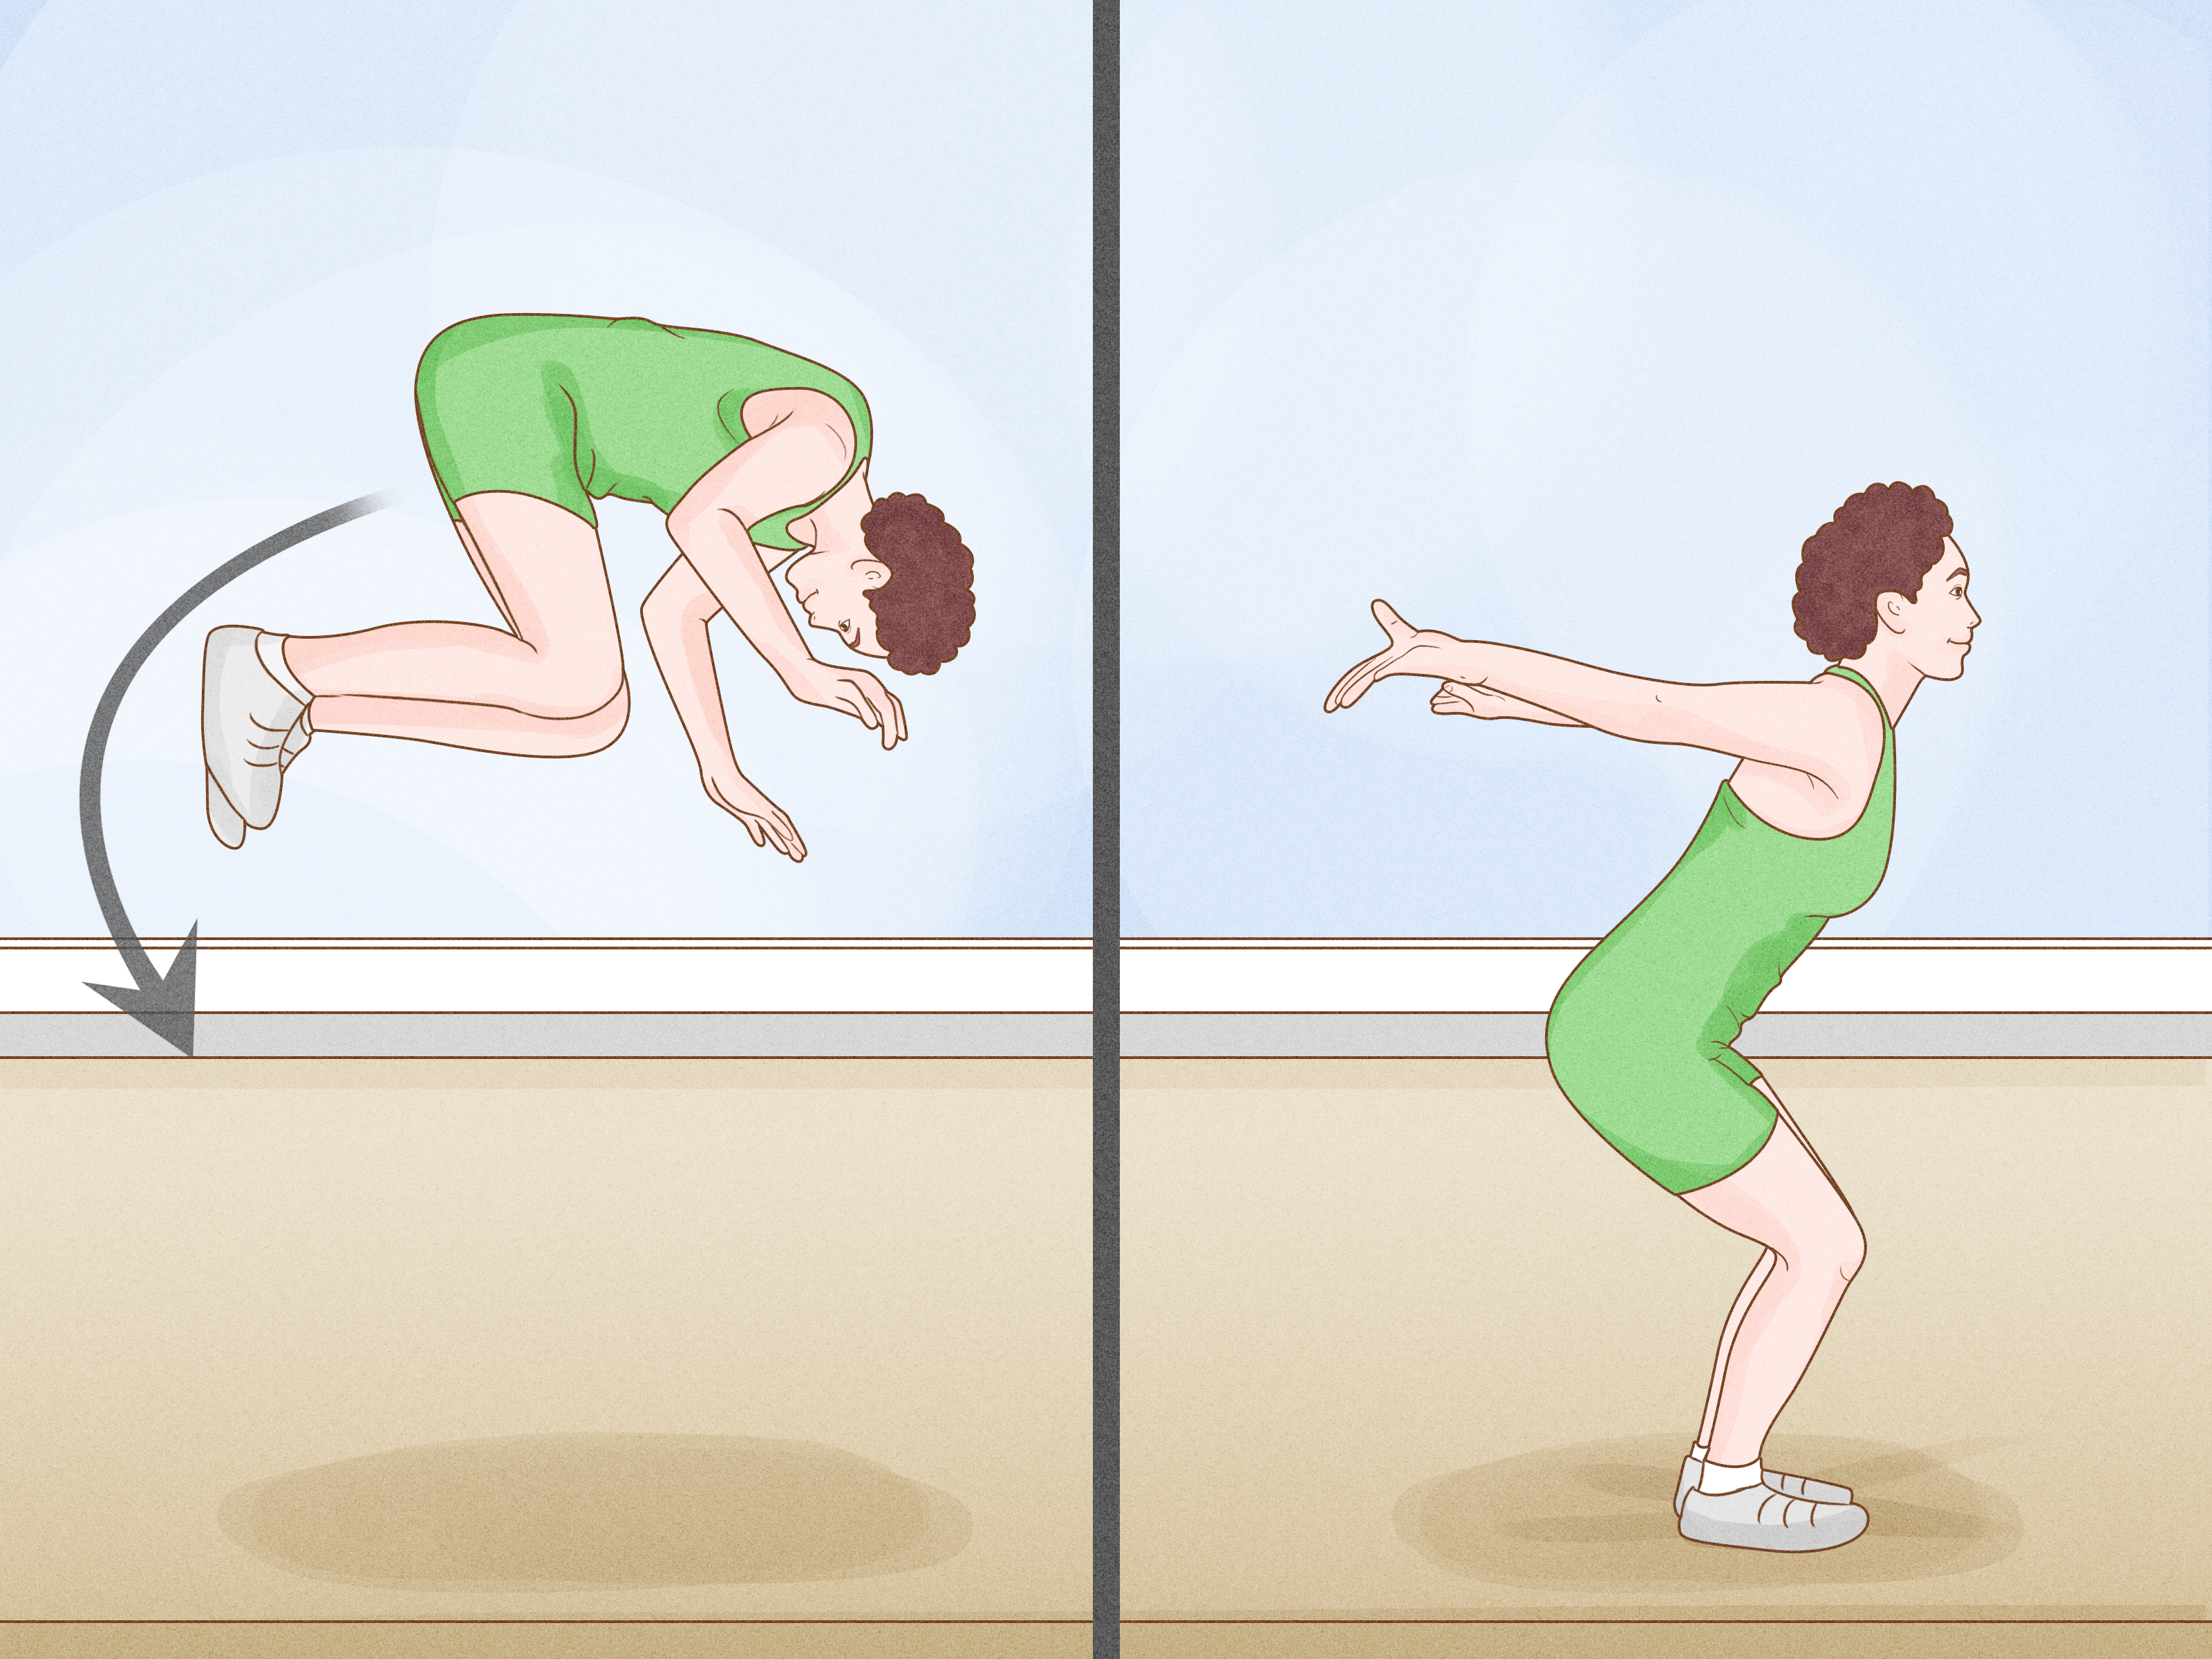
A standing back flip is a backward rotation performed from a stationary standing position. Unlike a roundoff back tuck or back handspring back tuck, it does not use running momentum. You generate power by jumping upward, setting your arms, tucking your knees, rotating, opening your body, and landing with control.
The main keyword here is “standing back flip from the ground,” but the same skill may also be called a standing back tuck, standing backflip, back tuck, or no-handed back flip. No matter what you call it, the technique depends on three major pieces: a strong vertical jump, a tight tuck, and safe landing mechanics.
Before You Start: Safety Comes First
Learning how to do a standing back flip safely begins before the first attempt. You need the right training environment, the right body preparation, and the right coach. A padded gymnastics floor, crash mat, resi mat, foam pit, or trampoline-to-mat progression is far safer than grass, carpet, sand, or your friend’s backyard after someone says, “I bet you can’t.”
Never attempt your first standing back flip alone. Use a trained spotter, not a random friend who once watched three parkour videos and now feels spiritually certified. A qualified coach can correct your set, tuck, head position, timing, landing, and fear response before bad habits become dangerous habits.
Prerequisites You Should Have
Before training a standing back tuck, you should be comfortable with basic tumbling and athletic movement. Helpful prerequisites include a strong vertical jump, controlled squat jumps, backward rolls, hollow body holds, tuck jumps, safe landing drills, and ideally experience with back handsprings, roundoff rebound drills, or back tuck progressions in a gym.
You should also have enough core strength to pull your knees toward your chest quickly, enough leg strength to jump powerfully, and enough air awareness to know where the ground is. The ground, as you may have noticed, has a habit of showing up whether you are ready or not.
How to Do a Standing Back Flip from the Ground: 14 Steps
Step 1: Train in a Safe Gym Environment
Start in a gymnastics or tumbling facility with thick mats, a foam pit, crash pads, or a harness system. A safe setup reduces impact and gives you room to learn without turning every mistake into a medical plot twist. Check that mats are secure, flat, and free of gaps. Remove jewelry, tie back long hair, and wear fitted athletic clothing that allows full movement.
Step 2: Work with a Qualified Coach or Spotter
A standing back flip is not the best project for trial and error. A coach can spot your rotation, help you overcome the fear of going backward, and stop you from common mistakes such as throwing your head back, jumping backward instead of upward, or opening too early. Good spotting is not just catchingit is teaching timing, body position, and confidence.
Step 3: Warm Up Your Whole Body
Begin with 10 to 15 minutes of light cardio and dynamic movement. Jog, jump rope, do high knees, arm circles, leg swings, lunges, inchworms, and gentle mobility drills. Your ankles, knees, hips, shoulders, back, and neck all participate in a back tuck. A cold back flip attempt is like asking your body to run a software update while falling through the air.
Step 4: Practice Safe Landings First
Before you flip, learn how to land. Practice jump-and-stick drills: jump straight up, land with feet about hip-width apart, bend your knees, keep your chest lifted, and hold the landing for three seconds. Your knees should track in the same direction as your toes. Avoid collapsing inward, landing stiff-legged, or dropping your chest toward the floor.
A good back flip landing absorbs force through the ankles, knees, hips, and core. Think “quiet feet, soft knees, proud chest.” If every landing sounds like a refrigerator falling down stairs, keep practicing.
Step 5: Build a Powerful Vertical Jump
The standing back flip is powered by a vertical jump, not by leaning backward. Practice squat jumps, tuck jumps, box jumps, and rebound jumps. Your goal is to jump up first, then rotate. Many beginners try to throw themselves backward, which reduces height and increases risk. Height gives you time. Time gives you rotation. Rotation gives you a landing that does not involve dramatic sound effects.
Step 6: Learn the Arm Swing and Set
The “set” is the upward lift that starts the skill. Stand tall with your arms by your ears, then swing them down and back as you bend your knees. Drive your arms upward as you jump. Your chest should rise, your eyes should look forward or slightly upward, and your body should lift tall before the tuck.
A strong set is one of the biggest differences between a clean standing back tuck and a panicked backward roll in the air. Do not whip your head back. Your head follows your body; it does not lead the mission like an overexcited tour guide.
Step 7: Master the Tuck Position
Practice tuck jumps on the ground. Jump straight up, pull your knees toward your chest, bring your hands toward your shins or behind your thighs, then land softly. Keep your core tight and avoid reaching down too early. The tuck should be quick, compact, and controlled.
In a back flip, the tighter the tuck, the faster you rotate. However, do not tuck before you leave the ground. Jump first, then tuck. If you tuck too early, you cut off your height and rotate low, which is exactly as unpleasant as it sounds.
Step 8: Use Backward Roll and Candlestick Drills
Backward rolls, candlestick rolls, and hollow-to-tuck drills teach body awareness. Lie on your back, lift your legs overhead into a candlestick shape, then pull into a tight tuck. These drills help you understand how your hips, knees, and core work together during backward rotation.
They also teach you not to panic when your body goes upside down. Air awareness is not magic; it is repetition, coaching, and learning how your body feels in different positions.
Step 9: Progress to Mat Stack or Foam Pit Drills
With a coach, practice jumping backward onto a soft elevated mat, landing on your back in a safe hollow position. This teaches the upward set and backward rotation without requiring a full landing. You may also use a foam pit, resi pit, wedge mat, or harness, depending on the facility.
The point is progression. You do not jump from “I watched a tutorial” straight to “I am now airborne.” You build the skill in layers until the final version feels like the next logical step, not a wild personal decision.
Step 10: Try Spotted Back Tucks
When your coach decides you are ready, begin spotted back tucks. The coach may stand to the side and support your back, hips, or thighs through the rotation. Your job is to keep the same technique: swing, dip, jump up, set tall, tuck tight, open, and land.
Do not rely on the spotter to flip you. The spotter is there for safety and correction, not as a human elevator. Each rep should help you feel more of the skill yourself while still staying protected.
Step 11: Keep Your Chest Up and Eyes Controlled
A common beginner mistake is throwing the head backward. This can flatten the jump, open the chest too soon, and pull the body out of alignment. Instead, keep your chest lifting and your eyes controlled as you set. Your head should stay neutral through the takeoff.
Imagine jumping to touch something above your head before rotating. This cue helps many athletes stop traveling backward and start jumping upward. A standing back flip should not cover a huge distance. It should rise, rotate, and land close to where it started.
Step 12: Open at the Right Time
After the tuck, you need to open your body to prepare for landing. Open too early and you may under-rotate. Open too late and you may land too low or sit down. Your coach will help you learn the timing by teaching you when to spot the floor and extend your legs.
In general, you tuck tightly through the rotation, then open when your feet are coming back under you. Think of it like closing a book to spin and opening it to land. Preferably not a book titled “Emergency Room Adventures.”
Step 13: Land Softly and Control the Finish
As your feet touch down, bend your knees and hips to absorb the landing. Keep your core engaged and your chest up. Your arms can reach forward or upward to help balance. Try to land with both feet together or nearly together, then stand tall to finish.
A safe landing is not just “not falling.” It is control. If you consistently land low, step backward, collapse, or twist, return to drills and spotted reps. Tumbling progress is not a straight line; sometimes the safest shortcut is going back one step.
Step 14: Practice Consistently, Not Recklessly
Once you can land a standing back flip with a coach, keep training smart. Do a limited number of quality reps, rest between attempts, and stop when fatigue affects technique. Tired legs and tired focus can turn a clean back tuck into a surprise geography lesson with the floor.
Consistency matters more than bravery. The goal is not to prove you can do one back flip once. The goal is to develop a reliable, repeatable skill that you can perform safely under appropriate conditions.
Common Mistakes When Learning a Standing Back Flip
Throwing the Head Back
This is one of the most common problems. Throwing your head back may feel like it helps rotation, but it often ruins the set. Keep your head neutral and let your jump and tuck create the flip.
Jumping Backward Instead of Upward
A standing back tuck needs height. If you jump backward, you lose lift and increase the chance of under-rotating. Focus on driving upward through your legs and arms.
Tucking Too Early
If you pull your knees up before your feet leave the ground, you reduce your jump power. Set first, then tuck. The order matters.
Opening Too Soon
Opening early slows rotation. Wait until your coach teaches you the correct timing and you can feel the floor coming back into view.
Training Without Enough Rest
Back flips are intense. Fatigue affects jump height, timing, and confidence. Quality beats quantity every time.
Conditioning Exercises That Help Your Back Flip
A better standing back flip starts with a stronger body. Add conditioning exercises such as jump squats, calf raises, planks, hollow body holds, hanging knee raises, glute bridges, lunges, and controlled box jumps. These build the legs, core, and coordination needed for a powerful set and tight tuck.
Flexibility also matters, but do not confuse flexibility with floppiness. You need mobile ankles, hips, shoulders, and spine, plus enough strength to control those ranges. Dynamic stretching before training and gentle static stretching after training can help support movement quality.
How Long Does It Take to Learn a Standing Back Flip?
The timeline varies widely. Some trained athletes learn the movement quickly because they already have tumbling experience, explosive jump power, and air awareness. Beginners may need months of progressions before attempting a full standing back tuck. There is no prize for rushing. In fact, rushing is usually how the floor wins.
Your progress depends on your strength, coordination, flexibility, fear level, coaching quality, training frequency, and consistency. A realistic goal is to master each progression before moving on. If your coach says you are not ready yet, that is not an insultit is injury prevention wearing a whistle.
Where Should You Practice?
The best place to practice is a gymnastics, cheer, parkour, martial arts tricking, or tumbling gym with trained instructors and proper equipment. Avoid practicing on concrete, tile, hardwood floors, wet grass, uneven ground, beds, couches, or backyard trampolines without professional instruction. A soft-looking surface is not automatically a safe surface.
If you are under 18, involve a parent or guardian and train only in a supervised environment. If you have a history of neck, back, knee, ankle, balance, or concussion issues, speak with a medical professional before attempting high-impact tumbling.
Experience-Based Tips: What Learning a Standing Back Flip Really Feels Like
Learning how to do a standing back flip from the ground is not only a physical process; it is a mental negotiation with your survival instincts. Your brain may be perfectly happy with cartwheels and handstands, then suddenly file a formal complaint when you ask it to jump backward into space. That fear is normal. Respect it, train through it gradually, and never treat fear as something to bully out of yourself.
One helpful experience many athletes describe is the “click” moment. At first, every part of the back tuck feels separate: arms, knees, jump, tuck, open, land. It can feel like trying to solve a math problem while riding a roller coaster backward. But after enough drills, the pieces start to connect. The arm swing creates lift. The set gives time. The tuck speeds rotation. The landing becomes less of a surprise party.
Another real-world lesson is that confidence usually comes from evidence, not hype. Telling yourself “I got this” is nice, but landing 20 safe tuck jumps, 20 strong rebound drills, 10 controlled spotted reps, and several clean mat-stack progressions gives your brain actual proof. Confidence built on preparation lasts longer than confidence built on someone yelling, “Send it!”
It also helps to record your training with a coach’s permission. Video can show mistakes you may not feel in the moment. You might think you are jumping straight up, but the video reveals you are traveling backward like a shopping cart with one bad wheel. You might think your tuck is tight, but your knees are casually wandering around like they missed the meeting. Used wisely, video feedback is one of the fastest ways to improve.
Many beginners also underestimate the importance of the arms. The arms are not decoration. They help generate lift, timing, and direction. A lazy arm swing often creates a lazy set. A powerful, coordinated arm drive can make the skill feel lighter and cleaner. Practice the arm swing without flipping until it becomes automatic.
Fear management deserves its own spotlight. If you hesitate during takeoff, you may lose power or change direction mid-skill. That is why progressions are so important. A coach may have you repeat drills that feel “too easy” because they are building trust in your movement pattern. When the full flip finally happens, your body should recognize the pathway.
Finally, remember that learning a standing back flip is not a personality test. Taking longer does not mean you are weak. Needing a spot does not mean you are failing. Returning to drills does not mean you are going backward. Safe athletes build skills layer by layer, and the best tumblers are often the ones who respect basics the most.
The coolest back flip is not the one you attempt before you are ready. It is the one you can land cleanly, safely, and repeatedly because you trained with patience. Bonus points if you do it without making your coach age five years in three seconds.
Conclusion
A standing back flip from the ground is an exciting skill, but it is not a casual party trick. To learn it safely, train with a qualified coach, use proper mats, master landing mechanics, build a strong vertical jump, practice progressions, and never skip the basics. The 14 steps in this guide are designed to help you understand the process, avoid common mistakes, and develop a safer path toward a clean standing back tuck.
Respect the skill, respect your body, and respect the floor. The floor is always there, always waiting, and frankly, a little too committed to its job.