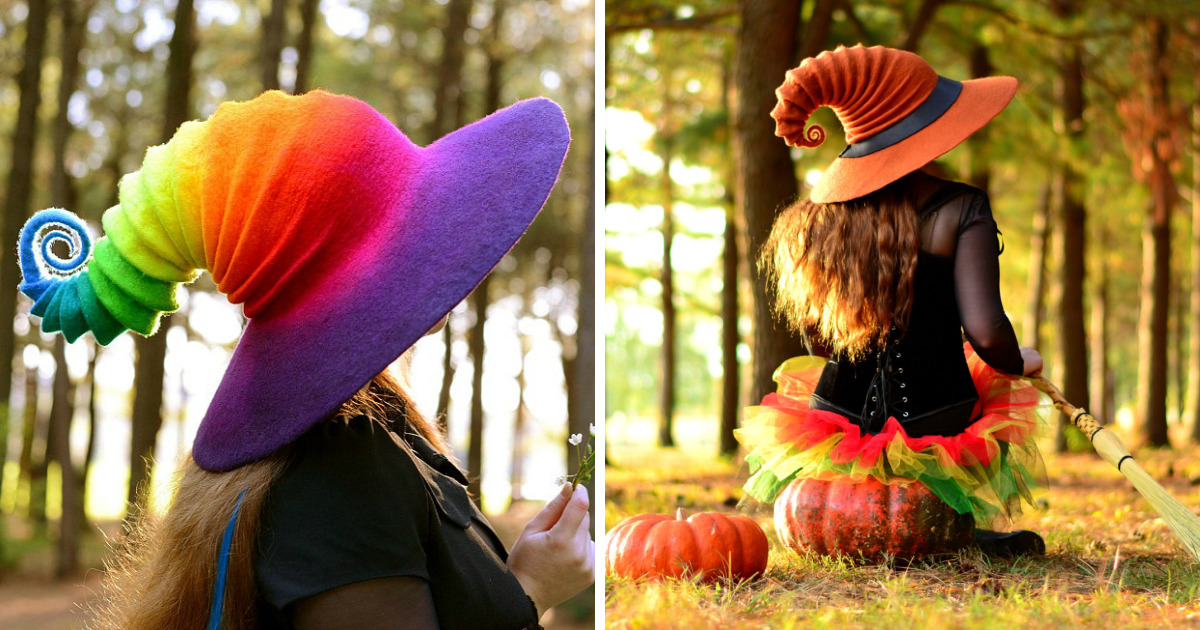

There are plenty of witch hats in the world, but a handmade felt witch hat has a special kind of mischief built in. It is soft yet sculptural, dramatic without needing a plastic buckle the size of a dinner plate, and full of tiny decisions that make each piece one of a kind. When I make felt witch hats from wool, I am not simply assembling a costume accessory. I am turning loose, cloudlike fibers into a wearable character with a crooked brim, a moody point, and enough personality to make a black cat look underdressed.
Wool is a remarkable material for hat making because it naturally wants to bond with itself. With moisture, gentle soap, friction, and changes in temperature, the tiny scales along wool fibers begin to lock together. The result is felt: a dense, seamless textile that can be shaped, stretched, pinched, rolled, and sculpted while it is still damp. Unlike woven fabric, handmade wool felt does not depend on a grid of threads, which gives me enormous freedom when creating whimsical witch hats.
Every hat begins as a pile of wool roving. Every finished hat ends as a little piece of wearable magic. The entertaining middle part involves water, patience, a surprising amount of arm work, and the occasional moment when the hat appears to be plotting against me.
Why Wool Is Perfect for Handmade Felt Witch Hats
A felt witch hat needs to do several jobs at once. It must look dramatic, hold its shape, feel comfortable, and survive a walk through a fall festival, a Halloween party, a costume parade, or a grocery-store trip where someone decides their Tuesday needs more witchcraft. Wool handles these demands beautifully.
When wool is wet felted, the fibers compress into a fabric with no seams and no cut edges that fray. That matters for a witch hat because the brim, crown, and pointed tip can flow together as one continuous form. I can create a sharp tip that bends to one side, a crown with a lopsided curve, or a brim that rises at the edges like it has overheard some excellent gossip.
Wool is also naturally springy. Even after it is compressed into felt, it retains a little flexibility. That gives the finished hat a more organic character than a stiff factory-made costume hat. A handmade wool witch hat can be shaped differently each time it is worn, much like a favorite leather boot or a dramatic eyebrow.
The Science Behind the Felt
Wool fibers are covered in tiny overlapping scales. When heat, moisture, friction, and pressure are introduced, those scales catch against neighboring fibers. As the fibers are rolled and rubbed, the wool gradually shrinks and becomes denser. This process is permanent, which is both wonderful and mildly terrifying. Once a hat is fully felted, there is no polite way to ask the wool to return to its original fluffy state.
That irreversible transformation is exactly what makes wet felting so satisfying. A loose layer of fiber becomes a strong, sculptural material without sewing a single seam. It feels a little like convincing a thundercloud to become a hat.
Choosing Wool for a Felt Witch Hat
Not all wool behaves the same way, and choosing the right fiber can make the difference between a soft, elegant witch hat and a lumpy object that looks as though it escaped from a haunted laundry basket.
Fine Wool for Smooth Surfaces
Fine Merino wool is popular for the visible outer layers of felt witch hats because it creates a smooth finish and blends beautifully with color. It is especially useful when I want a deep black hat with subtle charcoal shadows, a smoky gray crown, or an ombré tip that fades from midnight blue to violet.
Fine wool can produce a polished surface, but it may need more careful layering and patient felting. It is lovely for hats that are meant to look refined, mysterious, and slightly expensive in the way a witch’s private library probably feels.
Medium or Coarser Wool for Structure
For the interior layers, I often like a more substantial wool. Medium-grade wool can felt firmly and give the crown and brim more body. A structured witch hat needs enough density to stand up to shaping, especially if the point curves dramatically or the brim is wide.
I sometimes use a stronger core wool beneath finer decorative fibers. The core does the hardworking, unglamorous job of becoming the hat’s foundation, while the outer layers get to wear the fancy colors. It is the wool equivalent of stage crew and lead actor working together.
Natural Colors and Moody Dye Choices
Black is the classic choice for wool witch hats, but classic does not have to mean boring. Natural sheep colors can produce beautiful shades of cream, brown, gray, silver, and deep charcoal. These tones work wonderfully for woodland witches, cottage witches, forest spirits, and anyone who would rather look like they live near a mushroom circle than a suburban cul-de-sac.
For dyed wool, I love dark plum, moss green, rust, indigo, wine red, and stormy blue. Blending several shades instead of using a single flat color gives the felt dimension. A hat with a black base and a little purple tucked into the tip can look almost ordinary indoors, then reveal its secret personality in sunlight.
My Process for Making Felt Witch Hats From Wool
Every felt witch hat begins with planning. The process is creative, but it is not entirely chaos-driven. Wool shrinks significantly during felting, so I build larger than the final hat size. This is one of the first lessons every felt maker learns: wool has opinions about measurements, and it expresses them through shrinkage.
Step 1: Designing the Shape
I decide whether the hat will have a tall crooked crown, a short rounded crown, a wide theatrical brim, or a more practical everyday shape. A whimsical witch hat does not need to look perfectly symmetrical. In fact, a slight tilt often makes it better. A perfectly straight point can look formal; a bent point looks like it knows spells.
For a dramatic adult hat, I create a resist template larger than the finished head measurement. The resist acts as a temporary barrier inside the wool layers while I build the crown and brim. It helps create the hollow interior that eventually becomes the wearable part of the hat.
Step 2: Layering the Wool Roving
I pull the wool roving into thin, airy sections rather than cutting it. Then I lay the fibers in overlapping layers, alternating direction as I go. One layer may run horizontally, while the next runs vertically. This cross-layering helps the fibers lock together more evenly and creates a stronger felt.
The trick is not to make every section identical. Too much wool in one area can create a thick, stubborn lump. Too little can produce a thin spot that feels flimsy. I aim for a balanced layer that is generous enough to felt firmly but light enough to remain wearable.
Step 3: Wetting and Beginning the Felting
Once the wool is layered around the template, I add warm water and a small amount of soap. Then comes the first gentle phase of felting. I press and smooth the fibers carefully so they do not shift into an accidental modern-art disaster.
At this stage, the wool looks almost too delicate to become anything. It is fluffy, slippery, and slightly dramatic. But after repeated rubbing and rolling, the fibers begin to hold together. This is when the project stops looking like a wet wool sandwich and starts looking like a hat in progress.
Step 4: Shrinking, Rolling, and Shaping
As the wool begins to felt, I increase the pressure and rolling. The hat slowly shrinks around the resist, becoming denser and more durable. I check the shape frequently, adjusting the brim and crown before the fibers become too firm to negotiate.
Once the hat has enough structure, I remove the resist and continue shaping it by hand. I stretch the opening to fit the intended head size, smooth the crown, and begin encouraging the point to bend. The point is where a wool witch hat starts showing its personality. Some tips curl forward like a question mark. Others flop to one side as if they are exhausted from casting spells before breakfast.
Step 5: Blocking the Hat
Blocking is one of the most important stages in handmade hat making. While the felt is still damp, I place the hat over a hat block, form, bowl, or carefully chosen household object that matches the crown shape I want. Then I sculpt the brim and point by hand.
A wide brim may be flattened, curled upward, or given a wavy edge. A narrow brim can be shaped into a more fitted, storybook silhouette. I use my hands constantly during this stage because machine-made perfection is not the goal. The goal is a hat that looks like it belongs to someone with a key to a secret garden.
Details That Make Each Wool Witch Hat Unique
The basic form is only the beginning. The details are where a handmade felt witch hat becomes truly personal.
Needle-Felted Decorations
Needle felting lets me add designs after the main hat is formed. A barbed felting needle pushes small fibers into the surface, locking them in place. I can add tiny stars, crescent moons, mushrooms, ravens, leaves, spiderwebs, or small embroidered-looking accents without needing a printed fabric.
A black witch hat with a single needle-felted orange pumpkin can feel playful and cheerful. A charcoal gray hat with a flock of tiny black birds can feel darker and more mysterious. A deep green hat with brown leaves can look like it was borrowed from a forest witch who is very serious about compost.
Silk, Yarn, and Texture
Wool does not have to work alone. I sometimes add silk fibers, curly wool locks, handspun yarn, or small pieces of gauzy fabric to create texture. Silk can add a subtle shimmer, especially on a black or navy felt surface. Wool locks can make the brim look wild and weathered. A little yarn wrapped around the crown can become a hatband with far more charm than a plastic buckle ever managed.
The goal is balance. A witch hat should have enough detail to invite a closer look, but not so much that it resembles a craft store after a thunderstorm.
Hatbands and Embellishments
For a finishing touch, I may add a removable hatband made from velvet ribbon, leather cord, woven trim, or hand-felted wool. Removable bands are useful because they allow one hat to shift personalities. Add a purple ribbon for Halloween, a moss-green band for a forest costume, or a simple black cord for an everyday art hat.
Other embellishments can include vintage buttons, tiny bells, hand-stitched stars, fabric flowers, dried-looking leaves, or a small brooch. I prefer details that feel integrated with the hat instead of glued on as an afterthought. Handmade witch hats deserve accessories with a little more ambition than a sticker.
How to Wear a Handmade Felt Witch Hat
A felt witch hat can be a costume centerpiece, but it can also be worn as an art accessory. The secret is choosing a shape that suits the occasion.
For Halloween, a tall black witch hat with a broad brim works beautifully with a long dress, cape, boots, and a dramatic coat. For a fall festival, a softer gray or brown wool hat with leaf details feels more relaxed. For a fantasy event or Renaissance fair, a crooked point with textured yarn and silk accents can create a character without requiring a full theatrical wardrobe.
Smaller witch hats also work as photo props, party decorations, pet accessories, table centerpieces, or whimsical wall art. A miniature wool witch hat can sit on a pumpkin, top a handmade doll, or make a bookshelf look considerably more enchanted.
Caring for Wool Witch Hats
Handmade felt hats are durable, but they appreciate gentle treatment. I recommend storing a wool witch hat where it will not be crushed beneath a pile of coats, holiday decorations, or that mysterious box everyone owns but nobody remembers packing.
If the hat gets dusty, a soft brush or a quick shake is usually enough. For a small spot, dab carefully with cool water and a mild wool-safe soap, then blot gently. Avoid tossing a felt witch hat into a washing machine unless your goal is to create a tiny hat for a very confused squirrel.
If the brim loses its shape, lightly mist the area with water and reshape it by hand. Let the hat dry on a form or upside down on a clean surface so the crown does not collapse. Wool is forgiving, but it appreciates being asked nicely.
Why Handmade Felt Witch Hats Feel So Special
A handmade wool witch hat is never exactly the same twice. The fiber shifts slightly. The brim curves differently. The point decides whether it wants to stand tall, curl dramatically, or lean suspiciously to the left. Those little variations are not flaws. They are proof that a person made it with hands, patience, and a respectable amount of stubbornness.
That is what I love most about making felt witch hats from wool. The process begins with a natural material that has been used in textiles for centuries, yet every finished piece can feel fresh and personal. Wool allows me to make something functional, playful, sculptural, and a little magical all at once.
Whether the hat is meant for Halloween, cosplay, a fantasy photo shoot, a harvest market, or simply a person who believes regular hats need more drama, wool felt gives it a soul that mass-produced costume pieces rarely have.
My Experiences Making Felt Witch Hats From Wool
The first felt witch hat I made was supposed to be simple. That was my first mistake. I had imagined a neat black crown, a modest brim, and one tiny purple accent near the tip. In my head, it would be elegant and restrained. In reality, the point curled sideways, the brim developed a theatrical wave, and the purple wool spread farther than planned. The finished hat looked less like a traditional witch hat and more like it had just returned from an excellent concert in the woods.
I almost tried to “fix” it into something more symmetrical. Then I put it on a hat form, stepped back, and realized it had more personality than my original design. That hat taught me an important lesson about wet felting: wool does not always follow instructions, but it often improves the story.
Since then, I have learned to work with the material instead of trying to force it into a perfectly controlled shape. When a brim naturally rises at one edge, I ask whether it could become part of the design. When a crown leans slightly, I consider whether it looks intentional. When a point bends too much, I usually give it a name and let it keep going.
One of my favorite projects involved a dark forest-green witch hat made for an autumn market. I blended several shades of green wool, including moss, olive, charcoal, and a tiny amount of brown. At first, the mixture looked muddy and unpromising. But once it felted, the colors merged into something that looked almost alive. In sunlight, the hat had warm undertones. Indoors, it became deep and shadowy. I added a narrow brown wool band and a few needle-felted leaves near the brim. It looked like the kind of hat a person might wear while gathering herbs, writing mysterious letters, and refusing to explain where they got their mushrooms.
I have also discovered that people react to handmade witch hats differently than they react to ordinary costume hats. They often want to touch the felt, look closely at the texture, and ask how it was made. That is one of the best parts of working with wool. The material invites curiosity. People can see that it is not molded plastic or synthetic fabric. They can feel the slight irregularities and understand that every curve was shaped by hand.
Making felt hats has also changed how I think about color. Black wool is not always just black. It can contain hints of blue, charcoal, purple, brown, or silver. Gray can be soft and stormy, warm and smoky, or bright like moonlight. Green can look magical when it includes a little yellow or dark brown. Wool rewards subtle color mixing, especially when the goal is a witch hat that feels more like an heirloom from a fantasy story than a seasonal costume.
There are practical lessons, too. I now know that using too little wool on the brim creates a floppy edge that refuses to behave. I know that rushing the early felting stage can cause fibers to shift into awkward patches. I know that measuring the head opening repeatedly is much smarter than discovering, after several hours of work, that the hat fits only a particularly stylish cantaloupe.
Most of all, I enjoy the quiet rhythm of the process. Laying out the fibers, adding warm water, rubbing and rolling the wool, watching it shrink, and shaping the crown all require attention. It is repetitive in the best way. My hands stay busy while my mind slows down. By the end, a loose pile of wool has become something wearable and expressive.
That transformation never gets old. Every time I make a wool felt witch hat, I begin with a vague idea and finish with a character. Some hats are elegant. Some are funny. Some look a little suspicious. All of them remind me that handmade objects do not need to be flawless to be beautiful. They only need to feel alive.
Note: This article is intended as an original educational and creative guide. Felt-making methods, wool behavior, and shaping results can vary based on fiber type, water temperature, soap, agitation, humidity, and the maker’s technique. Technical background reflects guidance from U.S. Extension programs, American wool organizations, Smithsonian textile resources, craft institutions, and contemporary American felting educators.