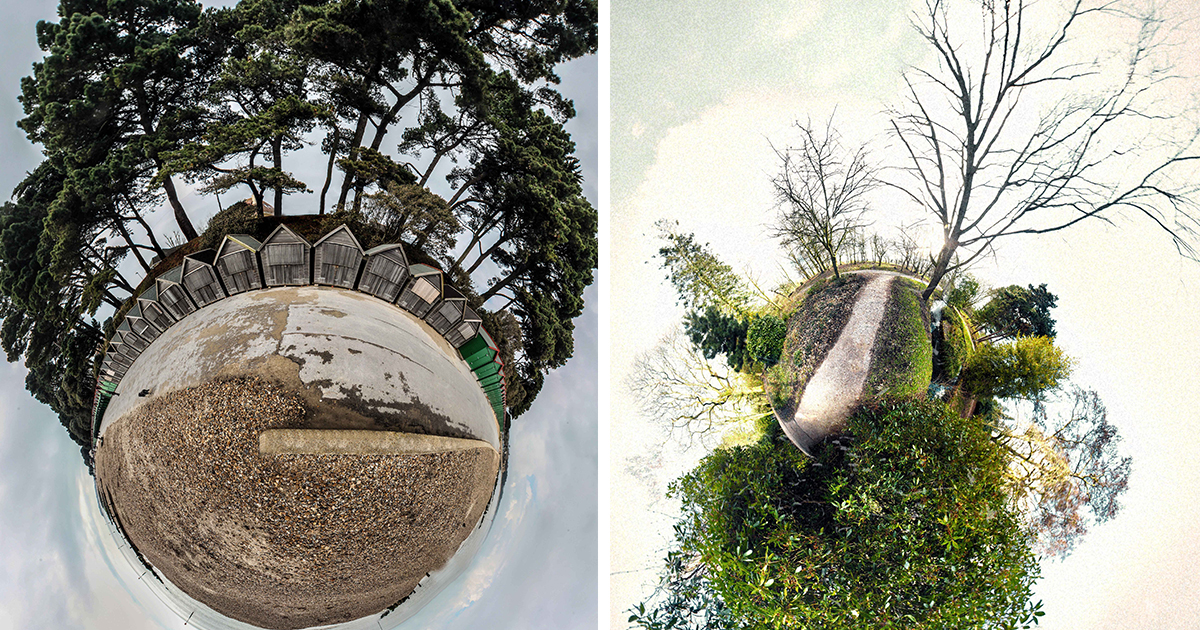
Some photographs ask politely to be admired. Little planet images kick the door open, roll a whole skyline into a marble, and say, “Behold, I have folded reality like a taco.” That is the strange joy of stereographic projection photography: it transforms a 360-degree panorama into a miniature world where streets bend into rings, skyscrapers lean like curious giants, and the sky becomes either a soft blue halo or a cosmic soup bowl.
“Little planets” are not just visual tricks. They sit at the meeting point of math, photography, cartography, digital art, and the slightly chaotic human desire to make ordinary places look like they escaped from a dream. A parking lot can become a lonely asteroid. A beach can curl into a private vacation moon. A city intersection can look like a toy universe built by an architect who had too much coffee.
This article explores what little planet photography is, how stereographic projections work, why the results feel so hyper-unreal, and how I approach them as both a technical process and a personal art habit. Bring your panorama, your editing software, and your willingness to let the horizon do gymnastics.
What Are Little Planets?
A little planet is a circular image usually made from a 360-degree panorama. The scene is wrapped so the ground or central subject forms a tiny globe, while the sky expands around it. Instead of looking into a photograph, you feel as if you are hovering above a miniature planet that somehow contains a whole neighborhood, trail, pier, plaza, or mountain ridge.
The most common source image is an equirectangular panorama, which represents a full spherical view: 360 degrees horizontally and 180 degrees vertically. In plain English, it captures everything around the camera, from the ground below to the sky above. When this rectangular image is remapped into a stereographic or polar-style view, the flat panorama becomes a round, gravity-defying world.
Why They Look So Surreal
Little planets feel surreal because they break the rules our eyes expect. In normal photography, straight roads stay straight, buildings point upward, and the horizon behaves like a responsible adult. In a stereographic little planet, the horizon can curl into a perfect ring, vertical objects can radiate outward, and distance becomes elastic. The effect is not random distortion; it is structured distortion, which is why the image can look impossible and strangely believable at the same time.
That tension is the magic. Your brain recognizes real objects, but the arrangement says, “Welcome to Earth, but after a software wizard sneezed.” The result is hyper-unreal: more intense than ordinary reality, but still made from real light, real places, and real perspective.
The Math Behind the Magic: Stereographic Projection
Stereographic projection is a method for mapping points from a sphere onto a plane. Imagine a globe and a flat sheet. A point on the sphere is projected onto that sheet from a chosen point on the sphere, often described as a pole. This process has long been used in mathematics, cartography, crystallography, geology, and visual design because it converts spherical relationships into a flat image while preserving certain useful properties.
One important feature of stereographic projection is that it is conformal, meaning it preserves angles locally. That does not mean it preserves size or area. In fact, size can stretch dramatically, especially near the edges. But angle preservation helps shapes remain recognizable in small regions, which is one reason little planets can feel clean, graceful, and oddly natural even while the whole world is being twisted into a donut-shaped daydream.
Not All Distortion Is Bad
Photographers are often taught to avoid distortion. Keep the lens level. Watch the edges. Correct perspective. Make the walls straight. Little planet photography gleefully ignores that advice and then somehow makes it art.
The distortion is not a mistake; it is the point. In a good little planet, the bend of the landscape guides the eye. The circular composition creates rhythm. Trees, lamp posts, towers, bridges, and people become radial elements that point outward like compass needles. The center becomes a stage. The edge becomes atmosphere. Distortion becomes design.
Little Planet vs. Tiny Planet vs. Polar Panorama
The terms “little planet” and “tiny planet” are often used interchangeably. Both refer to images that wrap a panorama into a globe-like composition. “Polar panorama” is another related phrase, especially in older tutorials that use polar coordinates filters. The difference often comes down to the software, projection method, and creative intent.
A quick polar coordinates effect can create a charming tiny planet from a standard panorama, especially if the image has a flat horizon and matching left and right edges. A stereographic projection, however, often produces a smoother and more elegant planet effect from true 360-degree imagery. It can reduce harsh pinching in the center and create a more balanced relationship between the planet and the surrounding sky.
The “Little Sky” Variation
Flip the projection direction and the little planet becomes a tunnel or “little sky.” Instead of the ground forming the globe, the sky or ceiling becomes the center, while the landscape wraps around the outside. This variation is perfect for forests, cathedrals, city canyons, glass atriums, and anywhere the overhead environment has personality. If a little planet feels like standing above a world, a little sky feels like being pulled through a portal.
How I Create Hyper-Unreal Stereographic Projections
My process begins before the editing software opens. A little planet succeeds or fails based on the scene. I look for places with a strong circular logic: open plazas, beaches, bridges, rooftops, empty roads, forests, piers, courtyards, and intersections. The best scenes have a clear ground plane, interesting vertical elements, and enough sky to breathe.
The horizon matters. A level horizon usually creates a cleaner planet. If the camera tilts too much, the final image may look like the planet is falling into another dimension. Sometimes that is excellent. Sometimes it looks like the camera had a personal crisis. The trick is knowing which kind of chaos you invited.
Step 1: Capture a Full 360-Degree Scene
The easiest route is to use a 360 camera. It captures the full sphere automatically and produces an equirectangular image that can be edited later. A smartphone panorama or DSLR sequence can also work, but the image must wrap cleanly from left to right. If the left and right edges do not match, the final planet will have a visible seam, which is the photographic equivalent of spinach in your teeth.
For DSLR or mirrorless shooting, overlap each frame generously, rotate around a consistent point, and avoid scenes with fast-moving subjects unless you want ghost cars, clone pedestrians, or a dog with three tails. A tripod helps, but handheld shooting can work if you are patient and willing to fix imperfections later.
Step 2: Choose the Right Projection
In panorama software, I usually look for stereographic projection or a dedicated little planet preset. In image editors, tools like polar coordinates or little planet filters can create similar results. GIMP includes a Little Planet filter designed for equirectangular images, while Photoshop users often square the image, rotate or flip it, and apply a Polar Coordinates filter using the rectangular-to-polar option.
The software does not make the art by itself. It only folds the paper. The real creative decisions come afterward: rotation, crop, center point, scale, contrast, color, sky cleanup, seam repair, and how much weirdness to leave in the final image.
Step 3: Control the Center
The center of a little planet carries enormous visual weight. If the ground is dull, the planet may look like a beige cookie. If the center contains a path, sculpture, person, shadow, spiral, or strong texture, the image gains a natural anchor. I often rotate the panorama until the most interesting ground detail sits near the center and the strongest vertical objects radiate around it.
People can work beautifully in little planets, but placement is everything. A person near the center becomes a tiny explorer. A person near the outer curve may stretch into a noodle. Unless noodle-human is your artistic goal, keep important figures away from extreme distortion zones.
Composition Tips for Better Little Planet Photography
A little planet may look playful, but strong composition still matters. The best images have order beneath the madness. They use symmetry, repetition, contrast, and negative space just like traditional photography.
Look for Radial Lines
Roads, bridges, shadows, fences, crosswalks, and shorelines can become radial lines that pull the viewer into the planet. In a normal photo, these lines lead toward the horizon. In a little planet, they often curve around the world or shoot outward like sunbeams.
Use the Sky as a Design Element
The sky is not empty space; it is the frame. A clean blue sky creates a minimalist look. Clouds add motion and drama. Sunset light can turn the entire planet into a glowing object. Storm clouds make the image feel like a fantasy map where dragons are only temporarily off-camera.
Avoid Busy Edges
The outer edge of a little planet can stretch objects heavily. If too many important details sit there, the image becomes noisy. I prefer to keep the outer ring relatively simple, letting the viewer’s eye travel around the planet without tripping over distorted billboards, half-cars, or one extremely confused pigeon.
Common Problems and How to Fix Them
Little planet editing is fun, but it has a few traps. The good news is that most problems can be fixed with better capture, cleaner stitching, or a few thoughtful edits.
Visible Seams
A seam appears when the left and right edges of the panorama do not match. This is common with changing light, moving people, waves, traffic, or handheld panoramas. To fix it, choose a better seam location, clone or heal the mismatch, or shoot a full 360-degree image with more consistent exposure.
Pinched Centers
If the middle of the planet looks crushed, the source image may not have enough ground detail, or the projection settings may be too aggressive. Try changing the pitch, zoom, or field of view. Sometimes a slight crop improves the planet more than another hour of heroic editing.
Awkward Horizons
A crooked horizon can make the planet look lopsided. That can be charming, but if the image feels accidental, level the panorama before projection. A clean horizon usually gives the final image a more polished, intentional feeling.
Why Little Planets Work So Well Online
Little planet images are scroll-stoppers. They look unusual even at thumbnail size, which makes them powerful for portfolios, social posts, travel blogs, digital art galleries, and experimental photography essays. The circular form reads quickly, while the details reward closer inspection.
They also invite curiosity. Viewers ask, “Where is this?” then “How did you make it?” and finally “Can I try that with my backyard?” That is a strong emotional sequence for visual content. The image is not only beautiful; it is a puzzle, a trick, and a miniature adventure.
The Artistic Appeal of Hyper-Unreal Worlds
I call my favorite versions hyper-unreal because they are not trying to imitate ordinary vision. They exaggerate the feeling of a place. A lonely road becomes lonelier when curled into a tiny isolated planet. A crowded city becomes more frantic when the buildings lean inward like gossiping skyscrapers. A quiet beach becomes dreamier when the shoreline wraps into a private blue-and-sand universe.
This is where little planets become more than novelty images. They can express memory. They can show how a place felt instead of how it looked. Travel memories often behave this way anyway: circular, compressed, emotional, not fully accurate but somehow true. A stereographic projection makes that mental distortion visible.
My Experience Making Little Planets
My first serious little planet attempt was not majestic. It was a lumpy photographic bagel with a tree growing out of one side and a horizon line that looked like it had recently lost a wrestling match. I had taken a panorama in a park, rushed through the edit, and assumed the software would sprinkle fairy dust on it. The software, apparently, was off duty.
That failed image taught me the first rule: little planets are planned in the field, not rescued in the edit. Now, when I walk into a location, I scan it like a tiny-planet hunter. Is there enough open ground? Does the horizon wrap cleanly? Are there tall objects that will look interesting when stretched outward? Is the sky doing anything besides existing? Will pedestrians move through the seam and create accidental two-headed citizens?
One of my favorite experiences happened near a waterfront at golden hour. The walkway formed a gentle curve, the railing repeated in neat lines, and the sky had just enough cloud texture to avoid looking flat. In the normal panorama, it was pleasant but not unforgettable. After stereographic projection, the walkway became a small floating island surrounded by glowing sky. The railing turned into a crown. The sunlit water bent around the scene like a silver belt. It felt less like a photograph of a place and more like a souvenir from a dream I had carefully exported.
I have also learned that little planets reward patience with imperfection. Sometimes a distorted person makes the scene funnier. Sometimes a stretched shadow adds drama. Sometimes a seam that would be “wrong” in a clean commercial image gives the planet a handmade, zine-like charm. The goal is not always technical perfection. The goal is visual conviction. If the image feels alive, the viewer forgives the oddities.
My editing routine has become almost ritualistic. I start by rotating the world, which sounds more powerful than it is but still feels delightful. I test several center points. I zoom in and out until the planet has the right amount of breathing room. I watch the outer edge carefully because that is where chaos likes to rent an apartment. Then I adjust contrast and color, not to make the image “realistic,” but to make the mood clear. Warm planets feel nostalgic. Cool planets feel futuristic. High-contrast planets feel graphic and poster-like. Soft planets feel like memory.
The strangest part is that making little planets changed how I see ordinary spaces. A sidewalk is no longer just a sidewalk; it might be a ring. A courtyard might be a moon. A row of palm trees might become a burst of green fireworks. Even boring places become candidates for transformation. That is the best gift of this technique: it trains the eye to look for hidden geometry in everyday life.
After many experiments, I still enjoy the moment when the projection finally clicks. The rectangle collapses into a world. The sky blooms. The ground tightens into a planet. The familiar becomes strange, and the strange becomes charming. It is a small act of visual mischief, but also a reminder that perspective is flexible. Sometimes all it takes to rediscover a place is to bend it into a tiny universe and let it spin.
Conclusion
Little planets are playful, mathematical, surreal, and surprisingly expressive. They use stereographic projection and 360-degree imagery to turn familiar locations into compact visual worlds. The technique works because it combines structure with surprise: real spaces are transformed through a logical projection, yet the final image feels magical.
Whether you use a 360 camera, a stitched panorama, Photoshop, GIMP, Hugin, PTGui, or another editing tool, the strongest little planets begin with good observation. Find a scene with shape. Respect the horizon. Watch the seams. Use distortion as a design tool. Most importantly, let the image become a little weird. That is where the charm lives.
In the end, little planet photography is not just about making a cool circular image. It is about seeing the world as flexible, playful, and full of hidden planets waiting to be folded into view.