Faux butterfly art is one of those magical DIY projects that looks expensive, delicate, and slightly museum-adjacentbut does not require you to own a museum, a taxidermy kit, or a dramatic Victorian greenhouse. With paper, fabric, vellum, paint, a shadow box frame, and a little patience, you can create butterfly wall art that feels airy, elegant, and full of movement.
The best part? It is completely butterfly-friendly. Instead of using real specimens, faux butterfly art recreates the look of pinned butterflies, botanical displays, or fluttering wall installations with ethical craft materials. That means your walls get the charm, while actual butterflies get to keep doing important butterfly business: pollinating, migrating, and looking fabulous in the garden.
This guide walks you through how to make faux butterfly art from start to finish, including material choices, layout ideas, cutting techniques, framing tips, and practical design advice. Whether you want a soft cottagecore shadow box, a modern gallery-style display, or a colorful kids’ room project, the process is approachable enough for beginners and flexible enough for serious DIY lovers who own more craft supplies than socks.
What Is Faux Butterfly Art?
Faux butterfly art is decorative artwork that uses handmade or manufactured butterfly shapes instead of real butterflies. Most versions are made from cardstock, watercolor paper, crepe paper, vellum, fabric, book pages, wallpaper scraps, or printable designs. The butterflies are usually shaped, layered, and arranged in a frame, shadow box, canvas, wreath, or wall installation.
The style can be realistic, abstract, vintage, minimalist, or wildly colorful. Some pieces imitate old natural-history displays with neat rows and labels. Others look like a cloud of butterflies flying across a wall. You can make them tiny and delicate, oversized and theatrical, or somewhere in the middlebasically the “just right” zone where your guests say, “Wait, you made that?” and you pretend to be humble.
Why Make Faux Butterfly Art Instead of Using Real Butterflies?
Real butterflies play an important role in ecosystems. Many species rely on specific host plants, and many plants rely on pollinators. In several regions, butterfly habitats are under pressure from development, pesticides, climate stress, and the loss of native plants. Faux butterfly art gives you the beauty of butterfly-inspired decor without adding pressure to living insects or their habitats.
From a home decor perspective, faux materials are also easier to control. Paper does not have fragile wings that crumble if someone sneezes from across the room. Faux butterflies can be made in any color palette, scaled to your frame, replaced if damaged, and arranged without the special handling concerns of biological specimens. It is ethical, affordable, customizable, and far less likely to make your aunt ask uncomfortable questions at Thanksgiving.
Best Materials for DIY Faux Butterfly Art
1. Paper and Cardstock
Cardstock is the most beginner-friendly material for DIY butterfly wall art. It holds shape well, cuts cleanly, and comes in endless colors. Use 65 lb to 110 lb cardstock for butterflies that need structure. For a softer look, layer lightweight paper over cardstock or use patterned scrapbook paper for decorative wings.
2. Vellum and Translucent Paper
Vellum creates a soft, glowing wing effect. It is especially beautiful when layered over printed or painted paper. Because vellum is semi-transparent, it adds depth without heaviness. Think of it as the fairy godmother of paper crafting: subtle, elegant, and slightly mysterious.
3. Crepe Paper
Crepe paper is excellent for realistic butterfly wings because it stretches and curves naturally. Double-sided crepe paper works especially well when you want color variation. It can be shaped with your fingers, lightly curled, and layered to create movement.
4. Fabric Scraps
Cotton, linen, silk scraps, and lace can all become beautiful faux butterflies. Fabric gives your art a soft textile quality and works well for nursery decor, boho interiors, or framed heirloom-style projects. Stabilize thin fabric with fusible interfacing before cutting so the edges stay neat.
5. Vintage Wallpaper, Book Pages, and Maps
Old wallpaper scraps, damaged book pages, sheet music, and maps can create charming faux butterfly art with a nostalgic feel. Use copies rather than valuable originals, especially if the paper is sentimental. For longer-lasting artwork, choose acid-free backing materials and avoid placing fragile paper in direct sunlight.
Tools You Will Need
You do not need a professional studio to make faux butterfly art. A kitchen table, decent lighting, and the willingness to find tiny paper scraps in weird places for the next three days will do nicely.
- Butterfly templates, SVG files, punches, dies, or printable outlines
- Cardstock, vellum, crepe paper, fabric, or decorative paper
- Sharp scissors or a craft knife
- Cutting mat
- Bone folder, ruler, or scoring tool
- Foam adhesive dots or strips
- Craft glue or glue pen
- Shadow box frame, canvas, or mat board
- Tweezers for small pieces
- Pencil and removable painter’s tape
- Optional: cutting machine such as Cricut or Silhouette
How To Make Faux Butterfly Art: Step-by-Step Guide
Step 1: Choose Your Style
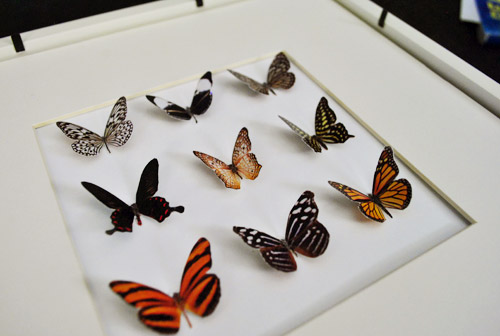
Before cutting anything, decide what kind of faux butterfly art you want to make. A natural-history-inspired display usually has butterflies arranged in rows with clean spacing. A whimsical piece may have butterflies flying diagonally across a frame. A modern design might use one color family, such as all white, black, gold, or soft neutrals.
For a beginner-friendly project, choose one of these layouts:
- Grid layout: Butterflies arranged in even rows inside a shadow box.
- Flight path layout: Butterflies rising from one corner to another.
- Ombre layout: Colors gradually shift from light to dark.
- Botanical layout: Butterflies mixed with faux leaves, pressed-style paper flowers, or illustrated stems.
Step 2: Pick a Color Palette
A strong color palette makes homemade art look intentional. Choose three to five colors instead of using every paper in your craft drawer. Yes, the glitter cardstock is calling your name. No, it does not need to attend every party.
For elegant faux butterfly wall art, try ivory, taupe, blush, and antique gold. For a bold modern piece, use black, white, emerald, and metallic copper. For a child’s room, mix sky blue, coral, lavender, and sunny yellow. If you want realism, look at photos of monarchs, swallowtails, blue morphos, and painted ladies for inspiration, then simplify the patterns so the piece does not become a full-time job.
Step 3: Prepare Your Background
The background should support the butterflies without stealing the show. White or cream mat board gives a clean gallery look. Scrapbook paper adds pattern. Watercolor washes create a dreamy handmade feel. Linen or burlap adds texture.
If you are framing the piece, cut the background to fit the inside of your shadow box or frame. For better durability, use acid-free mat board or acid-free foam board, especially if you are using artwork, printed pieces, or sentimental paper. Paper art lasts longer when protected from direct sunlight, moisture, and high heat.
Step 4: Cut the Butterfly Shapes
You can cut butterflies by hand, with a craft punch, with metal dies, or with a cutting machine. For hand cutting, print or draw a butterfly template, trace it lightly onto the back of your paper, and cut carefully with small scissors. For repeated shapes, make one sturdy template from cardstock and reuse it.
If you use a cutting machine, test one butterfly first before cutting a full sheet. Thin paper may tear if the blade pressure is too high. Heavy cardstock may need a deeper blade setting or multiple passes. This is the craft equivalent of “measure twice, cut once,” except it is “test once, save yourself from yelling at a machine.”
Step 5: Add Wing Details
Plain butterflies can look beautiful, but details make them feel special. Add wing veins with a fine-tip marker, paint pen, colored pencil, or a light scoring line. You can dab acrylic paint along the wing edges, sponge on metallic highlights, or layer smaller wing shapes over larger ones.
For realistic faux butterfly art, keep the body darker and the wings lighter. Add tiny dots near the edges, mirror the pattern on both wings, and avoid overcrowding the design. Butterflies are symmetrical, but handmade art does not need to be mathematically perfect. Slight imperfections add charm; giant glue blobs add drama, but not the good kind.
Step 6: Shape the Wings
Dimension is what turns flat paper into 3D butterfly art. Gently fold each butterfly along the body line so the wings lift upward. Use a bone folder, ruler edge, or your fingernail to create a soft crease. Curl the wing tips slightly around a pencil or paintbrush handle.
For layered butterflies, attach the top layer only along the body so the wings remain loose. This creates a floating effect inside the frame. Foam adhesive under the body can lift each butterfly away from the background and make the entire piece feel more alive.
Step 7: Arrange Before You Glue
Lay all butterflies on the background before attaching anything. Move them around until the spacing feels balanced. In a grid layout, use a ruler and light pencil marks. In a flight path layout, start with larger butterflies near the bottom or center, then use smaller ones as the movement rises.
Take a quick phone photo of your final arrangement before gluing. This saves you from the classic DIY mystery: “Where exactly was that perfect little blue one before I bumped the table?”
Step 8: Attach the Butterflies
Use foam dots for height, glue dots for clean attachment, or a thin line of craft glue along the butterfly body. Avoid coating the entire wing with glue unless you want a flat look. For shadow box art, keep the wings raised and make sure the frame depth allows clearance.
If you want the butterflies to appear pinned without using real insects, add tiny decorative straight pins, pearl-head pins, or drawn pin marks through the body area. Do not use sharp pins in children’s rooms or anywhere the frame may be opened casually. Safety is always more stylish than regret.
Step 9: Frame the Artwork
A shadow box frame is ideal because it protects the raised wings. Choose a frame deep enough that the glass does not press against the butterflies. If you use a regular frame, remove the glass or keep the design flatter. For a clean finish, make sure the background is smooth and the butterflies are not crushed when the frame closes.
Hang the finished art away from direct sunlight. Even high-quality paper can fade over time. A hallway, bedroom wall, reading nook, or covered entry area is better than a bright window where afternoon sun turns your lovely butterflies into crispy little memories.
Creative Faux Butterfly Art Ideas
Vintage Natural History Display
Create rows of faux butterflies in muted tones, then add small paper labels beneath each one. You can invent poetic names like “Blue Garden Daydream” or “Caffeinated Swallowtail.” Use cream mat board and a dark wood shadow box for an antique collector’s cabinet look.
Monarch-Inspired Paper Butterfly Art
Use orange, black, and white cardstock to make monarch-inspired butterflies. Keep the design simplified: black body, orange wings, black edges, and white dots. This style is instantly recognizable and works beautifully in classrooms, craft rooms, and nature-themed spaces.
All-White Minimalist Butterflies
Cut butterflies from white cardstock and mount them on a white background using foam dots. The result is subtle, sculptural, and modern. This is a great choice for minimalist decor because the shadows create the pattern rather than bold color.
Rainbow Butterfly Wall Art
Arrange butterflies from red to orange, yellow, green, blue, and purple. This works well for playrooms, art studios, or cheerful gallery walls. Use consistent butterfly shapes to keep the rainbow from looking chaotic.
Botanical Butterfly Shadow Box
Combine faux butterflies with paper flowers, fern shapes, painted stems, or pressed-style leaves. Keep the background simple so the arrangement does not become visually crowded. A few botanical details can make the piece feel like a tiny garden behind glass.
Common Mistakes to Avoid
Using Too Many Patterns
Patterned paper is fun, but too many competing prints can make the artwork look busy. Mix one or two patterned papers with solid colors for balance.
Skipping the Test Layout
Gluing as you go can work for freestyle art, but faux butterfly art usually benefits from planning. Arrange everything first, then attach once the composition feels right.
Flattening the Wings
The raised wings are what make 3D butterfly wall art so appealing. Glue only the body or center fold unless you intentionally want a flat collage.
Using Weak Background Paper
Thin paper may buckle under glue or foam adhesive. Use mat board, cardstock, or foam board for a sturdier base.
Forgetting About Frame Depth
Before attaching tall layers, check the depth of your frame. If the glass presses on the butterflies, the finished piece will look squashed. Nobody wants pancake butterflies.
How To Make Faux Butterfly Art Look Expensive
The secret to making DIY faux butterfly art look high-end is restraint. Use fewer colors, cleaner spacing, and better materials. Choose a sturdy frame. Trim edges neatly. Keep glue invisible. Use a background that feels intentional, not accidental. If your layout has breathing room, the piece will look more like boutique wall art and less like a craft explosion in aisle seven.
Another trick is repetition. A group of identical butterflies arranged in a precise grid can look more sophisticated than twenty different shapes. If you prefer variety, repeat at least one element, such as color, size, direction, or spacing. Repetition tells the eye, “This is design,” not “The scissors won.”
Experience Notes: What Usually Happens When You Make Faux Butterfly Art
The first experience most makers have with faux butterfly art is discovering that the project looks simple until the butterflies start multiplying. One butterfly is easy. Twelve butterflies are a relaxing afternoon. Fifty butterflies are a lifestyle choice. The trick is to break the process into stages: cut everything first, shape everything second, arrange everything third, and glue last. When you batch the steps, the project feels calm instead of chaotic.
Another common experience is underestimating how much dimension matters. A flat butterfly cutout can look nice, but the moment you fold the wings upward, the whole piece changes. Shadows appear. The wings look like they are moving. Even plain white cardstock suddenly feels elegant. This is why foam dots and gentle wing shaping are worth the extra few minutes. They turn “paper shapes on a board” into “wait, did that just flutter?”
Color choices also teach quick lessons. Bright paper can look wonderful up close but overwhelming in a full frame. Soft colors may seem boring on the table but look beautiful once repeated in a finished arrangement. Metallic paper can be stunning, but too much shine may reflect against the glass. A good practical approach is to cut three test butterflies in your chosen palette, place them inside the frame, and view them from across the room. Wall art is not judged from six inches away unless your guests are unusually intense.
Many beginners also discover that glue has a personality. Liquid glue can wrinkle thin paper if applied too heavily. Hot glue can create bulky lumps. Foam tape can show from the side if pieces are too large. Glue dots and small foam squares are often the easiest options for clean results. Tweezers help with placement, especially when arranging tiny butterflies or layered details.
Framing is another learning moment. A shadow box gives the artwork breathing room, while a standard frame can crush raised wings. Before final assembly, place the backing inside the frame without sealing it and check the side view. If anything touches the glass, reduce the height or remove the glass for a dimensional open-frame display.
Finally, faux butterfly art tends to become personal very quickly. A map from a favorite trip, a page from a damaged old book, leftover wedding paper, or fabric from a meaningful project can turn a simple craft into a keepsake. That is the real charm of this DIY: it can be polished enough for a living room but sentimental enough to carry a story. And unlike many home decor projects, it does not require power tools, advanced math, or pretending you understand drywall anchors.
Final Thoughts
Learning how to make faux butterfly art is a rewarding way to combine nature-inspired design, paper crafting, and ethical home decor. With a few basic materials and a thoughtful layout, you can create artwork that looks delicate, dimensional, and custom-made for your space.
Start simple with cardstock butterflies in a shadow box, then experiment with vellum, crepe paper, fabric, vintage paper, or painted details. Keep the wings lifted, the glue controlled, and the composition balanced. Most importantly, enjoy the process. Faux butterfly art is supposed to feel light, creative, and joyfulnot like you are negotiating with a tiny paper insect committee.
Note: This guide focuses on cruelty-free faux butterfly art made with paper, fabric, vellum, and other craft materials. It does not require collecting, pinning, or preserving real butterflies.