Learning how to make a balance beam is one of those wonderfully practical DIY projects that looks simple, feels impressive, and makes your garage smell faintly like ambition and sawdust. A homemade balance beam can help kids practice coordination, beginner gymnastics, posture, focus, and confidence without turning your living room into a full Olympic training center. That said, this is not the place for “eh, good enough” craftsmanship. A balance beam is meant to be walked on, stood on, and occasionally wobbled on by someone who trusts your screws, sanding, padding, and judgment.
This guide walks you through a low-profile practice beam designed for home use. It is not a competition beam, not a high beam, and definitely not a launchpad for risky tricks. The safest homemade balance beam is sturdy, smooth, low to the ground, padded where helpful, and used with adult supervision. Think “confidence builder,” not “backyard circus audition.”
Below, you will find a complete 9-step tutorial, material suggestions, safety notes, finishing tips, and a practical experience section to help you avoid common DIY mistakes. Whether you are building it for a young gymnast, a preschool gross-motor activity, physical coordination practice, or simple backyard fun, this balance beam project can be affordable, durable, and surprisingly satisfying.
Before You Start: What Kind of Balance Beam Should You Build?
A regulation gymnastics balance beam is very narrowabout 4 inches wideand much longer and higher than anything most families should attempt at home. For home practice, especially for children and beginners, a low wooden beam is the better option. Keeping the beam close to the floor reduces fall height, makes practice less intimidating, and gives beginners a chance to build balance gradually.
The most common DIY design uses an 8-foot-long beam made from a solid wood post or laminated lumber, mounted on short support feet. A nominal 4×4 post is commonly used because it is sturdy and easy to find, though its actual dimensions are usually closer to 3.5 inches by 3.5 inches. That is still suitable for a beginner practice beam, especially if the top is sanded smooth and covered with carpet, suede-like fabric, or another grippy material.
Materials and Tools You Will Need
Basic Materials
- One 8-foot nominal 4×4 wood beam, or laminated boards for a wider practice surface
- Two to four support feet made from 2×4 or 2×6 lumber
- Wood screws, typically 2.5 to 3 inches long
- Wood glue for added stability
- Sandpaper in medium and fine grits
- Optional carpet runner, suede-like fabric, marine vinyl, or athletic mat material
- Heavy-duty staples or adhesive for covering material
- Optional rubber pads or non-slip furniture pads for the underside of the feet
Recommended Tools
- Tape measure
- Pencil
- Circular saw, miter saw, or handsaw
- Drill and drill bits
- Countersink bit
- Staple gun
- Clamps
- Sanding block or power sander
- Safety glasses
- Dust mask
If you are new to woodworking, do not let the list scare you. This is a beginner-friendly project. The beam is basically a carefully prepared board with stable feet. The difference between “cute DIY project” and “why is this wobbling like a shopping cart wheel?” comes down to measuring, pre-drilling, sanding, and testing.
Step 1: Choose a Safe Beam Size
Start by deciding the length, height, and width of your homemade balance beam. For most home users, an 8-foot beam is ideal. It gives enough room for walking drills, turns, step-kicks, and beginner poses without becoming too heavy or awkward to move.
For height, keep it low. A beam that sits about 6 to 8 inches off the ground is usually enough for beginners to feel like they are “on a beam” without adding unnecessary risk. If you are building for toddlers or younger children, you may choose an even lower design by placing a sanded 2×4 or 4×4 directly on small feet.
The walking surface should be wide enough for beginner comfort but narrow enough to challenge balance. A nominal 4×4 gives a practical surface for home use. If you want a slightly wider training beam, you can laminate lumber or add a carefully secured top layer, but do not make it so wide that it stops functioning as a balance tool.
Step 2: Select Straight, Solid Lumber
At the lumber aisle, choose the straightest beam you can find. Sight down the length of the board like you are checking whether a pool cue is warped. Avoid lumber with deep cracks, severe twisting, large knots on the walking surface, or splintered edges. The beam should feel solid, not punky, soft, or suspiciously light.
Pine is affordable and easy to work with, which makes it popular for DIY balance beams. Fir and other framing lumber can also work. Hardwood is stronger but heavier, more expensive, and usually unnecessary for a simple low practice beam. If the beam will live outdoors, choose lumber and finishes appropriate for exterior exposure, but remember that treated lumber can be rougher and may require extra sanding and sealing.
Do not buy the first board you touch. Lumber piles are like dating apps for wood: the good ones require a little scrolling. Take a few minutes to inspect several pieces. Your future self, holding a drill instead of a regret sandwich, will thank you.
Step 3: Cut the Support Feet
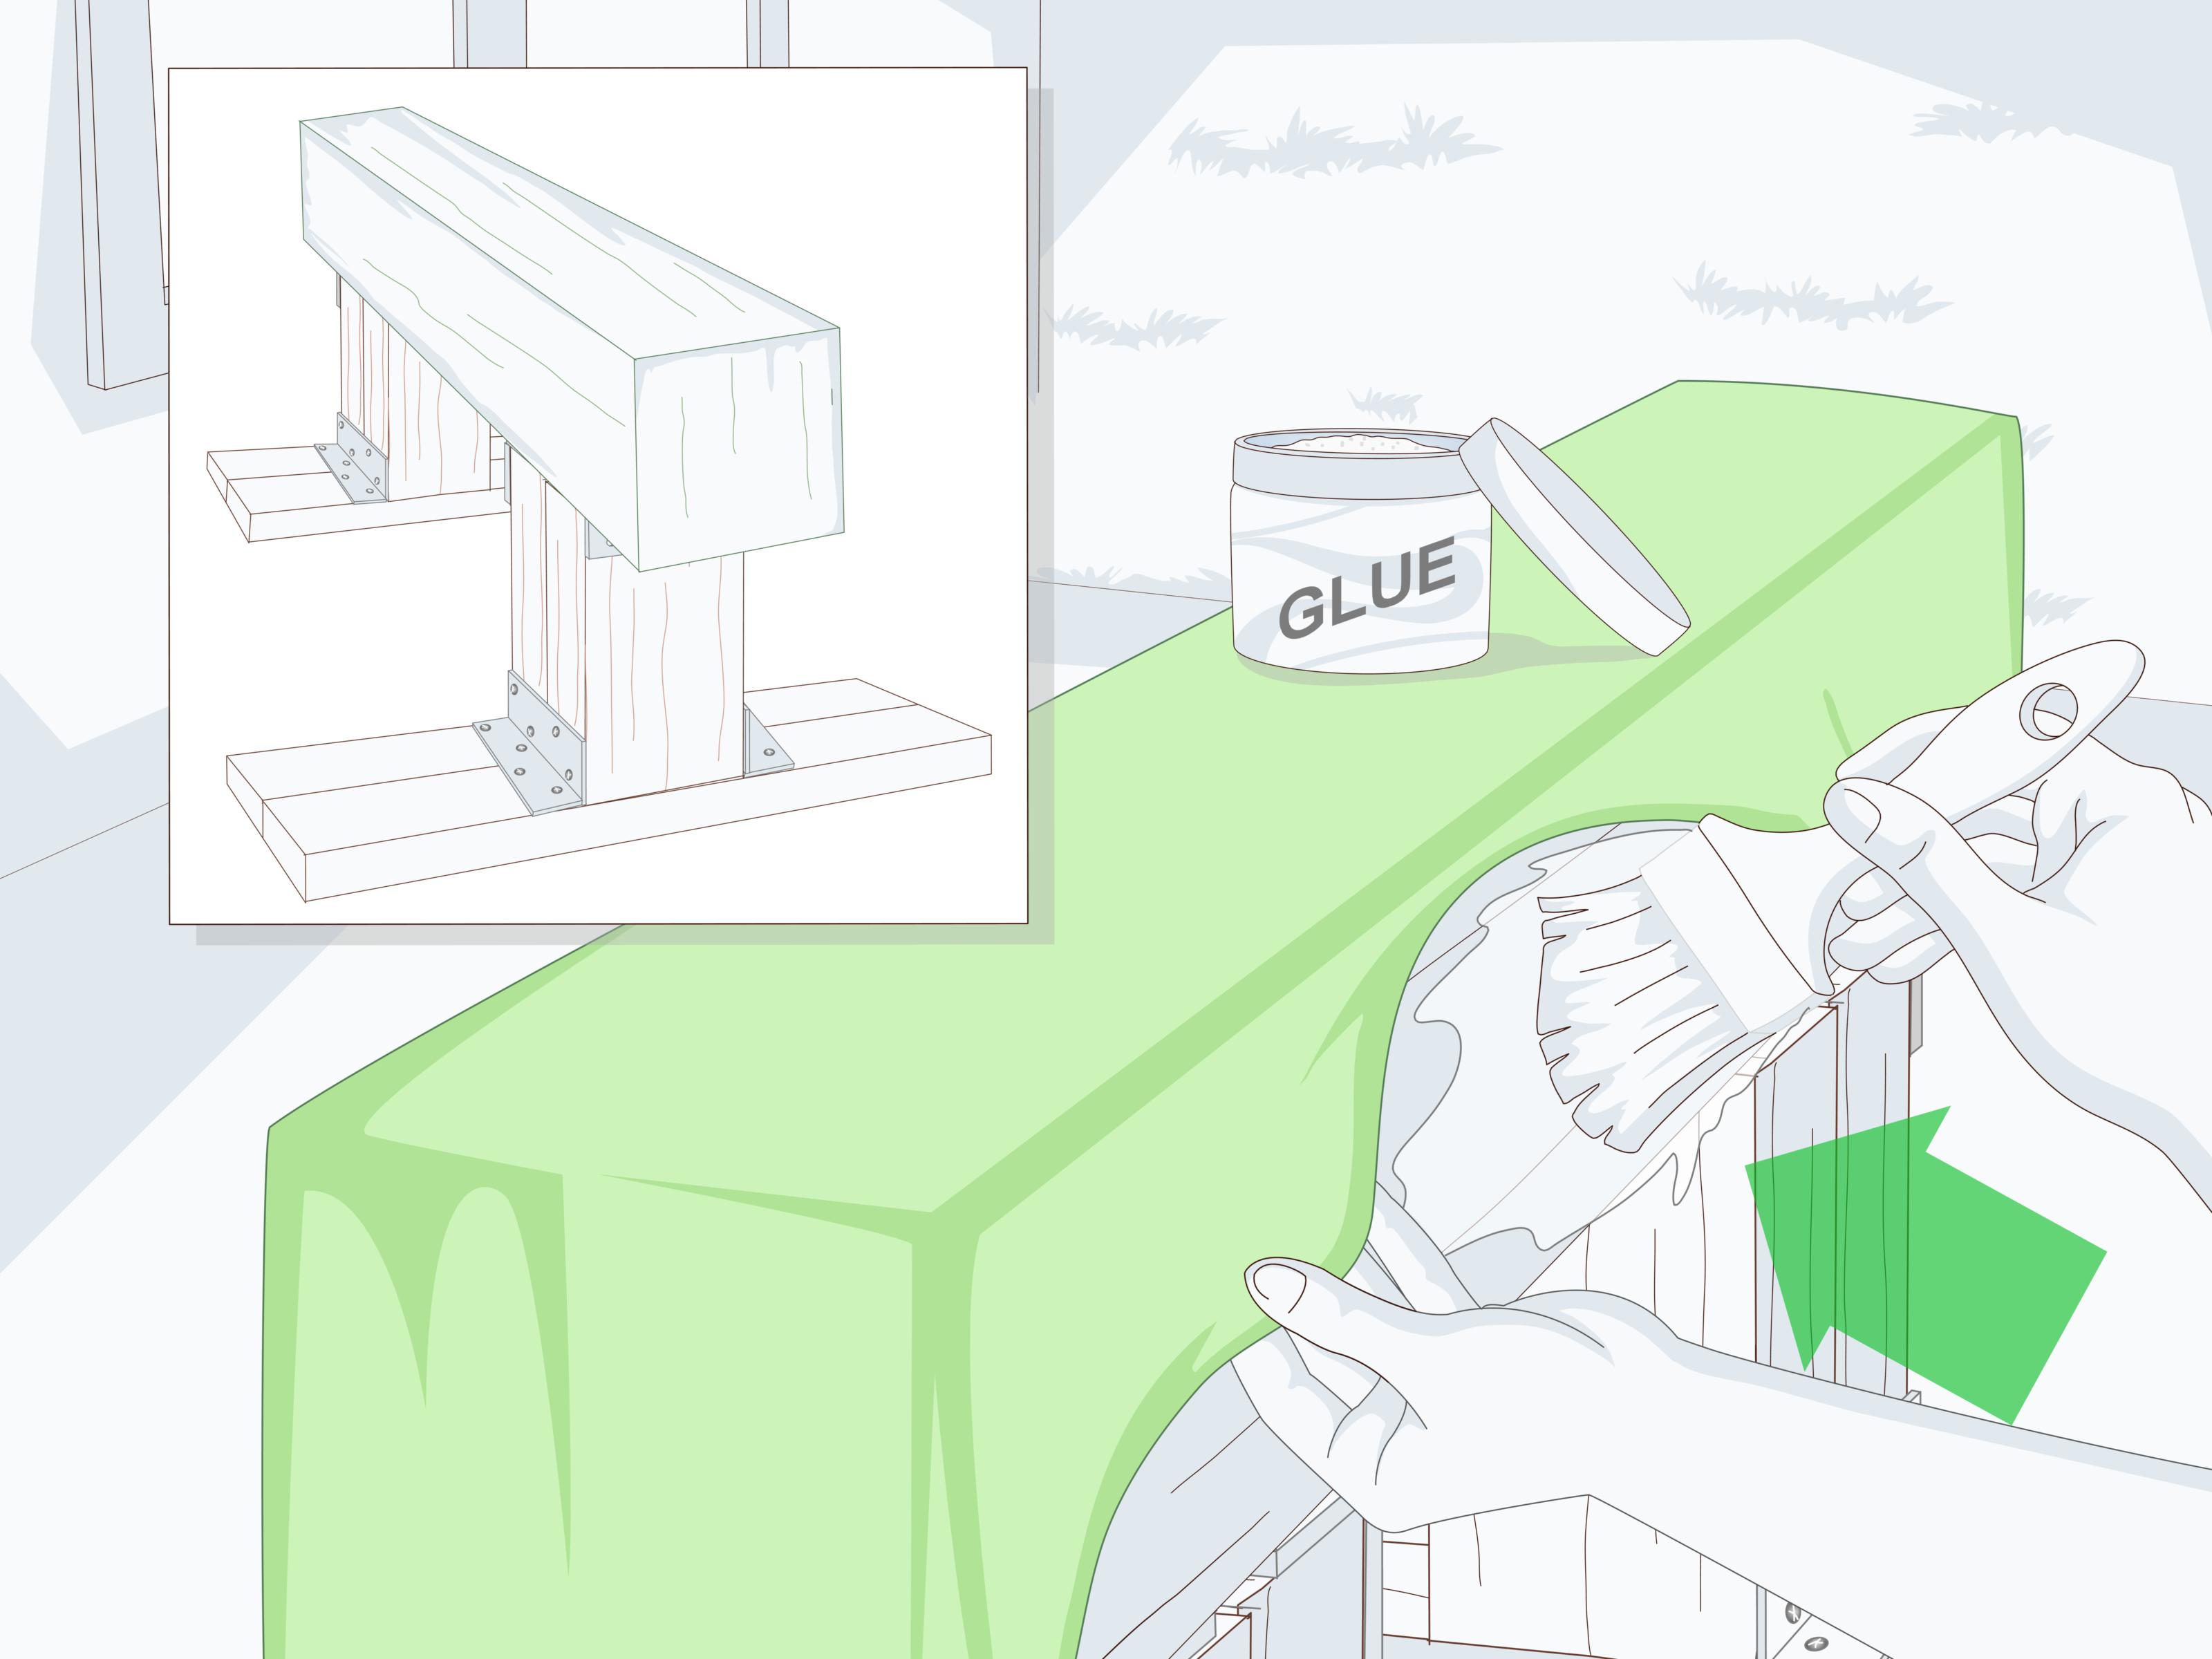
Next, cut the support feet. For a simple low beam, two sturdy feet may be enough, but three or four feet can improve stability, especially for an 8-foot beam used by active kids. A common approach is to cut 2×4 or 2×6 boards into 12- to 18-inch lengths and attach them perpendicular to the beam.
If you use two feet, place one near each end, set in about 12 inches from the edge. If you use three feet, place one in the center and one near each end. If you use four, space them evenly. The goal is to prevent tipping, rocking, and sagging while still keeping the beam low and manageable.
For young children, wider feet offer more side-to-side stability. A 2×6 support foot gives a broader base than a 2×4. If your beam will be used indoors on hardwood, tile, or laminate flooring, add rubber pads to the underside of the feet to reduce sliding and protect the floor.
Step 4: Sand Every Surface Smooth
Sanding is not optional. Splinters and balance beams are not friends. Start with medium-grit sandpaper to remove rough areas, saw marks, and sharp corners. Then move to a finer grit for a smoother finish. Pay special attention to the top walking surface, long edges, corners, and the ends of the beam.
Slightly rounding the top edges makes the beam more comfortable and reduces sharp impact points. You do not need to carve the beam into a professional oval shape, but you should soften the corners enough that bare feet, socks, or gymnastics shoes do not catch on rough wood.
Wear eye protection and a dust mask while sanding. If you use a power sander, keep it moving and avoid digging grooves into the wood. After sanding, wipe the beam with a clean cloth to remove dust before gluing, painting, staining, or covering.
Step 5: Pre-Drill and Attach the Feet
Place the beam upside down on a stable work surface. Mark where each support foot will go. Apply wood glue between the support foot and the underside of the beam, then clamp the pieces if possible. Pre-drill pilot holes before driving screws. This helps prevent splitting and makes it easier to sink screws cleanly.
Use two screws per foot at minimum, though larger feet may need more. Drive screws from the underside of the foot into the beam, or from the top of the beam down into the support depending on your design. For a cleaner walking surface, it is usually better to avoid exposed screw heads on top. If screws must go through the top, countersink them deeply and fill the holes smoothly.
Make sure all screws are tight, but do not overdrive them so aggressively that the wood cracks. Once assembled, flip the beam upright and press down at different points. If anything shifts, creaks dramatically, or performs a tiny tap dance, fix it before moving forward.
Step 6: Add Padding or a Grippy Cover
A plain wooden balance beam can work, but a covered surface is usually more comfortable and beginner-friendly. Carpet, suede-like fabric, marine vinyl, yoga mat material, or thin foam under fabric can all create a softer, grippier top. The best covering is snug, smooth, and securely fastened so it cannot wrinkle, slide, or bunch underfoot.
Cut your cover material long enough to wrap over the top and down both sides of the beam. If using padding, glue it to the top surface first and let it set according to the adhesive instructions. Then stretch the fabric evenly over the beam and staple it along the lower sides or underside, keeping staples away from the walking surface.
Do not leave exposed staples, sharp edges, or loose fabric. A loose cover can be more dangerous than no cover at all because it may shift while someone is walking. Tug on the material firmly after installation. If it moves, re-staple or reattach it.
Step 7: Seal or Finish Exposed Wood
If parts of the beam remain uncovered, consider sealing the wood. A clear polyurethane, paint, or exterior-grade finish can help protect the beam from moisture, dirt, and wear. Indoor beams do not need heavy-duty outdoor protection, but a light finish can make cleaning easier.
If the beam will be used outside, use a weather-resistant finish and store it indoors or under cover when not in use. Even sealed wood can warp, crack, or become slippery if left in rain, snow, or harsh sun. A balance beam that lives outdoors year-round may age faster than expected, especially at the feet where moisture collects.
Let any finish dry fully before use. Strong fumes and tacky surfaces are not part of a premium gymnastics experience. They are part of a “why does the garage smell like a hardware store had a dramatic incident?” experience.
Step 8: Test Stability Before Anyone Uses It
Before the beam becomes a practice tool, test it like a responsible adult with a healthy respect for gravity. Set it on a flat surface. Press down on each end, the center, and both sides. Step on slowly while holding a wall, rail, or another stable support. Check for rocking, sliding, flexing, or twisting.
If the beam moves, adjust the feet, add rubber pads, widen the support base, or place the beam on a non-slip mat. If the beam flexes too much, add another support foot. If the cover shifts, remove and reinstall it. If screw heads or staples are exposed, fix them immediately.
Also check the area around the beam. The safest setup has open space on both sides, no sharp furniture nearby, and a forgiving surface underneath. A gym mat, foam exercise mat, or padded carpeted area is better than concrete, tile, or hardwood. The beam should be used in a clear zone where a fall does not end with someone meeting a coffee table at speed.
Step 9: Use the Balance Beam Safely
Once the beam is complete, start with simple activities. Beginners can walk forward, walk backward, step sideways, practice toe taps, hold airplane arms, or pause in a one-foot balance. Children should be supervised, especially when they are excited, competitive, or convinced they are secretly ready for the Olympics after three minutes.
Set rules early: one person on the beam at a time, no pushing, no jumping off near furniture, no flips, and no using the beam when it is wet or unstable. Socks may be slippery on some surfaces, so bare feet or appropriate gymnastics shoes may work better depending on the covering material.
Inspect the beam regularly. Look for loose screws, cracked wood, worn padding, raised staples, shifting fabric, and unstable feet. A balance beam is not a “build it once and forget it forever” project. It is a piece of active equipment, and active equipment needs maintenance.
Helpful Design Variations
For Toddlers and Preschoolers
Use a very low beam, wide support feet, and a soft floor surface. Keep activities simple: walking across, stepping over, balancing stuffed animals, or pretending the floor is lava. The floor is not actually lava, but the commitment to the game is admirable.
For Beginner Gymnasts
An 8-foot covered beam with a 4-inch-style surface and low feet is a practical choice. Add a folding mat beside it for drills. Focus on posture, control, pointed toes, slow turns, and clean dismounts. Save advanced skills for a qualified coach and proper gym equipment.
For Outdoor Play
Use weather-resistant finishes, non-slip feet, and a storage plan. Outdoor beams should be checked more often because moisture and temperature changes can affect wood and fasteners. Never use the beam when the surface is wet, icy, muddy, or covered in leaves.
Common Mistakes to Avoid
The first big mistake is building the beam too high. Height may look impressive, but for home practice it adds risk without adding much benefit. Keep it low. A beginner can learn balance, control, and confidence just a few inches off the ground.
The second mistake is skipping sanding. Rough lumber can cause splinters, snags, and discomfort. Every edge that a hand, foot, knee, or shin might touch should be smooth.
The third mistake is using narrow or poorly attached feet. A beam that tips is not a beam; it is a wooden prank. Use wide support feet, pre-drill holes, use enough screws, and test carefully.
The fourth mistake is choosing a slippery cover. Some fabrics look nice but become slick under socks. Test your covering before final installation. A balance beam should provide traction, not surprise ice-skating practice.
The fifth mistake is letting children use it without rules. Even a low beam deserves supervision and boundaries. Most accidents happen when simple equipment is used in creative but questionable ways. Children are brilliant inventors. Unfortunately, some inventions involve jumping backward while yelling, “Watch this!”
Maintenance Tips for a Homemade Balance Beam
Check the beam every few weeks if it is used often. Tighten screws, inspect the fabric, and look for cracks or splinters. Clean the walking surface with a gentle method appropriate for the cover material. Avoid soaking the beam with water, especially if it is wood covered with fabric or carpet.
If the beam starts rocking, do not ignore it. The fix may be as simple as replacing a rubber pad or tightening a screw. If the wood has warped or cracked, retire the beam or rebuild it. A homemade balance beam should feel boringly stable. Boring is excellent when gravity is involved.
Experience Notes: What Building a Balance Beam Teaches You
After building a few simple wooden projects, you begin to notice that DIY success is less about owning fancy tools and more about patience. A balance beam proves that point beautifully. On paper, it is just a beam with feet. In real life, it asks you to think carefully about stability, surface texture, weight, movement, and how people actually use things.
One of the biggest lessons is that straight lumber matters. A slightly twisted board may not look terrible in the store, but once it becomes a balance beam, every wobble becomes obvious. If you have ever placed a warped board on the floor and watched it rock like a tiny boat, you know the feeling. Taking extra time to choose a straight post is one of the easiest ways to make the finished beam feel professional.
Sanding is another surprisingly important experience. Many beginners think sanding is just cosmetic, something you do if you want the project to look fancy. With a balance beam, sanding is functional. A smooth top surface protects feet. Softened edges make the beam more comfortable. Rounded corners help the cover sit better. The project teaches you that finish quality is not vanity; it is usability.
Attaching the feet also teaches a practical woodworking truth: screws work best when the wood is prepared for them. Pre-drilling may feel like an extra step, but it helps prevent splitting and keeps the parts aligned. Countersinking is equally useful when screw heads might interfere with a surface. Once you learn this on a balance beam, you will use the same habit on shelves, benches, planter boxes, and almost every other project that involves screws.
The covering stage is where many DIY builders develop respect for tension. Fabric that is too loose wrinkles. Padding that is too thick can feel unstable. Staples placed in the wrong spot can create scratchy hazards. The trick is to pull the material evenly, fasten it securely, and check the entire surface with your hands before anyone steps on it. A neat cover does not just look better; it performs better.
Another real-world lesson is that children test objects differently than adults do. Adults step carefully, inspect stability, and say things like, “Let’s be safe.” Children step on it sideways, hop off the end, crawl under it, balance toys on it, and invent games with rules that apparently came from another legal system. That is why the beam should be overbuilt for ordinary use, inspected often, and kept low to the ground.
The most rewarding part is watching confidence grow. A child who begins with arms stretched out and cautious little steps may soon walk across smoothly, turn around, and ask to try again. Balance practice is physical, but it is also mental. The beam becomes a small stage for focus, courage, patience, and body awareness.
For adults, the project is satisfying because it delivers a useful result without requiring advanced carpentry. You can finish it in an afternoon, customize it with fabric or paint, and store it against a wall when not in use. It is affordable, practical, and just challenging enough to feel like an accomplishment. Plus, every time someone says, “You made that?” you get to nod casually while pretending you were not deeply emotionally invested in choosing the perfect piece of lumber.
Conclusion
Making a balance beam at home is a realistic DIY project for families, beginner gymnasts, teachers, and anyone who wants a simple tool for improving balance and coordination. The key is to keep the design low, stable, smooth, and safe. Choose straight lumber, sand every edge, attach wide support feet, add a grippy cover, and test the beam thoroughly before use.
A homemade balance beam should never replace professional gymnastics instruction or certified equipment for advanced skills. However, for basic walking drills, confidence-building, playful movement, and beginner practice, it can be a fantastic addition to a home, backyard, playroom, or classroom. Build it carefully, supervise its use, and maintain it regularly. Gravity has a full-time job, but good DIY can make its work a little less dramatic.
Note: This guide is for building a low-profile home practice beam only. Always supervise children, use soft landing surfaces, inspect the beam regularly, and avoid advanced gymnastics skills unless working with a qualified coach and proper equipment.