Old dog urine stains have a special talent: they disappear just long enough for you to forget about them…
then reappear the moment company comes over. That’s not your imaginationold urine can leave behind
dried uric acid crystals and stubborn yellow pigments that “wake up” with humidity, heat, and repeated
cleaning in the wrong order.
The good news: most set-in dog urine stains can be improved (and many can be fully removed) with the
right approach. The not-so-fun news: if the urine soaked through carpet into the pad or into unfinished
wood/subfloor, you may need a deeper treatmentand sometimes sealing or replacement is the only
permanent fix.
Below are three proven, practical methods that work on the most common surfaces: carpet, rugs,
upholstery, mattresses, sealed hardwood, and even subfloors. I’ll also share what to do when the stain
“comes back,” how to avoid damaging fibers or finishes, and how to keep your dog from re-marking the
same spot.
Before You Start: 5-Minute Game Plan (So You Don’t Make It Worse)
1) Find the full stain, not just the “visible” part
Old urine spreads. What you see on top can be smaller than what soaked underneath. If you have a UV
flashlight, it can help reveal hidden spots. If not, do a simple “sniff-and-dab” test: press a slightly damp
white cloth onto the area, wait 10 seconds, then sniff the cloth. (Yes, it’s glamorous. No, it’s not optional.)
2) Blot/extract firsteven for old stains
If the stain is old and dry, lightly dampen the area with plain water first, then blot firmly or use a wet/dry
vacuum to extract. The goal is to pull out old residue so your cleaner can reach what’s leftrather than
dissolving the stain and pushing it deeper.
3) Always spot-test
Test any cleaner on a hidden area first. Enzymes are usually gentle, but peroxide/oxygen cleaners can
lighten dyes. Natural fibers (like wool or silk) and some hardwood finishes can be especially sensitive.
4) Safety: don’t mix cleaning chemicals
Never mix bleach with ammonia, vinegar, or other acids. Use good ventilation, keep pets/kids away while
cleaning, and let surfaces fully dry before allowing pets back into the area.
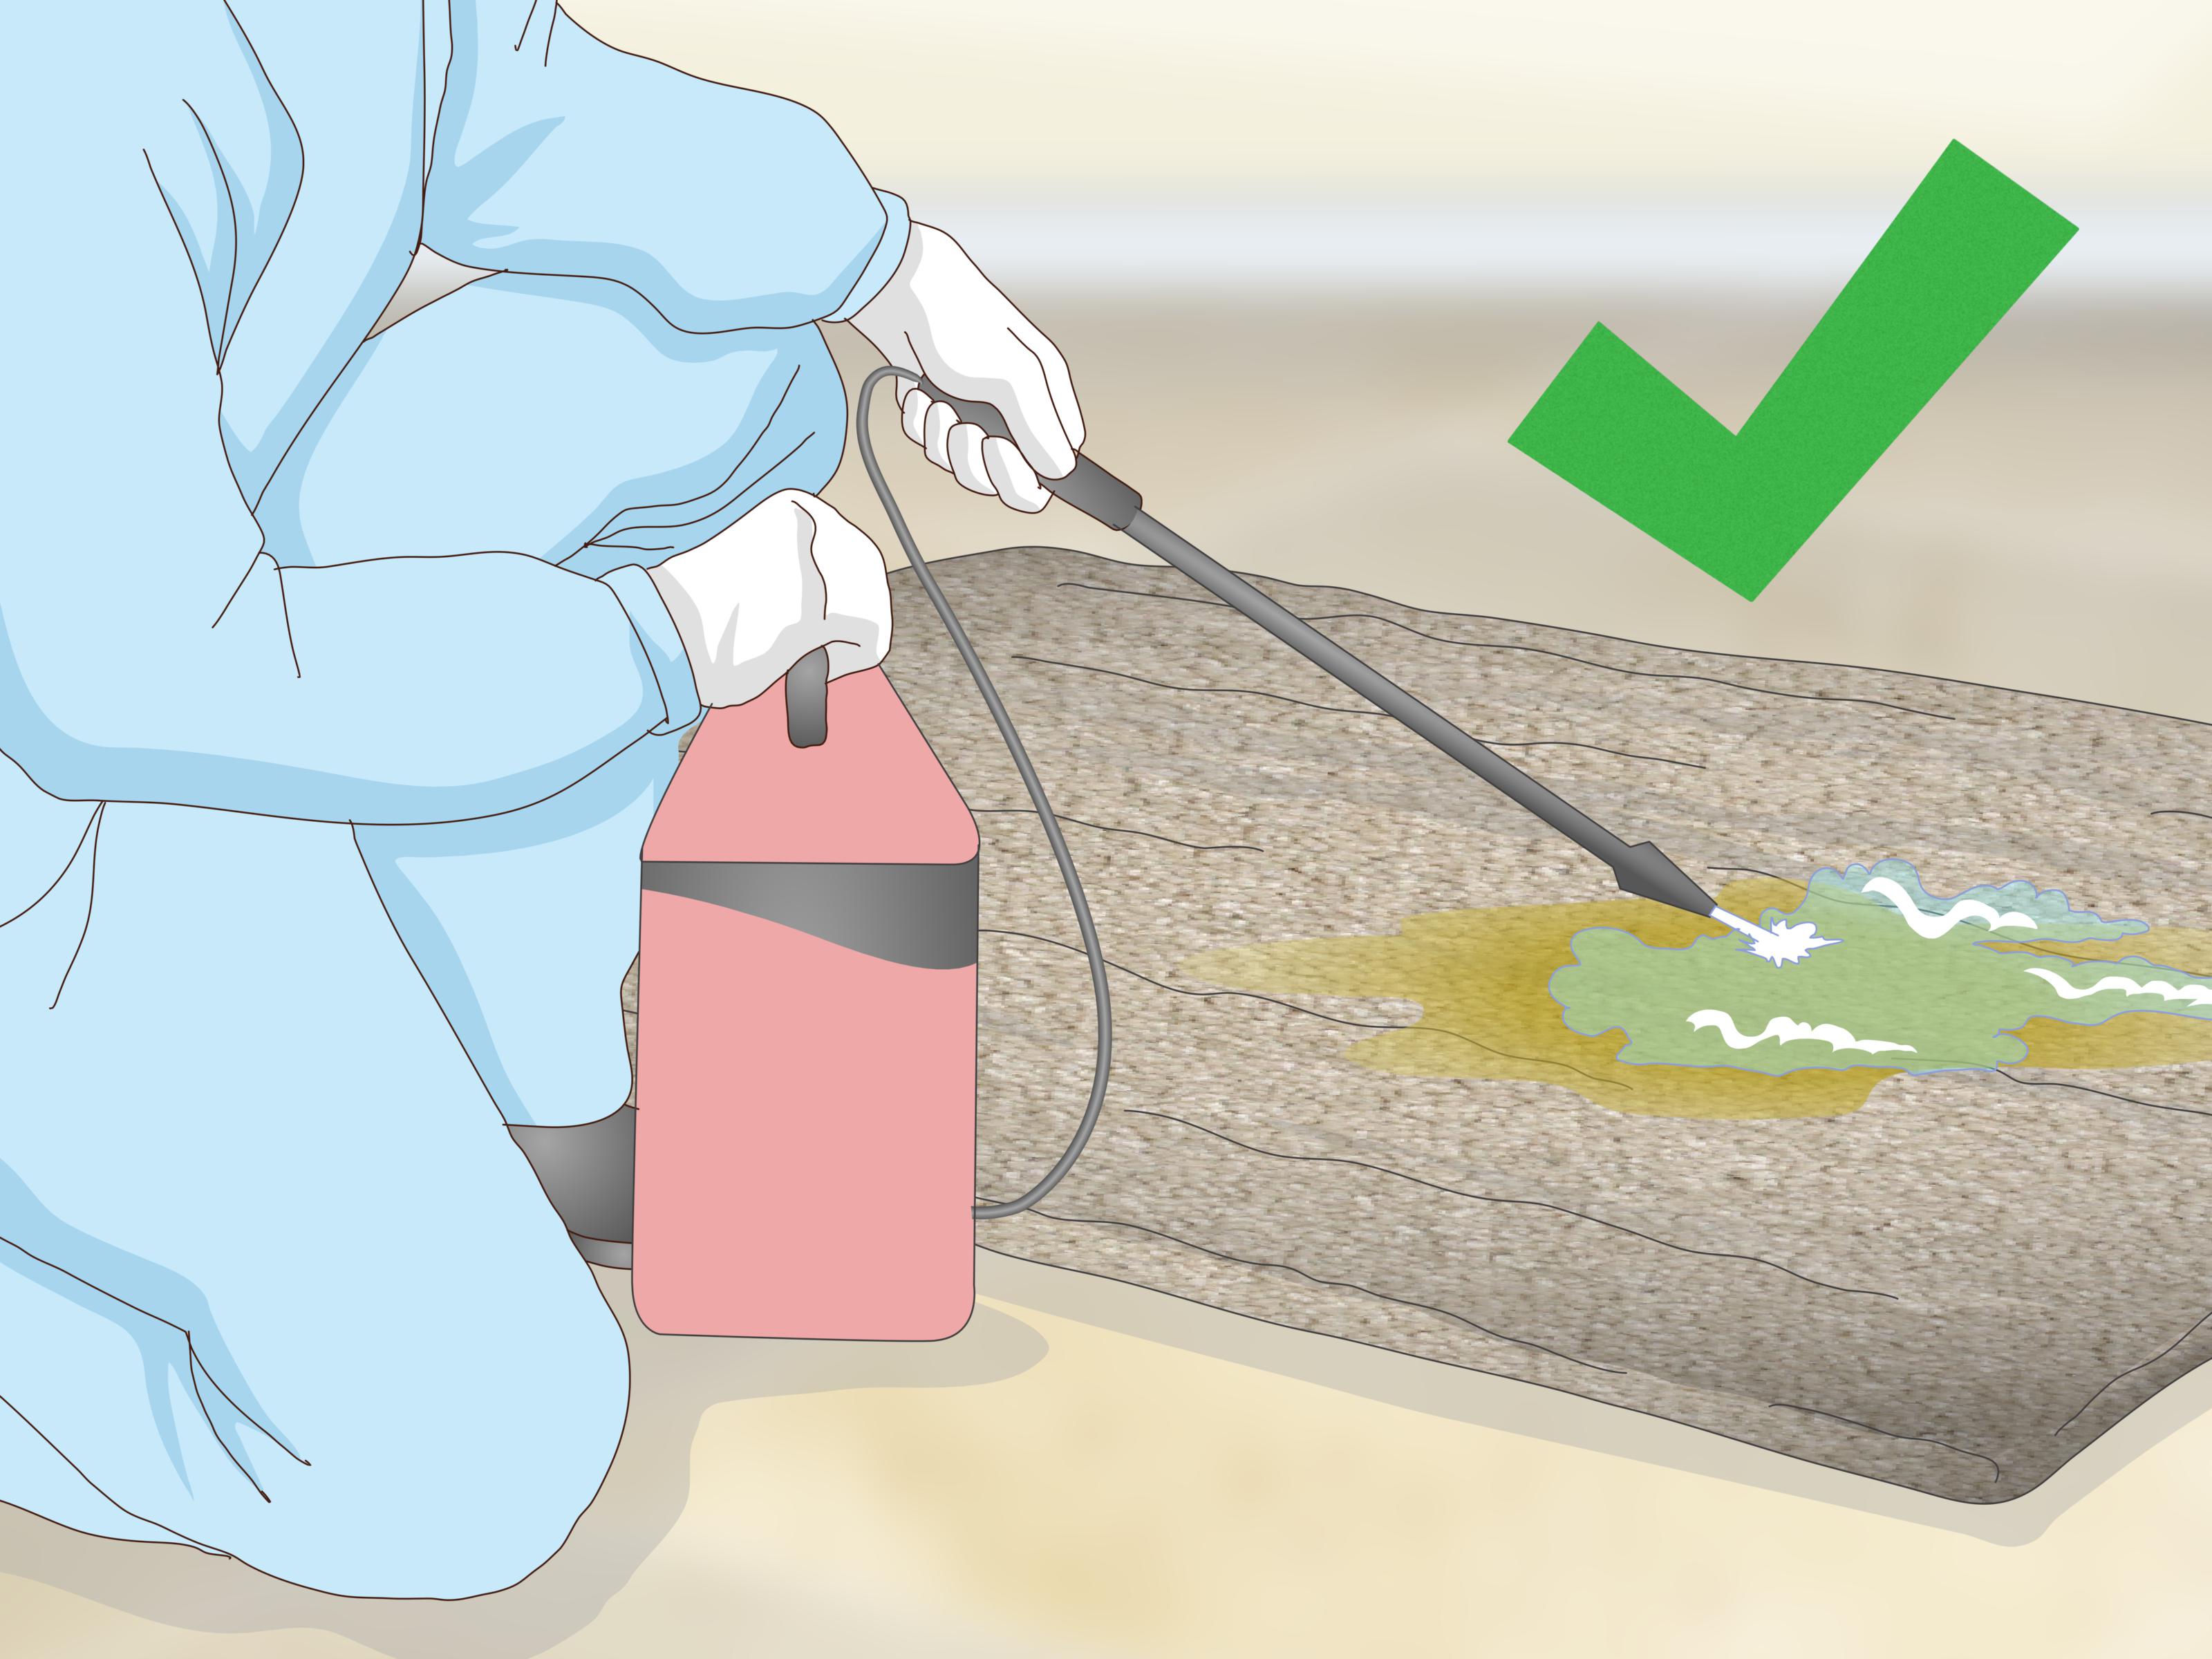
Way #1: Enzymatic “Soak + Dwell + Extract” (Best Overall for Old Urine)
If you want one method that’s most likely to remove both stain + odor, start here. Enzymatic
cleaners are designed to break down the organic components that cause lingering smell and repeat
marking. The key is time: enzymes need a proper dwell period to work.
Works best on
- Carpet and area rugs (especially synthetic fibers)
- Upholstery and pet beds (check fabric codes)
- Mattresses (spot treatment onlydon’t soak)
- Sealed hard surfaces (tile/laminate/vinylmainly for odor)
You’ll need
- Enzymatic pet urine cleaner (follow the label directions)
- White towels or paper towels
- A spray bottle (optional)
- Wet/dry vacuum or carpet extractor (strongly recommended)
- Fan for drying
Step-by-step
-
Rehydrate the stain (if dry): Lightly mist with water. Wait 1–2 minutes.
Blot firmly with towels or extract with a wet/dry vac. -
Apply enzyme cleaner generously: Old urine is rarely just “on the surface.”
For carpet, apply enough product to reach the depth of the contaminationoften more than you think.
If the label says “saturate,” it means saturate. -
Let it dwell: Cover the area with plastic wrap or a clean plastic bag to keep it
from drying too fast. Enzymes work while wet. Typical dwell times range from 10–30 minutes to several
hours depending on product and severity (follow the label). -
Extract again: After dwell time, blot or extract thoroughly. This step matters because
it physically removes dissolved residue and reduces wicking. -
Rinse lightly (optional but helpful): If the surface allows, mist plain water and extract
once more to reduce sticky residue that can attract dirt. -
Dry completely: Use a fan. The area should be bone-dryespecially on carpet pad and
upholsterybefore you judge results.
Pro tips (aka “things that save your sanity”)
-
Repeat for set-in stains: Long-term stains often need 2–3 rounds, especially if urine
soaked into padding. -
Don’t rush to fragrance: Perfume masks odors; it doesn’t remove them. You want “neutral,”
not “mountain breeze.” -
Stop wicking: If the stain reappears after drying, that’s wickingresidue rising from below.
Extracting and repeating treatment usually solves it.
Way #2: Oxygen/Peroxide Spot Lift (Best for Yellowing and “Shadow Stains”)
Sometimes you’ve already handled the odor, but a yellow halo remainsespecially on light carpet,
upholstery, or sealed wood. Oxygen-based cleaners and 3% hydrogen peroxide can help lift the color
left behind by old organic stains. This is the “brightening” method.
Works best on
- Synthetic carpet and rugs (nylon/polyester)
- Washable upholstery (spot-test!)
- Sealed hardwood for localized dark spots (carefully)
A simple peroxide paste (for many carpets)
Mix baking soda with enough 3% hydrogen peroxide to form a spreadable paste. For extra cleaning
power on some stains, you can add a tiny drop of dish soapbut go easy, because soap residue can
attract dirt later.
How to use it safely
- Spot-test first: Peroxide can lighten dyes and some finishes.
- Apply to the stain only: Keep the application tight. You’re treating a target, not painting a mural.
- Let sit briefly: 10–20 minutes is a common dwell window for carpet spot cleaning.
- Blot + rinse: Blot with a damp cloth, then blot again with clean water to remove residue.
- Dry completely: Fan-dry to prevent rings and reduce re-soiling.
For hardwood: the “peroxide compress” technique
If the urine stain is on sealed hardwood and you have a dark spot, you can try a controlled peroxide
compress:
- Lightly clean the area and dry it.
- Saturate a folded paper towel with 3% hydrogen peroxide and place it directly on the spot.
- Cover with plastic wrap to slow evaporation.
- Check every hour. Remove once the stain lightens (this may take a few hours).
- Wipe with a barely damp cloth and dry thoroughly.
If you notice the finish turning dull or the area lightening unevenly, stop. Wood can be unforgiving,
and “just one more hour” is how refinishing projects are born.
When to skip peroxide
- Wool/silk rugs or delicate natural fibers (risk of color loss or damage)
- Unsealed or wax-finished wood
- If you haven’t neutralized odor yet (peroxide can brighten the stain but may not solve the smell)
Way #3: Deep Set Stains in Floors/Subfloors: Treat, Dry, Then Seal (When Needed)
Here’s the hard truth: if urine soaked into carpet padding, crept between floorboards, or penetrated a
wood subfloor, “surface cleaning” may only give temporary relief. In these cases, your winning strategy
is a three-part sequence:
- Treat (enzymes to break down contamination)
- Dry (fullyno shortcuts)
- Seal (odor-blocking primer/sealer when the odor is trapped in the material)
Step 1: Treat the source
Use an enzymatic cleaner on the affected area and allow enough dwell time. If carpet is involved and
the smell returns quickly, the pad may be contaminatedmeaning extraction from the top may not reach
the worst of it.
Step 2: Dry completely (seriously, completely)
Sealing in moisture is a recipe for new problems (including persistent odor and potential damage).
Use fans and give it time. If you’re working on subfloor, drying can take longer than you’d like
which is exactly why so many people try to seal too early.
Step 3: Seal lingering odor in wood/subfloor (when cleaning isn’t enough)
If the area is clean and dry but still smells, odor-blocking primers and shellac-based sealers are often
used to lock in persistent odors so they don’t migrate back into the roomespecially when replacing
carpet or refinishing flooring. Choose a product designed for odor sealing and follow ventilation and
label directions carefully.
Where sealing helps most
- Subfloors under removed carpet
- Wood around old pet areas that still smells after enzyme treatment
- Stained areas you plan to cover with new flooring
When sealing is NOT enough
- Soft, crumbling, or warped subfloor (material damage may require replacement)
- Large areas with repeated saturation (you may be chasing contamination through multiple layers)
If you’re not sure whether you’re dealing with “surface stain” or “deep contamination,” a professional
carpet cleaning/restoration company can help evaluateespecially if you suspect urine has soaked into
pad, underlayment, or multiple flooring layers.
Quick Surface Guide (Choose the Right Method Fast)
- Carpet (visible stain + odor): Start with Way #1. Follow with Way #2 if yellowing remains.
- Area rug (synthetic): Way #1, then a careful Way #2 spot lift.
- Wool rug: Way #1 only (spot-test), or call a rug specialist for set-in stains.
- Upholstery: Way #1 (minimal moisture). Way #2 only if fabric is colorfast.
- Sealed hardwood: Way #1 for odor, then a cautious peroxide compress (Way #2) for dark marks.
- Subfloor/under carpet: Way #3 (treat, dry, seal).
Troubleshooting: “Why Does the Stain Keep Coming Back?”
It disappears wet, then returns when dry
That’s classic wicking. Residue below the surface rises as moisture evaporates. Solution:
extract more thoroughly, rinse lightly, and repeat enzyme treatment.
It looks clean, but the smell returns on humid days
Old urine residue can reactivate with humidity. Focus on Way #1 (longer dwell + better extraction).
If it’s in wood/subfloor, Way #3 may be necessary.
Your dog keeps going back to the same spot
Dogs have powerful noses. Even when you can’t smell anything, trace odor may remain. Use an enzyme
cleaner, let the area fully dry, and block access during drying. Then consider a deterrent approach:
change the routine (more frequent potty breaks), use a washable cover, or place food/toys in the area
after it’s truly clean (many dogs won’t soil where they eat/play).
When to Call in the Pros
- Urine soaked through carpet into pad over a large area
- Odor persists after 2–3 full enzyme treatments with thorough extraction
- Hardwood stains are deep/black and spreading through the grain
- You’re dealing with multiple old spots and want a whole-room reset
A good pro can use specialized extraction and treatmentsand just as importantly, help you confirm
whether replacement or sealing is the only permanent fix.
Real-World Experiences (The “What Actually Happens at Home” Section)
If dog urine stains only happened in neat little circles, this would be the easiest article on the internet.
In real homes, the mess is usually more… creative. Here are a few common situations people run into,
plus what tends to work best when the “basic steps” aren’t cutting it.
Experience #1: The “I cleaned it three times and it’s still there” carpet stain
This usually isn’t because you didn’t try hard enoughit’s because you cleaned the top fibers but left
the deeper contamination in the pad. In many households, the first instinct is to spray a cleaner and
blot until the surface looks better. The carpet appears improved, but the padding underneath acts like
a sponge holding old urine salts and odor. Once humidity rises or you steam-clean the room, the smell
comes back and the stain can “ghost” back to the surface.
In this scenario, the win is almost always extraction. People who switch from “blot-only” to a wet/dry
vacuum or carpet extractor often see a dramatic difference. Even a small wet/dry vac helps pull out
dissolved residue after the enzyme dwell. A fan is also underratedfast drying reduces wicking and
prevents the newly cleaned area from turning into a dirt magnet.
Experience #2: The “yellow halo” that won’t quit
After the odor is gone, a faint yellow ring can remain like a bad memory. This is where oxygen/peroxide
spot treatments shineespecially on light carpets or upholstery. A common mistake is scrubbing hard
(which can rough up fibers and spread the discoloration). The better pattern is: treat small, let it dwell,
blot, rinse, dry, then reassess.
People often get better results when they treat the stain like a slow negotiation instead of a wrestling
match. Two controlled applications with full drying time between them can work better than one intense
scrub session. And the spot-test? Non-negotiable. The only thing worse than an old dog urine stain is a
brand-new “I bleached my carpet” stain.
Experience #3: The hardwood “black spot” surprise
With hardwood, old urine can darken the wood grain and sometimes penetrate below the finishespecially
near gaps or scratches. Homeowners often try surface cleaners first, then wonder why nothing changes.
A peroxide compress can lighten some stains, but it’s a careful, patient process and doesn’t always
restore the wood to “brand new.”
The most successful outcomes usually come from realistic goals: “make it less noticeable” rather than
“erase all evidence my dog once had a bad day.” If the smell remains in the wood or subfloor after
cleaning and drying, sealing can be the practical fixespecially before installing new flooring. It’s not
the most glamorous solution, but it can be the difference between “fresh room” and “mystery odor that
haunts my life.”
Experience #4: The multi-spot home (aka “Where do I even start?”)
When there are multiple old spots, the best strategy is consistency: mark each area, treat one room at a
time, and don’t skip drying. Many people get discouraged because they treat ten spots in one afternoon,
the house smells like cleaner, and then a week later they can’t tell what worked. A simple checklist helps:
spot identified → extracted → enzyme dwell → extracted again → dried → evaluate → peroxide spot-lift if needed.
Finally, a reality check that’s oddly comforting: even “perfect” cleaning sometimes can’t reverse damage
when urine has repeatedly soaked into pads, underlayment, or raw wood. If you end up needing to seal or
replace materials, that’s not failureit’s just physics, chemistry, and the fact that dogs didn’t consult your
flooring warranty before making decisions.
Conclusion
To remove old dog urine stains successfully, match the method to the problem:
enzymes for deep organic residue (Way #1), oxygen/peroxide for lingering discoloration (Way #2),
and treat–dry–seal for urine that penetrated wood or subfloor (Way #3). Take your time, extract more
than you think you need to, and let everything dry fully before deciding whether the stain is truly gone.
With the right approach, you can usually get your floors and fabrics back to looking (and smelling) like
your dog has never made a questionable life choice in the living room. Almost.