Note: This article is written in original American English and synthesized from reputable DIY, tile-installation, tool, and safety guidance. No source-link elements or citation placeholders are included in the HTML.
Marble tile has a talent for making any room look expensive, calm, and slightly better dressed than everyone else. It also has a second talent: reminding DIYers that natural stone is not the same as a forgiving sheet of plywood. Cut it too fast, use the wrong blade, or skip the setup, and your elegant tile can turn into a pricey puzzle piece with an attitude problem.
The good news is that learning how to cut marble tiles is completely manageable when you choose the right tool for the job. The three most useful methods are cutting with a wet saw, shaping with an angle grinder, and using a manual score-and-snap approach only for certain thin, straight cuts. Each method has a place, but they are not interchangeable. Marble is a natural stone, which means it can contain veins, tiny fissures, and softer or harder areas that react differently under pressure.
This guide explains three ways to cut marble tile safely and cleanly, including what tools to use, how to avoid chips, when to slow down, and how to finish rough edges so your project looks intentional instead of “I watched one video and trusted my confidence.”
Before You Start: Understand Marble Tile
Marble is a metamorphic natural stone, usually made mostly from calcite or dolomite. In normal-person language, that means it is beautiful, dense, polishable, and less predictable than manufactured ceramic or porcelain tile. The same dramatic veining that makes marble stunning can also create weak points where a tile may chip or crack if handled roughly.
Because marble is softer than granite but still hard enough to require a diamond blade, the goal is not brute force. The goal is control. A clean marble tile cut depends on steady support, water cooling when possible, sharp blades, light pressure, and patience. If you try to win a race against marble, marble usually winsand sends you back to the store for another box.
Tools and Supplies You May Need
- Wet tile saw with a continuous-rim diamond blade
- Angle grinder with a diamond blade for stone
- Manual tile cutter for limited straight cuts on suitable thin tile
- Measuring tape, pencil, grease pencil, or washable marker
- Straightedge, square, or painter’s tape
- Clamps and a sturdy work surface
- Safety glasses, hearing protection, gloves, and a respirator or dust mask
- Rubbing stone, diamond hand pad, or fine-grit sandpaper for edge finishing
- Scrap tile for practice cuts
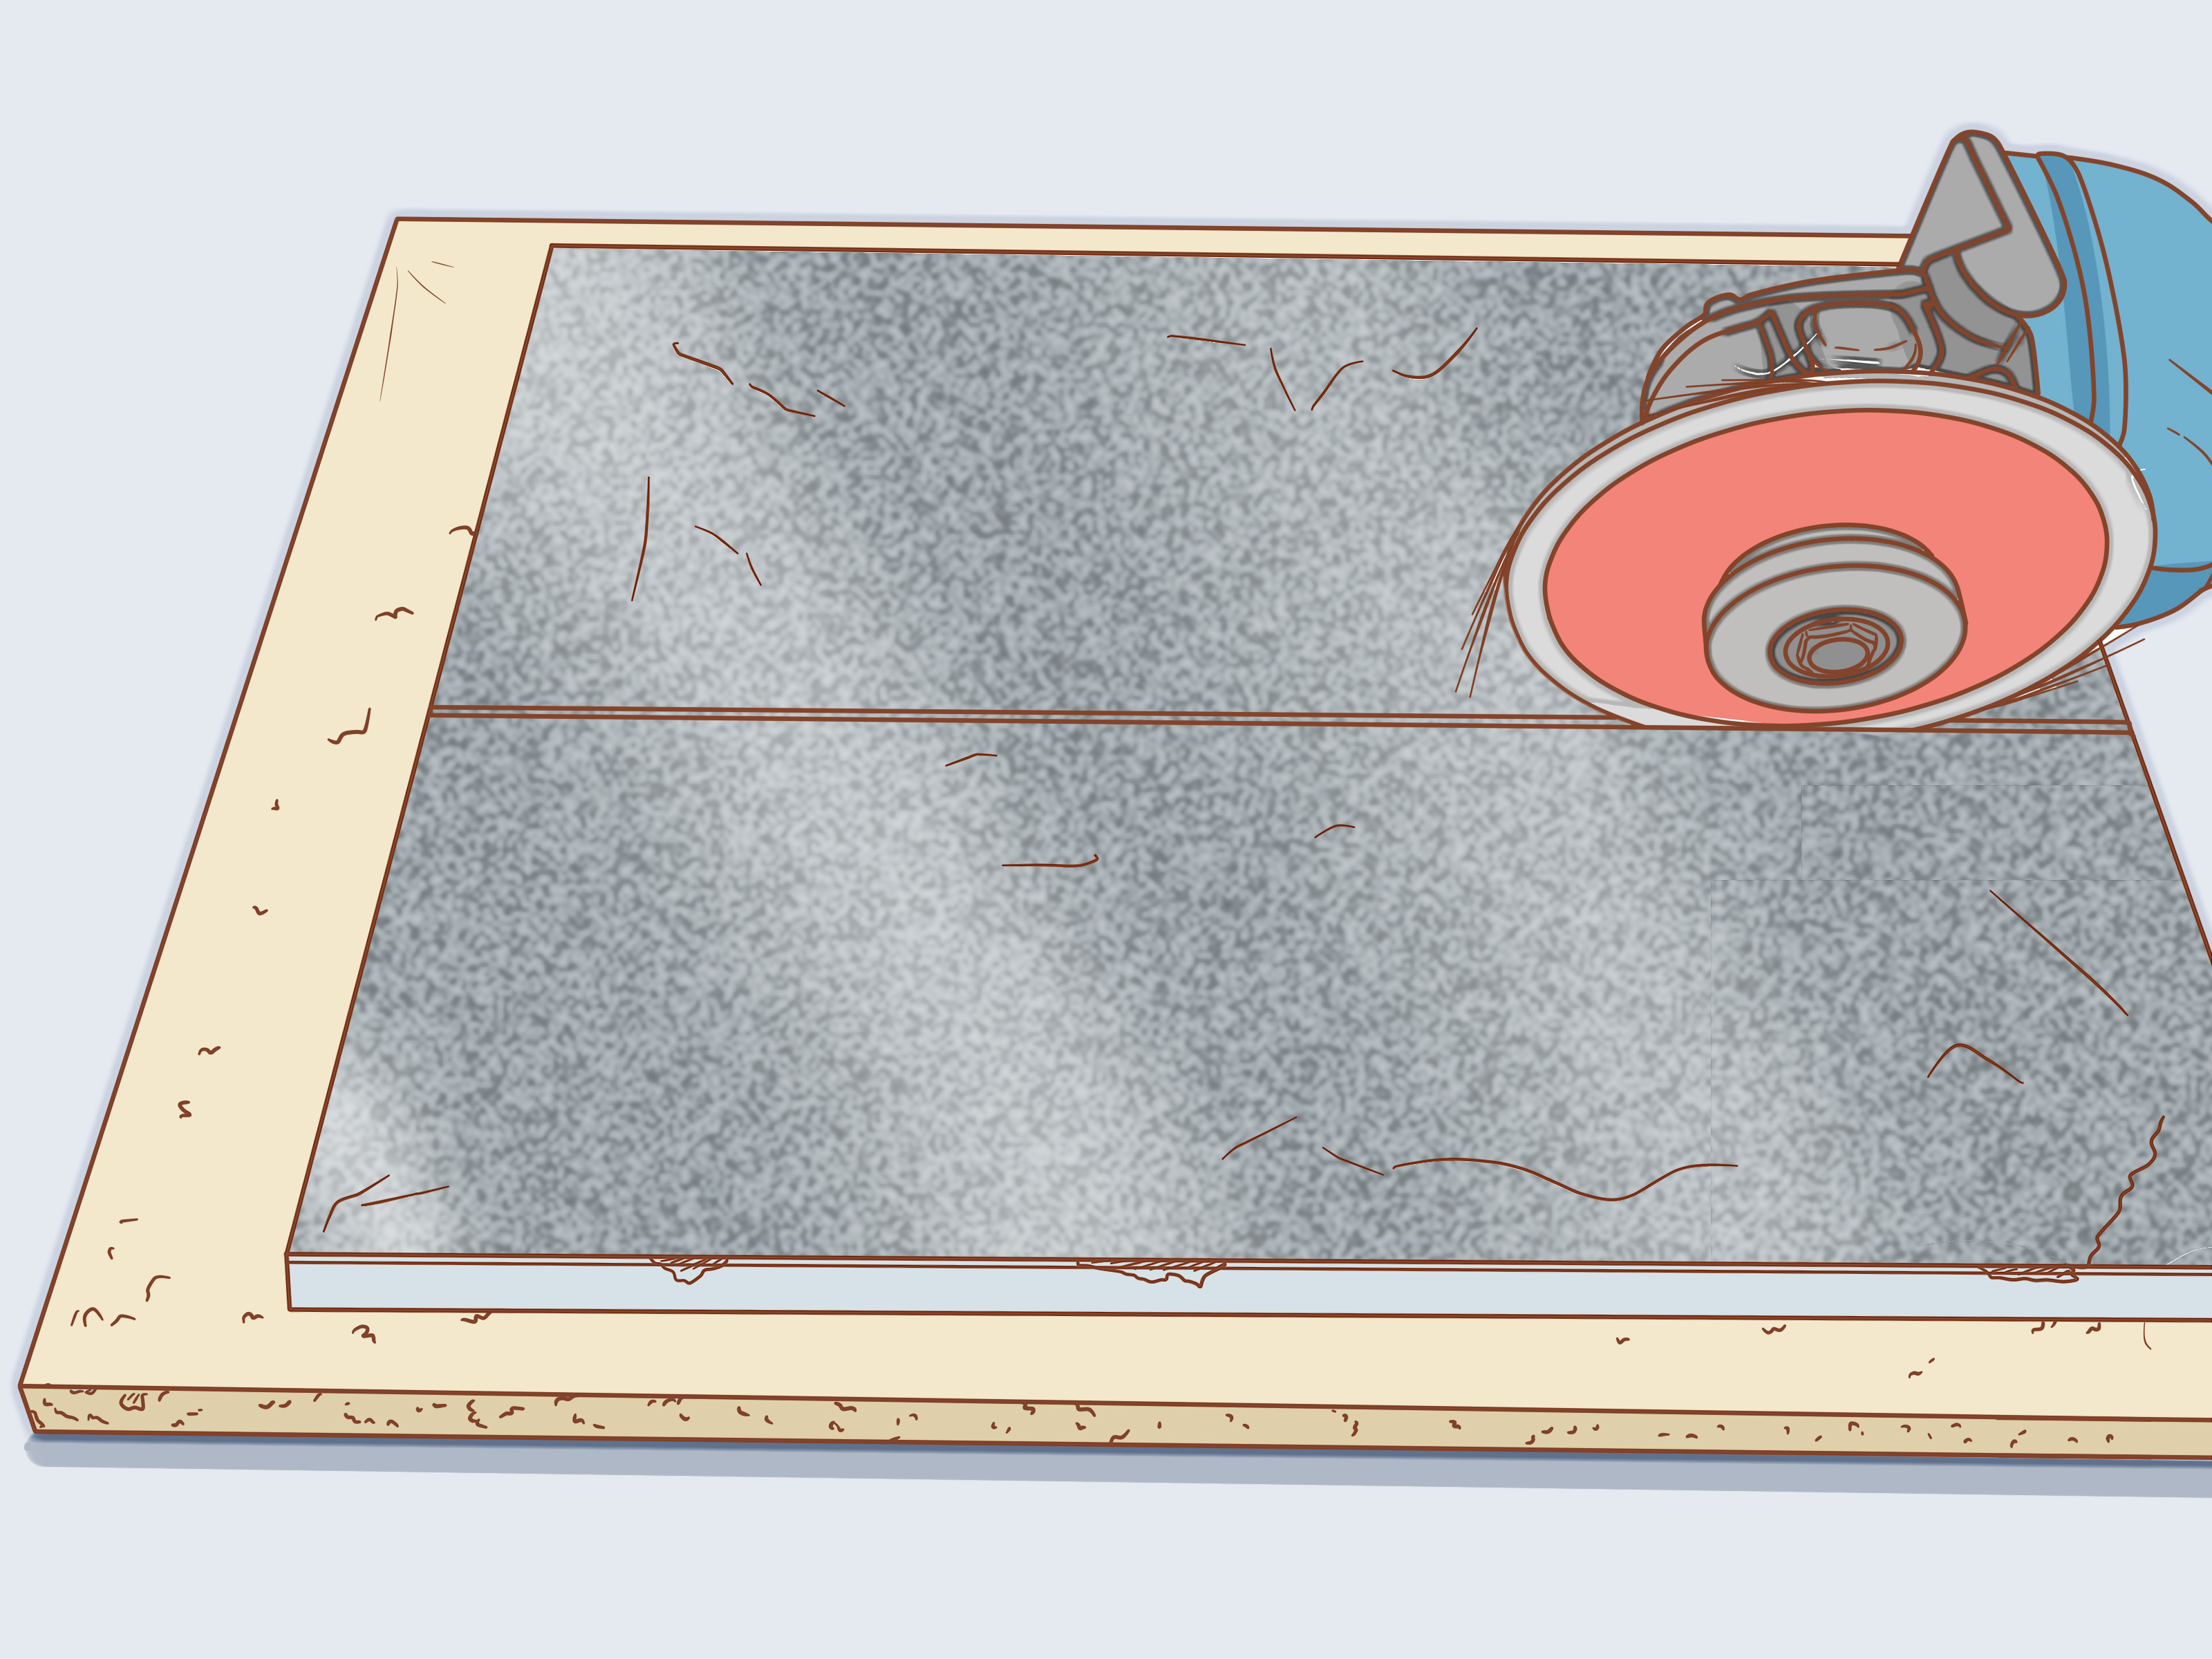
Way 1: Cut Marble Tiles With a Wet Saw
If you remember only one thing from this article, let it be this: for most marble tile projects, a wet saw is the best tool. It is the cleanest, most reliable method for straight cuts, diagonal cuts, notches, and repeated cuts. A wet saw uses a diamond blade cooled by water, which helps reduce heat, dust, and chipping. Marble appreciates this civilized approach. Think of it as giving the stone a spa day while slicing it in half.
Best For
A wet saw is ideal for floor tile, wall tile, backsplash tile, shower tile, large-format marble, thick natural stone, long straight cuts, diagonal cuts, and professional-looking edges. If your marble tile is expensive, highly polished, heavily veined, or larger than a small accent piece, choose the wet saw.
Step 1: Choose the Right Blade
Use a continuous-rim diamond blade designed for stone or tile. A segmented blade may cut aggressively, but it can increase chipping on polished marble. A dull blade is also a problem. If the blade wanders, burns, chips badly, or makes the motor sound like it is reconsidering its life choices, stop and inspect it.
Step 2: Measure and Mark Carefully
Measure the opening where the tile will fit, then transfer the measurement to the marble. Use a pencil, washable marker, or tape line. On polished marble, painter’s tape can make the mark easier to see and may help reduce minor surface chipping. Always mark the face of the tile unless your saw setup requires otherwise.
Step 3: Set Up the Wet Saw
Fill the reservoir with clean water and confirm that water flows onto the blade before you cut. Set the fence or guide so the tile stays straight. Check that the saw table is clean, flat, and free of grit that could scratch the marble’s polished face. Place the tile face-up if the saw blade cuts downward into the surface, which is common on many tabletop wet saws.
Step 4: Cut Slowly and Steadily
Turn on the saw and let the blade reach full speed. Push the tile into the blade with gentle, even pressure. Do not force it. Let the diamond blade grind through the stone. If the tile vibrates, chatters, or begins to chip, slow down. Keep both hands away from the blade path and use push blocks or a guide for small pieces.
For long cuts, support the full tile so it does not sag near the end. Marble can break at the final inch if the offcut is unsupported. For extra-delicate pieces, cut almost to the end, pause, rotate the tile, and finish from the opposite side. This can reduce breakout at the edge.
Step 5: Smooth the Edge
Even a good wet saw cut may leave a slightly sharp or frosted edge. Smooth it with a rubbing stone, diamond hand pad, or fine-grit sandpaper. Use light passes and avoid rounding the visible edge unless that is the look you want. For exposed marble edges, polishing pads in progressively finer grits can create a more finished appearance.
Wet Saw Tips for Better Marble Cuts
- Practice on a scrap piece before cutting the tile that matters.
- Use fresh water; dirty slurry can scratch polished marble.
- Cut with the finished face supported and protected.
- Slow down at the beginning and end of each cut.
- Do not push harder to “help” the saw. The saw does not need emotional support.
Way 2: Cut Marble Tiles With an Angle Grinder
An angle grinder is the tool you use when a wet saw cannot easily reach the shape you need. It is excellent for curved cuts, small notches, outlet openings, toilet flanges, pipe cutouts, and trimming tile that needs custom shaping. However, it is also loud, dusty, and less forgiving than a wet saw. Use it with respect, not swagger.
Best For
Use an angle grinder for curved cuts, L-shaped cuts, U-shaped cuts, small adjustments, and cuts around plumbing or fixtures. It is especially useful when you need to remove small amounts of marble rather than slice an entire tile in a perfect straight line.
Step 1: Use a Diamond Blade
Install a diamond blade rated for stone or tile. A continuous-rim or turbo diamond blade can work, depending on the cut and tool. Check the blade direction and tighten it properly. Never use a damaged blade. A cracked blade spinning at high speed is not a plot twist anyone needs.
Step 2: Mark the Cut on Tape
Apply painter’s tape where the cut will go, then draw the line on the tape. This makes the line easier to follow and can help reduce small chips. For round pipe cuts, trace the opening with a template or mark the radius with a compass. For square notches, mark both cut lines clearly and identify the waste area so you do not cut the wrong side.
Step 3: Clamp the Tile Securely
Set the marble tile on a padded, stable work surface. Clamp it gently but firmly. Do not clamp directly onto polished marble without protection; use scrap wood, cardboard, or a soft pad between the clamp and tile. The tile should not move while cutting.
Step 4: Score First, Then Deepen the Cut
Start with a shallow scoring pass along the marked line. This creates a guide and reduces the chance of the blade wandering. Then deepen the cut in multiple passes. Avoid trying to cut through thick marble in one heroic plunge. Marble rewards patience and punishes drama.
If you are cutting a curve, make several small relief cuts up to the curved line, then nibble away the waste and refine the edge. For an L-cut, cut both lines carefully and stop just before the inside corner. Finish the corner gradually to avoid overcutting past the visible line.
Step 5: Control Dust and Heat
Dry grinding marble creates fine dust. Work outdoors when possible, wear eye protection, hearing protection, gloves, and a properly fitted respirator. If your grinder and blade are designed for wet use, follow the manufacturer’s instructions for water control. Never mix water with an electric tool unless the tool is specifically rated for that setup.
Step 6: Refine the Edge
After cutting, use a diamond hand pad, rubbing stone, or sandpaper to smooth the edge. For holes and curves, wrap sandpaper around a dowel or use a round diamond file. Test-fit the tile before installation. If the cut will be hidden by a cover plate, flange, trim, or caulk line, it does not need to look like it belongs in a museum. It just needs to fit cleanly.
Angle Grinder Tips for Marble Tile
- Keep the grinder moving; lingering in one spot can overheat the stone.
- Use light pressure and let the blade cut.
- Do not twist the grinder during a cut.
- Make shallow passes instead of one deep cut.
- Plan for dust before you start, not after your garage looks like a powdered donut.
Way 3: Cut Marble Tiles With a Manual Cutter or Score-and-Snap Method
This method needs an honest warning: manual score-and-snap cutters are usually better suited to ceramic and some porcelain tiles than to natural stone. Marble does not always snap predictably because it contains natural veining and internal variation. That said, some thin marble tiles or marble mosaics may be trimmed with scoring tools or manual cutters in limited situations, especially when the cut is straight, narrow, and not highly visible.
Best For
Use this method only for small, thin marble pieces, straight cuts, test pieces, or situations where the cut edge will be hidden under trim. For thick marble, polished marble, expensive tile, or any cut that must be perfect, use a wet saw instead.
Step 1: Test First
Before committing, test the method on a spare tile from the same batch. Marble varies from piece to piece. If the test tile fractures along a vein or breaks unevenly, congratulationsyou have received your answer. Switch to a wet saw.
Step 2: Mark a Straight Line
Use a straightedge and mark the cut line clearly. Make sure the tile is fully supported on the cutter bed. If using a handheld scoring tool, place the tile on a flat, stable surface with the line positioned for controlled snapping.
Step 3: Score Once With Firm Pressure
Run the scoring wheel or carbide-tipped tool along the line in one controlled pass. Do not saw back and forth. Multiple uneven passes can create tiny fractures and make the break jagged. The goal is to create one clean weakness line.
Step 4: Snap Gently
Apply even pressure on both sides of the score line. If using a manual cutter, press the breaker foot down steadily. If snapping by hand over a raised edge, support both sides and press slowly. Do not pound the tile. Marble is fancy, not indestructible.
Step 5: Dress the Edge
Use a rubbing stone or diamond pad to smooth the edge. If the break is uneven but the tile still fits under baseboard, cabinet toe-kick, or trim, it may be acceptable. If the edge will be visible, cut a replacement piece with a wet saw.
Manual Cutting Tips
- Use this method only after a successful test cut.
- Avoid pieces with dramatic veins crossing the cut line.
- Do not use manual cutters for curves or notches.
- Expect more waste than with a wet saw.
- When in doubt, choose the wet saw and protect your marble budget.
How to Prevent Chipping When Cutting Marble Tile
Chipping is the villain in nearly every marble-cutting story. To reduce it, use a sharp diamond blade, support the tile completely, cut slowly, and avoid pushing the tile too fast. Painter’s tape over the cut line can help on polished surfaces. Starting the cut gently and slowing down near the exit edge are also important because many chips happen at the beginning or end of the cut.
If you are cutting a visible edge, consider leaving the line slightly oversized and then polishing or grinding down to the final mark. This takes longer, but marble is not a speed sport. A few extra minutes can save a tile that costs more than dinner.
Safety Matters: Dust, Water, Noise, and Sharp Edges
Cutting marble can create dust, slurry, noise, and sharp fragments. Wear safety glasses every time. Use hearing protection with wet saws and grinders. Wear gloves when handling cut tile, because marble edges can be surprisingly sharp. For dry cutting or grinding, use respiratory protection and work outdoors if possible.
Wet cutting reduces airborne dust, but it creates slurry. Clean it before it dries, because dried stone slurry can become dust again. Keep electrical cords and plugs away from water. Use GFCI-protected outlets when operating wet tools. If you are unsure whether your tool is rated for wet use, assume it is not until the manual confirms otherwise.
Common Mistakes to Avoid
Using the Wrong Blade
A general-purpose blade may cut, but it can chip the marble badly. Use a diamond blade made for tile or natural stone.
Forcing the Cut
Pushing harder does not make marble behave. It increases heat, vibration, and breakage. Let the blade do the work.
Skipping Practice Cuts
Practice cuts reveal how your specific tile responds. This is especially important with veined marble.
Cutting Without Support
Unsupported tile can crack near the end of the cut. Support both the main piece and the offcut.
Ignoring Edge Finishing
A cut edge often needs smoothing. Even if the cut is hidden, removing sharp edges makes installation safer.
Which Marble Tile Cutting Method Should You Choose?
Choose a wet saw for most marble tile cuts, especially straight cuts, diagonal cuts, and visible edges. Choose an angle grinder for curves, holes, and small custom shapes. Use a manual cutter only for thin tiles, hidden straight cuts, and after testing successfully on a spare piece.
If your project includes a full bathroom floor, shower wall, kitchen backsplash, fireplace surround, or any installation where the edges will be seen, renting or buying a wet saw is usually worth it. If you only need one small notch behind a pipe cover, an angle grinder may be enough. If you are trying to cut premium marble with a cheap snap cutter and hope, please pause. Hope is not a cutting tool.
Experience-Based Tips for Cutting Marble Tiles
One of the biggest lessons from working with marble tile is that setup often matters more than the actual cut. Many beginners focus only on the tool, but the tile’s support, the clarity of the mark, the blade condition, and the cutting speed all decide the result. A wet saw with a good blade can still chip marble if the tile wobbles. A careful DIYer with a modest saw can make beautiful cuts if the tile is stable, the water is flowing, and the feed rate is slow.
Another practical lesson is to sort your tiles before cutting. Marble tiles from the same box may vary in veining, color, and strength. Put the most attractive pieces in visible areas and save tiles with awkward veins, small chips, or less desirable patterning for cuts along walls or under cabinets. This simple habit reduces waste and makes the final installation look more intentional. It also prevents that painful moment when you realize your prettiest tile is now hidden behind the toilet.
For polished marble, always protect the face. A few grains of stone slurry or sand on the saw table can scratch the surface while you slide the tile through the blade. Wipe the table often, rinse the tile, and avoid dragging the polished face across rough surfaces. When possible, place a clean towel, cardboard, or foam pad nearby so finished pieces have a safe landing zone.
When making repeated cuts, label your pieces. Marble projects often involve many similar-looking tiles, and it is easy to cut a left-side piece when you needed a right-side piece. Mark the back of each tile with its location, direction, and orientation. Use arrows when matching veining across neighboring tiles. This may feel overly careful at first, but it saves time during installation and helps maintain the flow of the stone pattern.
For notches and outlet cuts, sneak up on the final size. Cut slightly inside the waste area first, test the fit, then refine the opening. Cover plates and trim can hide small imperfections, but oversized cuts are harder to fix. With marble, removing a little more material is easy. Putting material back is the part where everyone suddenly becomes very quiet.
Finally, expect a learning curve. Even skilled installers occasionally lose a marble tile to a hidden fissure or an unlucky vein. Buy extra tile, especially for natural stone. A common rule of thumb is to purchase more than the exact square footage to allow for cuts, pattern matching, breakage, and future repairs. Marble is too distinctive to assume you can easily find a perfect match later.
The best experience-based advice is simple: slow down. Marble cutting is not difficult because it is mysterious; it is difficult because it punishes rushing. Measure carefully, cut patiently, finish the edges, and test-fit everything before applying mortar. Do that, and your marble tile project can look polished, professional, and far more expensive than the tool rental receipt.
Conclusion
Cutting marble tiles successfully comes down to matching the method to the cut. A wet saw is the top choice for clean, accurate marble cuts. An angle grinder is useful for curves, holes, and custom shapes. A manual cutter can work only in limited cases with thin marble and hidden straight cuts, but it should never be your first choice for premium natural stone.
Marble may be elegant, but it is not impossible. With a diamond blade, steady support, careful measuring, dust control, and a little patience, you can make cuts that fit beautifully and keep the stone’s natural beauty intact. Treat each tile like it matters, because with marble, it usually does.