If you have a painted terracotta pot that no longer matches your style, do not banish it to the sad corner of the garage where forgotten craft supplies go to question their purpose. Give it a second life. A faux concrete finish can turn a bright, glossy, slightly chaotic flowerpot into something that looks modern, expensive, and suspiciously designer for a fraction of the price.
That is the magic of this project. You keep the shape and usefulness of terracotta, but visually trade the “craft day in 2019” vibe for a clean, earthy, architectural look. Faux concrete pots work beautifully with succulents, snake plants, pothos, rosemary, lavender, olive trees, and even a dramatic fiddle-leaf fig if you are feeling bold and emotionally prepared. Best of all, the finish does not have to be perfect. Real concrete is full of tiny shifts in tone, soft patches, cloudy texture, and the occasional charming imperfection. In other words, this project rewards a relaxed hand.
In this guide, you will learn exactly how to transform a painted terracotta pot into a faux concrete pot that looks elevated, natural, and web-publishing worthy. We will cover materials, prep, painting techniques, texture tricks, styling ideas, and the mistakes that make a pot look like gray frosting instead of stone. Because yes, there is a difference.
Why a Faux Concrete Pot Is Worth the Effort
Concrete planters are popular because they feel grounded, minimalist, and expensive without shouting about it. They pair well with modern, Scandinavian, rustic, industrial, coastal, and even farmhouse spaces. They also let plants be the star. The neutral gray tone does not compete with glossy leaves, colorful blooms, or trailing vines. It simply says, “I have my life together,” even if you are repotting a basil plant at midnight.
But real concrete pots can be heavy, costly, and not exactly fun to move once filled. Terracotta is lighter, easier to find, and already made for planting. Up-styling one into a faux concrete pot lets you get the look without the backache. It is also a smart upcycling project. Instead of tossing an old painted pot, you refresh it with a finish that is timeless and easier to decorate around.
What You Need for This DIY Faux Concrete Pot Project
Basic supplies
- One painted terracotta pot
- Mild soap and water
- Microfiber cloth or lint-free rag
- Fine-grit sandpaper
- All-surface primer or a matte base coat
- Acrylic craft paint or multi-surface paint in gray, white, black, and taupe
- Foam brush, chip brush, or old paintbrush
- Small sponge or damp rag
- Painter’s tape if you want a crisp rim or clean interior line
- Matte sealer suitable for your intended use
- Drop cloth or kraft paper
Optional supplies for extra texture
- Baking soda mixed into acrylic paint for subtle grit
- Textured paint medium
- Joint compound or lightweight spackle for a thicker cement-style finish
- Charcoal or dark wax for an aged look
The goal is not to make the pot perfectly smooth. The goal is to create believable variation. Faux concrete looks best when it has soft layers, chalky depth, and a slightly weathered personality.
Step 1: Clean the Pot Like You Mean It
Before you start painting, clean the pot thoroughly. Dust, soil residue, mineral buildup, and old grime will mess with adhesion. Wash the painted terracotta pot with mild soap and water, then let it dry completely. Do not rush this step. Paint over moisture and your beautiful faux concrete finish may later peel like it is trying to escape responsibility.
If the old painted surface is glossy, lightly sand it. You are not trying to remove every bit of the previous finish. You just want to dull the surface enough so the new layers grip properly. Wipe away sanding dust with a clean cloth.
Step 2: Decide What Kind of Faux Concrete Look You Want
Not all faux concrete finishes look the same. That is good news, because you can tailor the pot to your space.
Soft modern concrete
This finish is smooth, cloudy, and matte. Think clean shelves, neutral decor, and a plant that probably has a stylish Latin name.
Weathered concrete
This look has more tonal contrast, with smoky patches, pale highlights, and a bit of age. It works well in cottage, rustic, and collected interiors.
Chunky cement texture
This version has more grit and body. It looks handmade and slightly imperfect in the best way. Great for patios, porches, and statement planters.
Choose one style before you begin so you do not accidentally wander from “minimalist stone” into “mysterious gray casserole dish.”
Step 3: Prime the Pot for a Better Finish
Priming helps the new paint adhere more evenly, especially on a previously painted pot with mixed texture or shine. Use an all-surface primer or a matte neutral base. White, light gray, or greige works well. If the old pot has bold patterns or bright colors, two thin coats may be better than one heavy coat.
Let the primer dry fully according to the product label. This part is not glamorous, but it matters. A faux concrete finish looks best when the layers stay soft and matte, not tacky and overworked.
Step 4: Build the Base Color
Concrete is rarely one flat gray. Real concrete usually contains warm undertones, cool shadows, and tiny color shifts. That means the prettiest faux concrete pots are usually made with a blend, not a single color.
A good starter mix is:
- 2 parts medium gray
- 1 part white
- A tiny touch of black
- An optional dab of taupe or beige to warm it up
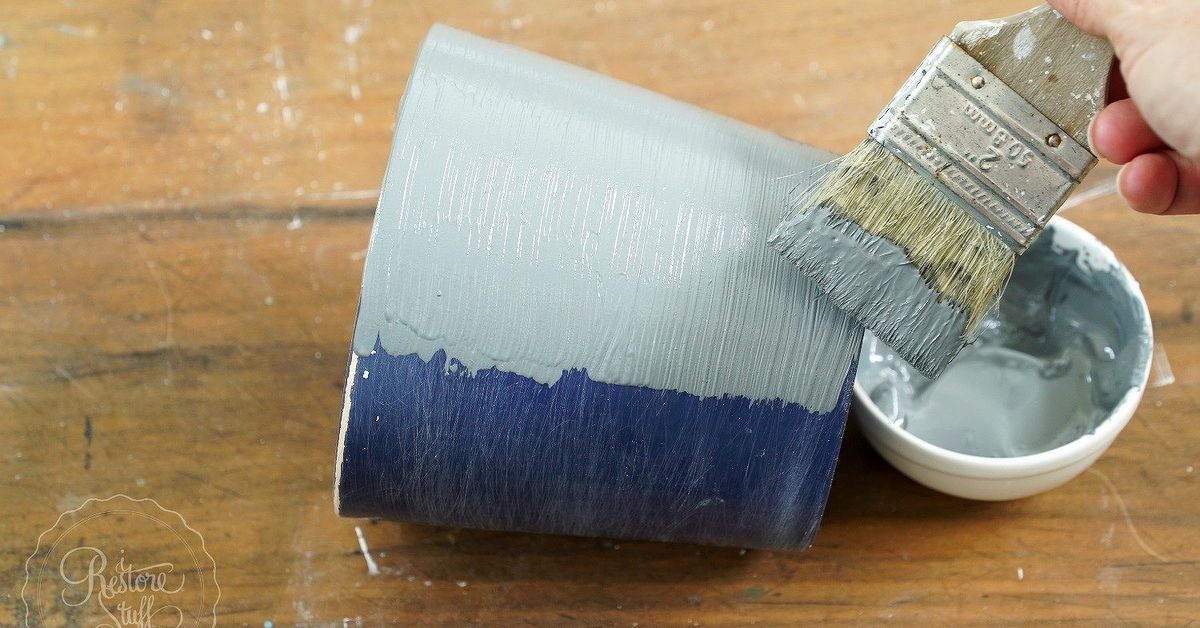
Apply the base coat with a foam brush for a smoother finish or a chip brush for more texture. Use uneven, natural strokes. If you want a more modern look, brush mostly in one direction. If you want a rougher cement feel, vary the stroke pattern slightly. Let that coat dry.
Do not panic if it looks plain at this stage. Most faux finishes look underwhelming halfway through. This is normal. So is doubting your life choices between coat one and coat two.
Step 5: Create a Faux Concrete Texture
Now comes the fun part: making the pot look like stone instead of painted clay.
Technique 1: Dry brushing
Dip the tip of a dry brush into a lighter gray or off-white paint, then wipe most of it off on a rag. Skim the brush lightly across the pot. This catches high points and creates natural variation. It is one of the easiest ways to fake a concrete finish without overthinking it.
Technique 2: Sponge mottling
Use a damp sponge to dab on slightly darker and lighter shades of gray. Blend as you go. This creates the cloudy, mineral-like tone changes that make concrete feel real.
Technique 3: Baking soda paint
Mix a little baking soda into acrylic paint to create a fine, gritty texture. Apply it in thin layers, especially around the lower half of the pot or on the rim. This adds subtle tooth without making the surface look lumpy.
Technique 4: Smudged wash
Thin a darker gray paint with a bit of water, brush on a light wash, then immediately soften it with a rag. This creates shadowy patches that mimic weathered cement.
The secret is restraint. Add texture gradually. Stand back between layers. If everything is the same shade and density, it will look flat. If every inch is aggressively textured, it may look like the pot lost an argument with wet drywall.
Step 6: Make the Rim and Details Look Real
The rim is where faux finishes often become convincing. Real concrete planters usually have slightly darker edges, soft wear marks, or tonal buildup near the top and bottom. Dry-brush the rim with a paler gray, then add a few smoky touches underneath it. You can also feather a tiny amount of charcoal gray around the drainage area or lower edge to suggest age and natural use.
If your pot has a matching saucer, paint it too. A faux concrete pot sitting on a bright orange saucer is a plot twist nobody asked for.
Step 7: Seal It the Smart Way
Sealing depends on how you plan to use the pot.
For decorative indoor use
A matte clear sealer helps preserve the finish and makes the pot easier to wipe clean. If the pot will sit on a wood shelf or tabletop, sealing can also help reduce moisture transfer.
For outdoor use
Use an exterior-rated matte or low-sheen sealer. Skip heavily glossy products unless you want your faux concrete pot to look like it moisturizes daily. Concrete should read soft and natural, not shiny.
For direct planting
Keep the drainage hole open. That part is non-negotiable. Also avoid clogging the interior with thick layers of product. If you want the easiest route, use the finished pot as a cachepot and place a nursery pot inside it. You keep the look, preserve drainage, and simplify watering. If you plant directly into it, use a saucer and let the pot dry properly between waterings.
And no, do not put rocks in the bottom to “improve drainage.” That old gardening myth refuses to retire, but it does not do your plants any favors.
How to Style a Faux Concrete Pot
One of the best things about this DIY planter makeover is how flexible it is. A faux concrete pot can look sleek or relaxed depending on the plant and the room.
Best plants for the look
- Snake plant for a clean architectural vibe
- Pothos for soft trailing contrast
- Succulents for a sculptural tabletop display
- Lavender or rosemary for a Mediterranean feel
- Rubber plant for glossy leaves against matte texture
Easy styling examples
Place one medium faux concrete pot on an entry console with a trailing pothos and a stack of books for a simple modern look. Group three pots in different sizes on a patio step for an upscale outdoor display. Pair a tall faux concrete planter with a black metal plant stand for a minimalist corner that looks far more expensive than it is. That is not lying. That is decorating.
Common Mistakes to Avoid
Using only one gray
Flat gray paint can look lifeless. Blend warm and cool tones for more realism.
Skipping prep
Dust, gloss, and leftover grime are not your creative partners. Clean and lightly sand first.
Applying thick coats
Several thin coats look more natural and tend to dry better than one heavy layer.
Choosing the wrong finish
High gloss is great for a lacquered vase, not so much for faux concrete. Stick with matte, chalky, or softly weathered finishes.
Using indoor-only texture products outside
Some stone-look spray products are decorative and intended only for indoor use. Read the label before using them on porch or patio planters.
Forgetting about weather
Terracotta is porous. In freezing weather, moisture can cause cracking. If you use the pot outdoors in colder climates, move it to a sheltered area when temperatures drop.
Final Thoughts
Up-styling a painted terracotta pot into a faux concrete pot is one of those rare DIY projects that is affordable, forgiving, and genuinely stylish. You do not need a workshop, a power tool collection, or nerves of steel. You just need a pot, a few layers of thoughtful paint, and permission to let the finish be imperfect.
The beauty of faux concrete is that it is supposed to feel organic. Slight tonal shifts, soft patches, weathered edges, and subtle grit are part of the charm. In fact, the less you try to make it look factory-perfect, the more believable it becomes. That makes this project ideal for beginners and satisfying for seasoned DIYers who enjoy a quick, high-impact makeover.
So the next time you see an old painted terracotta pot that feels dated, do not write it off. Give it a matte gray glow-up, add your favorite plant, and let it live its best designer life.
Experiences and Lessons From Doing This Project
The first time I tried turning a painted terracotta pot into a faux concrete pot, I made the classic beginner mistake of assuming gray paint alone would do the job. It did not. It looked less like concrete and more like a pot that had been dipped in office wall paint during a moment of poor judgment. The transformation only started to feel convincing when I layered different tones and stopped trying to make every brushstroke disappear.
What surprised me most was how much the old finish underneath affected the final result. A shiny painted pot fought back. Once I cleaned it well and sanded it lightly, everything improved. The paint grabbed better, the texture looked softer, and the whole project stopped feeling like a battle. That was my first real lesson: prep is not the boring part you rush through. Prep is the reason the pretty part works.
I also learned that faux concrete looks best when it is a little inconsistent. At first, I kept correcting every patch that looked lighter or darker. Then I stepped back and realized those variations were exactly what made the pot look real. Concrete in the wild is not one perfect shade. It has cloudy areas, dry-looking streaks, and little changes in depth. Once I accepted that, the project became easier and much more fun.
Another thing I noticed was how different the finish looked depending on the light. In bright morning sun, the pot seemed softer and warmer. At night, under indoor lighting, the darker gray details stood out more. That made me more thoughtful about where I planned to use each pot. For a living room, I now prefer a gentler greige concrete finish. For a patio or front porch, I like stronger contrast and slightly more texture so the pot does not visually disappear outdoors.
There was also a practical lesson involving sealers. One of my early pots looked beautiful until I watered the plant and realized the outside finish was not protected well enough for how I was using it. Since then, I have been much more intentional. If a pot will be decorative only, I seal it lightly. If it will hold a plant on a wood surface, I pay more attention to protection and always keep the drainage situation in mind. Beauty is lovely, but not when it leaves a damp ring on furniture.
The most satisfying part of this project is how high-end the result can feel compared to the cost. An old pot that once looked random and forgettable suddenly feels curated. Group a few faux concrete pots together and the whole area looks more polished. It is the kind of makeover that makes people assume you bought them from a boutique home store with very calm lighting and very confident price tags.
Most of all, this project taught me to trust layering over perfection. Every time I tried to force the finish, it looked stiff. Every time I built it slowly, softened the edges, and left a little unpredictability in place, it looked better. That is probably the biggest takeaway. Faux concrete is not about copying a surface exactly. It is about creating the impression of depth, age, and texture in a way that feels natural. Once you get that, the project becomes less about rules and more about rhythm.