If Thanksgiving had a love language, it would be: carbs, compliments, and one person yelling “WHO TOUCHED THE THERMOSTAT?”
But tucked inside all the menu planning and chair-counting is the real main event: gratitude. One of the simplest (and surprisingly
addictive) ways to bring that gratitude to life is a “Thanks Jar” a clear glass jar that collects tiny notes of appreciation all
month long, then turns into a heart-melting, table-stopping tradition on Thanksgiving Day.
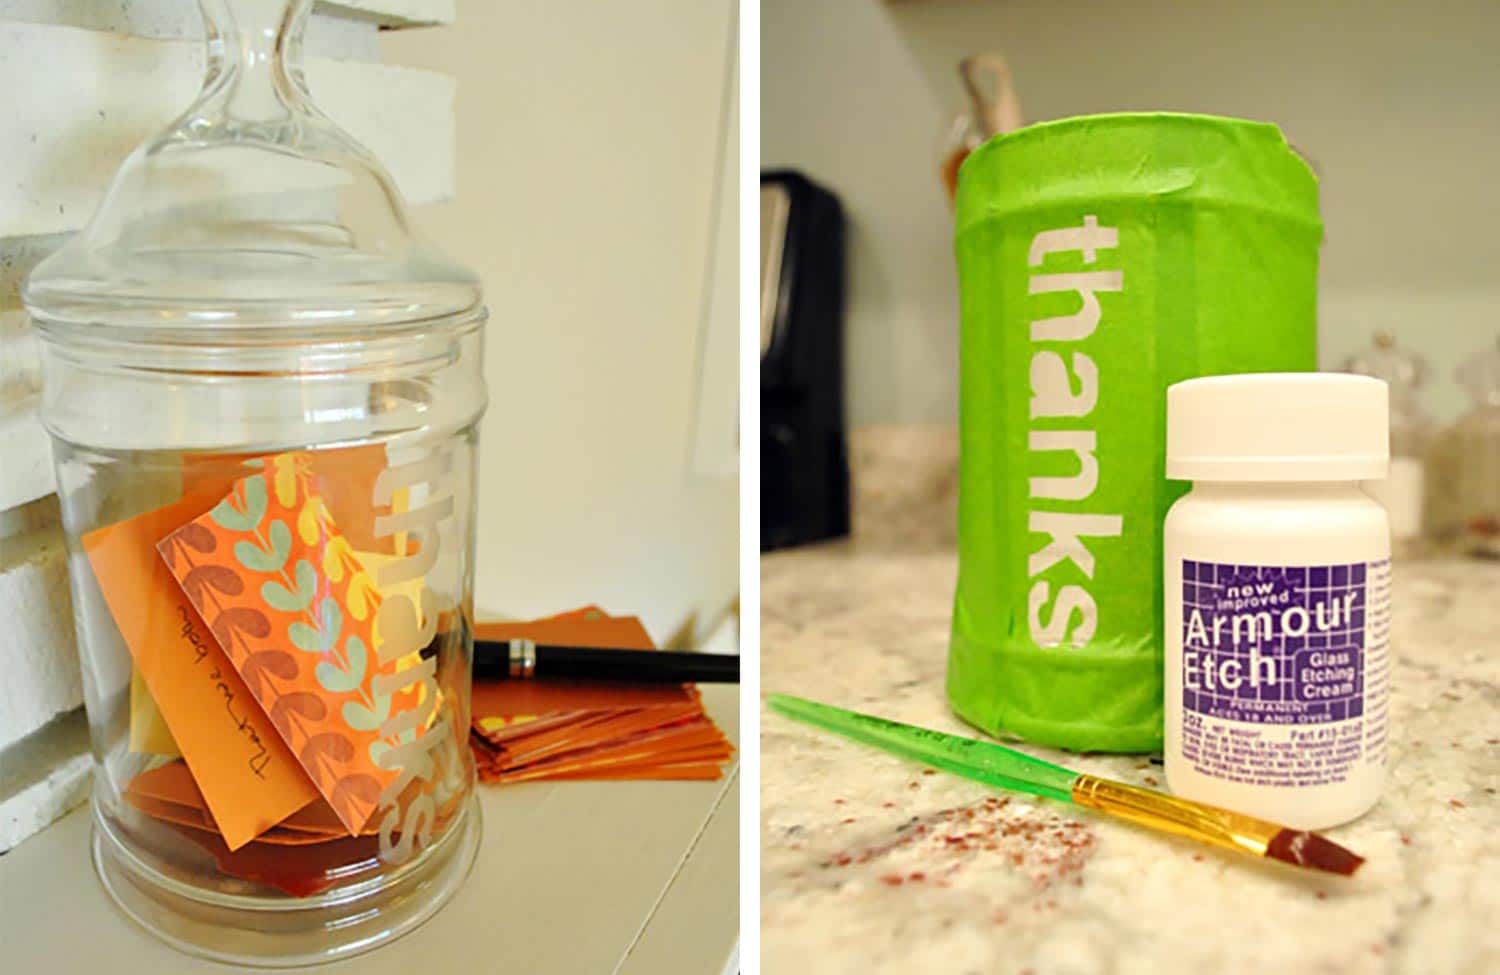
Young House Love popularized a particularly charming version: a thrifted glass jar with the word “thanks” etched
right into it, so it feels less like a craft project and more like a family heirloom that just happens to live near the cranberry sauce.
In this guide, we’ll break down how to make your own glass “Thanks Jar,” how to use it as a Thanksgiving tradition, and how to keep it
fun (not forced) for kids, guests, and that one uncle who thinks sarcasm is a food group.
What Is a “Thanks Jar” (and Why It Works So Well)?
A “Thanks Jar” (also called a gratitude jar or thankful jar) is exactly what it sounds like:
you write down things you’re thankful for on small slips of paper and drop them into a jar. You can do it daily throughout November,
only during Thanksgiving week, or even year-round if you’re feeling ambitious (or if you just love jars, which… fair).
The magic isn’t the jar it’s the tiny habit
The reason this tradition sticks is that it makes gratitude visible. Notes pile up. The jar fills. You get a physical reminder
that good things happened even during the weeks when the “good thing” was simply “I found my keys on the first try.”
And on Thanksgiving, reading the notes turns into an activity that’s equal parts meaningful and entertaining.
Supplies for a Glass “Thanks Jar” (Etched Like Young House Love)
You can absolutely make a thankful jar with a Sharpie label and call it a day. But if you want that elevated, etched-glass look,
here’s the shopping list. Most of it is inexpensive, and some of it is likely already hiding in your “random craft drawer of destiny.”
Core supplies
- Glass jar with lid (apothecary jar, cookie jar, big Mason jar, or any wide-mouth glass container)
- Glass etching cream (commonly sold in craft stores)
- Small paintbrush (cheap is fine you won’t write a novel with it)
- Painter’s tape (or vinyl stencil material if you have it)
- Craft knife (X-Acto style) and a cutting surface
- Printer paper for your stencil design
- Cardstock or sturdy paper for gratitude notes (bonus points for fall colors)
- Pens/markers
Optional “make it extra” supplies
- Ribbon or twine for a simple bow
- Hole punch + binder ring (for saving notes year to year)
- Sticker labels or tag labels for “prompt jars”
- Vinyl cutting machine (nice-to-have, not required)
How to Make the Glass “Thanks Jar”
The Young House Love approach is clever because it uses everyday supplies (hello, painter’s tape) to create a stencil that’s snug against
glass which is what you want for crisp, clean etching. Here’s a simplified, beginner-friendly walkthrough.
Step 1: Pick your jar (and don’t overthink it)
Thrift stores are gold for this. Look for something with a stable base, a lid (nice but not required), and enough opening width for hands
to drop in notes without doing origami on the spot. Wash the jar thoroughly and remove any stickers. A clean, dry surface helps the stencil
stick and makes your etch look sharper.
Step 2: Create a stencil design that’s stencil-friendly
Keep the word simple “thanks,” “grateful,” “give thanks,” or your family name. Choose a bold, blocky font (thin scripts can get fiddly).
Print it at the size you want. If you’re placing the word near the bottom of the jar, remember that curves can distort letters, so slightly
larger text is often easier to read.
Step 3: Build your painter’s tape stencil
- Lay a wide strip (or overlapping strips) of painter’s tape onto a cutting board or sturdy surface.
- Tape your printed word on top of the painter’s tape so it doesn’t shift while cutting.
- Carefully cut out the letters with a craft knife, pressing firmly enough to cut through the tape layer.
- Remove the paper printout, leaving your tape stencil behind.
Pro tip: Don’t panic if a letter isn’t museum-perfect. Once it’s etched, tiny imperfections often read as “handmade charm,” which is the
craft world’s way of saying “I tried and it’s still cute.”
Step 4: Apply the stencil to the jar (seal it like you mean it)
- Peel the painter’s tape stencil off the cutting surface slowly.
- Apply it to the glass where you want your word.
- Press down all edges firmly. Add extra painter’s tape around the stencil area to protect the reminder of the glass.
The goal is to prevent etching cream from sneaking under edges. Smooth it well especially on curved jars and press the inner edges
of each letter like you’re trying to keep gravy from escaping a boat. (Different craft, same intensity.)
Step 5: Use etching cream safely
Etching cream is powerful stuff. Work in a well-ventilated area, protect your surface, and wear gloves (and eye protection if recommended).
Keep kids at the “watching from a safe distance” stage for this part, then bring them back for decorating and note-writing.
Step 6: Apply etching cream
- Use a small paintbrush to dab a thick, even layer of cream over the exposed glass areas.
- Try not to paint it on like you’re watercoloring dabbing tends to reduce streaks.
- Follow the timing on your product. If you’re using painter’s tape, don’t let it sit so long that the tape starts to break down.
Step 7: Rinse, peel, admire
- Rinse off the etching cream thoroughly under running water.
- Remove the stencil and protective tape.
- Wash the jar again and dry it.
You should see a frosted, etched look where your design was. And yes, it feels a little like magic like you just unlocked a new “adult”
crafting level without having to learn macramé.
How to Use the Thanks Jar as a Thanksgiving Tradition
An etched jar looks adorable on a shelf, but the real joy is using it. The most popular method is to start at the beginning of November
and write one note per person per day. But you can adjust for your household’s bandwidth because sometimes the month of November is just
a blur of school emails and “Wait, do we have cranberry sauce?”
Option A: The “November Daily Drop”
- Write one gratitude note per day.
- Include the date and the writer’s name (optional, but helpful for keepsakes).
- Fold and drop it into the jar.
- No peeking until Thanksgiving (or until your willpower dissolves, whichever comes first).
Option B: The “Thanksgiving Week Sprint”
- Do 3–5 notes per person during the week leading up to the holiday.
- This works great for busy households or last-minute tradition starters.
- Read them right after dinner (or during dessert when everyone is emotionally vulnerable and full of pie).
Option C: The “Guest Jar” for Thanksgiving Day
- Set the jar and a stack of note cards at the entry or near appetizers.
- Invite guests to write one thing they’re thankful for (or one thing they appreciate about the host).
- Read them aloud at the table, or let people pick a card to read after dinner.
Gratitude Note Ideas and Prompts That Don’t Feel Cringey
Some people can effortlessly write heartfelt gratitude notes. Others freeze like they’ve been asked to deliver a TED Talk on the emotional
significance of mashed potatoes. Prompts help especially for kids, teens, and guests who are shy.
Simple, kid-friendly prompts
- Something that made me laugh recently was…
- A person who helped me this month is…
- A food I’m thankful for is…
- One thing I love about our home is…
- A small win I had this week was…
Prompts that work for adults (and skeptical relatives)
- A convenience I’m grateful for (that I used to take for granted) is…
- A skill I’m thankful I learned is…
- One moment I want to remember from this year is…
- Someone who showed up for me recently is…
- A comfort I’m grateful for when life gets loud is…
Examples of great “real” notes
The best notes usually mix big and small. Think:
“My sister’s pep talks,” “Saturday morning pancakes,” “the neighbor who brought our packages in,” “a good doctor,”
“warm socks,” “my dog’s ridiculous joy when I open cheese,” or “spellcheck” (which, honestly, is a modern miracle).
Make It Look Like Decor, Not Homework
The Thanks Jar can double as a Thanksgiving centerpiece if you give it a little stage presence. Keep it simple:
set it on a tray with mini pumpkins, add a small stack of note cards, and place pens in a cup nearby.
You want it to say “welcoming tradition,” not “fill out this form in triplicate.”
Low-effort styling ideas
- Tie a ribbon around the lid.
- Use fall-colored cards for a naturally pretty “jar fill.”
- Add a small sign: “Drop your thanks here” (friendly, not bossy).
- Keep it somewhere visible all month (kitchen counter beats a closet shelf every time).
Safety and Practical Tips for Glass Etching
A few smart moves make your etch cleaner and your process safer.
- Ventilation matters: Use etching cream in an airy space and protect your work surface.
- Wear gloves: Treat etching cream like the chemical tool it is, not like frosting.
- Seal the stencil edges: Most “oops” etching happens from tiny gaps under the stencil.
- Follow your product’s timing: Longer isn’t always better if your stencil material starts to degrade.
- Rinse thoroughly: Remove all traces of cream before peeling tape and washing the jar.
Troubleshooting: Common “Thanks Jar” Problems (and Fixes)
“My etch looks streaky.”
This often happens when the cream is brushed on thinly or unevenly. A thicker, dabbed-on layer tends to produce more consistent frosting.
Also confirm the glass was clean and dry before stenciling.
“The cream bled under the stencil.”
Usually an edge-sealing issue. Press down the stencil firmly, especially around letter edges. If your jar is very curved, consider a vinyl
stencil next time, because it can conform better than painter’s tape.
“No one is writing notes.”
Make it frictionless. Put the jar where people naturally pause (kitchen counter). Keep cards and pens right next to it.
Assign a fun “drop time” (after dinner, before bedtime, during morning coffee). And if needed, start with one silly note to break the ice:
“I’m thankful for whoever invented stretchy pants.”
How to Preserve Notes Year After Year
This is where the tradition goes from “cute” to “I will cry at the table and I’m not even sorry.” At the end of the season, you can:
- Punch holes in the notes and store them on a binder ring or ribbon.
- Bundle each year’s notes with twine and label by year.
- Photograph or scan favorite notes (especially if kid handwriting is evolving at warp speed).
Next Thanksgiving, you can re-read a few past notes before starting new ones. It’s like a highlight reel for your family’s gratitude
without needing a subscription plan.
FAQ: Quick Answers for Busy Crafters
Do I have to etch the jar?
Nope. You can label it with a chalk marker, add a tag, or use vinyl lettering. The tradition works either way; etching just adds a
polished, permanent look.
What if I don’t want a “serious feelings” moment at dinner?
Keep it light. Encourage silly gratitude (pets, snacks, warm blankets, funny TV shows) alongside heartfelt notes.
Gratitude doesn’t have to be dramatic to be real.
How do I get teens to participate?
Give them prompts that feel relevant (friends, achievements, music, inside jokes). And let them be concise. A teen’s “I’m grateful for
my best friend” might not be long, but it can still be meaningful.
of Real-World “Thanks Jar” Experiences
Here’s the part nobody tells you when you start a Thanksgiving craft tradition: the jar will teach you things. Not in a “lecture” way
more in a “wow, this tiny slip of paper just changed the vibe in my kitchen” way.
The first experience many families have is the awkward start. Day one: everyone is enthusiastic. Day two: someone can’t find a pen.
Day three: you discover the jar has become invisible, like a houseplant you swore you would water. The fix is almost always practical,
not emotional. Put the jar where life happens (kitchen counter). Keep cards and pens attached to it like they’re part of the jar’s job.
Suddenly the habit returns because the tradition isn’t about perfect discipline; it’s about making gratitude easy enough to actually do.
Another common experience: kids’ notes are wildly specific and unintentionally hilarious. Adults tend to write broad things (“family,”
“health,” “friends”), which are lovely but kids will hit you with, “I’m thankful for the purple spoon,” or “I’m thankful the dog sneezed
and it sounded like a tiny duck.” Those notes aren’t “less meaningful.” They’re a reminder that gratitude lives in everyday moments, not
only in big milestones. If you save the notes year after year, it becomes a time capsule of what your household actually cherished:
a favorite teacher’s name, a new pet, a song you played on repeat, a vacation, a funny phrase, the year everyone got obsessed with air
fryers.
Thanksgiving Day brings its own set of experiences. Some families read notes at the table, one by one, passing the jar around. Others
prefer reading after dinner when plates are cleared and people are calmer (and also slightly euphoric from pie). If you have guests, you’ll
notice patterns: a shy guest writes a very heartfelt note and doesn’t want credit; a talkative guest writes five notes and reads them like a
stand-up routine; kids insist on reading theirs out loud immediately because patience is a myth. This is all normal. The jar isn’t a script
it’s a container for your people being their people.
One of the sweetest experiences tends to happen later, when you pull the jar back out the next year. You read an old note and suddenly
remember a tiny detail you would have lost otherwise: the neighbor who helped during a stressful week, the “new baby” who is now sprinting
through your house, the season when someone learned to drive, the year a family member recovered from something hard. That’s when the jar
stops being “just a Thanksgiving craft” and starts feeling like a tradition worth protecting not because it’s fancy, but because it keeps
your attention on what matters, even when the holidays get loud.
Conclusion: A Simple Jar, A Big Payoff
The glass “Thanks Jar” is the kind of Thanksgiving craft that earns its place in your home. It’s part DIY, part holiday decor, and part
gratitude practice that actually fits real life. Whether you etch the word “thanks” into a thrifted jar like Young House Love or keep it
simple with a label, the point is the same: you’re collecting proof that good things happened and giving everyone at your table a
meaningful way to share them.
Start small, keep it easy, and let it be imperfect. Gratitude doesn’t need flawless handwriting. It just needs a place to land.