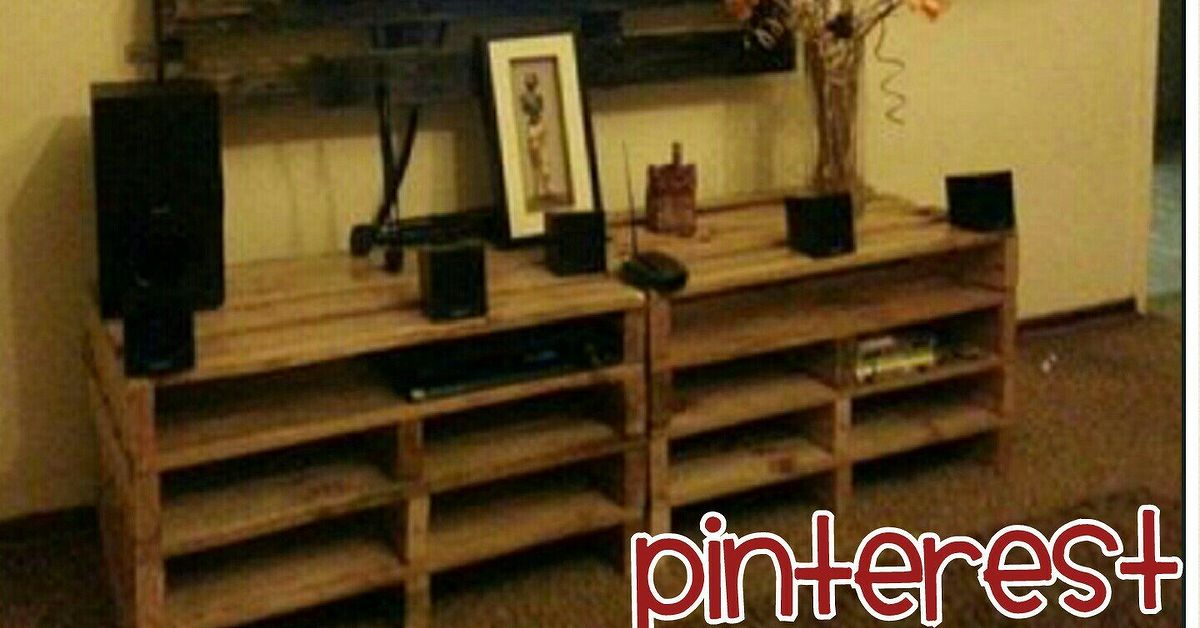
If your TV is currently balancing on a wobbly side table, a stack of moving boxes, or (no judgment) an upside-down laundry basket, it might be time for an upgrade. The good news: you don’t need a designer showroom budget to get a stylish media console. A simple pallet TV stand can give you rustic charm, plenty of storage, and serious DIY bragging rightsall for the price of a couple of pallets and some screws.
Inspired by the creative spirit of Hometalk-style DIYers, this guide walks you through how to turn basic shipping pallets into a custom TV stand that fits your space, your gear, and your style. We’ll cover everything from planning and safety to step-by-step building tips, finishing options, and real-life lessons from folks who’ve actually lived with pallet TV stands in their homes.
Why a Pallet TV Stand Is So Popular
Pallet projects have become a staple in DIY communities for a few big reasons. First, pallets are cheapor free. Many local hardware stores, warehouses, and small businesses are happy to give them away, especially if they’d otherwise pay to have them hauled off. That makes a pallet TV stand a perfect weekend project when you want a big visual impact on a small budget.
Second, a pallet TV stand fits right into today’s favorite decor styles. Whether you love farmhouse, industrial, boho, or modern rustic, the worn texture and varied tones of pallet wood create an instant “I paid extra for that” look without the designer price tag. You can keep the wood raw and weathered, stain it dark and moody, or paint it crisp white for a lighter, coastal feel.
Third, pallets are surprisingly versatile. With a little cutting and reassembly, you can create:
- Low, bench-style TV stands with open cubbies
- Chunky, console-style stands with shelves for media components
- Corner pallet TV stands that tuck into small rooms
- Full pallet entertainment centers with upper shelving and side towers
- Wall-mounted pallet TV backdrops that make the TV feel built-in
And finally, there’s the satisfaction factor. Turning rough, discarded wood into a custom piece of furniture you use every day just feels good. It’s eco-friendly, creative, and a little bit rebelliouslike telling overpriced big-box furniture, “Thanks, but I’ve got this.”
Planning Your Pallet TV Stand
Measure Your TV and Your Space
Before you touch a saw, grab a tape measure. The most common mistake DIYers make is building a stand that’s either too small for the TV or too big for the room.
- TV width: Your stand should be at least a few inches wider than your TV on each side so it doesn’t look top-heavy.
- Height: When you’re seated, the middle of the screen should be roughly at eye level. For most living rooms, that means a stand height of around 18–24 inches.
- Depth: Make sure you leave space for cable boxes, game consoles, or sound bars, plus clearance for cords and plugs at the back.
Once you know your ideal length, height, and depth, you can decide if you’re using whole pallets as-is or cutting them down to size.
Choosing and Sourcing Pallets Safely
Not all pallets are created equal. Some are perfectly safe for indoor furniture; others have been treated with chemicals or exposed to spills, oils, or unknown substances. A few things to keep in mind:
- Look for pallets stamped with “HT” (heat treated) instead of chemical treatment codes.
- Avoid pallets that smell strange, look heavily stained, or feel oily.
- Check for loose nails, split boards, or obvious structural damage.
- If you can choose hardwood pallets (often used for heavier loads), they’ll be stronger and more durable for a TV stand.
Plan on at least two standard-size pallets for a simple stand, and more if you want extra shelves or a large entertainment center.
Tools and Materials Checklist
Here’s a basic list to get you started. You can mix and match depending on what you already own:
- Circular saw, jigsaw, or handsaw
- Drill/driver with wood bits
- Deck screws or wood screws
- Pry bar or reciprocating saw with metal/wood blade (for dismantling pallets)
- Hammer and nail punch
- Orbital sander or sanding block, plus sandpaper in multiple grits
- Wood glue (optional but helpful)
- Stain, paint, or clear sealer
- Furniture feet or casters (optional)
- Safety gear: gloves, safety glasses, dust mask or respirator
Step-by-Step: How to Build a Simple Pallet TV Stand
There are endless ways to design a pallet TV stand, but this basic bench-style version is a great starting point. It’s sturdy, simple, and easy to customize with extra shelves or doors later.
Step 1: Dismantle and Prep the Pallets
Start by breaking down your pallets into individual boards. You can do this with a pry bar and hammer, but many experienced pallet builders like to use a reciprocating saw to slice through the nails while keeping the boards intact. It’s faster, less frustrating, and saves more usable lumber.
Once the pallets are apart, remove any protruding nails, then lightly sand each board to knock down splinters and rough edges. Don’t worry about making the wood perfect yetthat comes later.
Step 2: Build the Frame
Cut four sturdy pallet boards to the full length you want for your TV stand. These will become the top and bottom rails of the frame. Cut four shorter pieces for the vertical legs at each corner.
Arrange the boards into a rectangle: two long pieces on top and bottom, with the short leg pieces at each end. Screw everything together, pre-drilling pilot holes to prevent the pallet wood from splitting. When you’re done, you should have a simple open box frame.
Step 3: Add the Shelf Supports
Decide how many shelves you want. Most people like at least one shelf for consoles and storage baskets. Mark the height where you want the shelf to sit, then screw shorter boards across the inside of the frame at that level to support your shelf boards.
If you have heavy gear like gaming systems, AV receivers, or large speakers, add a center support or two to keep the shelf from sagging.
Step 4: Lay the Top and Shelves
Cut enough pallet boards to cover the top of the stand. Lay them side by side, adjusting for gaps and trimming as needed. You can butt them tightly together for a smoother surface or leave small gaps for a more rustic, slatted look.
Repeat the process for any shelves you’ve planned. For a polished look, stagger the board joints so they don’t all line up in a straight line across the top.
Step 5: Add Legs or Casters (Optional)
If you prefer a taller console or want to make cleaning underneath easier, add furniture feet or heavy-duty locking casters. Make sure whatever you use is rated to support the combined weight of the stand, TV, and all your equipment.
Attaching casters can also give your pallet TV stand a cool industrial vibelike something rescued from an artist’s loft.
Step 6: Sand for Comfort and Safety
Now’s the time to really smooth things out. Start with a medium-grit sandpaper to remove rough patches and splinters, then move to a finer grit for a silky surface. Pay extra attention to corners, edges, and anywhere kids (or bare shins) might bump into.
You don’t have to erase all the character of the wood; just aim for “comfortably rustic,” not “I just hugged a porcupine.”
Step 7: Stain, Paint, and Seal
The finish you choose will completely change the look of your pallet TV stand:
- Dark stain: Adds drama and a high-end feel, especially with black metal hardware.
- Light stain or clear coat: Shows off the natural grain and knots for a more relaxed, Scandinavian vibe.
- Paint: Crisp white or soft gray works well in modern or coastal spaces; bold colors can turn the stand into a statement piece.
Whatever you choose, finish with a clear protective coatpolyurethane, water-based topcoat, or furniture waxto help resist scratches and make cleaning easier.
Step 8: Style and Cable Management
Once the stand is in place, run your cords and power strips before loading it up. Use cable clips, zip ties, or adhesive channels along the back to keep cords neat and out of sight.
Then add baskets for remotes and controllers, a plant or two for life, and a few favorite decor pieces. Just leave enough breathing room so the stand doesn’t feel clutteredyour TV should still be the star of the show.
Design Ideas Inspired by DIY Communities
One of the best parts of a pallet TV stand is that there’s no single “right” design. Creative DIYers have turned pallets into everything from compact dorm-room consoles to massive wall units. Here are a few ideas to spark your own project:
- Corner pallet TV stand: Build a triangular or angled stand that tucks neatly into a cornerperfect for small living rooms or bedrooms.
- Pallet wall backdrop: Mount boards vertically behind a wall-mounted TV to mimic a shiplap wall or reclaimed-wood accent, then add a slim pallet console below.
- Crate-and-pallet combo: Mix pallet boards with wooden crates to create cubbies for baskets, DVDs, or game controllers.
- Mixed-material stand: Pair pallet wood with black pipe legs, hairpin legs, or metal brackets for a modern industrial look.
- Closed storage: Add simple pallet-board doors on hinges to hide clutter, routers, or cables while keeping the rustic feel.
Take measurements of your space, sketch a quick front and side view, and play with shelf heights and widths. A little planning on paper saves a lot of re-building later.
Finishing Touches and Safety Tips
Because your pallet TV stand will hold expensive electronics (and maybe a giant TV), you’ll want to think about safety as much as style.
- Weight capacity: Use thicker boards for the top and add center supports so your stand doesn’t bow over time.
- TV anchoring: Consider using an anti-tip strap or wall mount, especially if you have kids or curious pets.
- Ventilation: Leave the back open or cut vents so game consoles and receivers don’t overheat.
- Floor protection: Add felt pads under legs or casters to protect hardwood or tile floors.
A little extra thought in these areas will help your DIY stand look great and function safely for years.
Styling Your Pallet TV Stand Like a Pro
Once the sawdust settles, the fun part begins: styling. A few simple tricks can make your pallet TV stand look like a custom piece from a design catalog.
- Balance the visual weight by placing a taller item (like a vase or stack of books) opposite your sound bar or speaker.
- Use woven baskets or fabric bins to hide controllers, charging cables, and random clutter.
- Layer in texture with a mix of wood, ceramic, metal, and greenery.
- Keep decor low enough that it doesn’t block the screenyour fern does not need a starring role during movie night.
Treat your pallet TV stand like any other piece of furniture: adjust decor with the seasons, swap out colors, and have fun with it. The more “you” it feels, the more you’ll love seeing it every day.
Real-Life Experiences with Pallet TV Stands
It’s one thing to build a pallet TV stand; it’s another thing to live with it. Here are some experience-based insightsthink of them as “learned the hard way so you don’t have to.”
Lesson 1: Sand More Than You Think You Need To
Almost every pallet DIYer has the same realization a week after moving the furniture into the house: “I should have sanded more.” Pallet wood can be surprisingly rough, especially around cut edges and nail holes. When you’re in the garage, a few splinters don’t seem like a big deal. But once the stand is in your living room and people are brushing past it, propping their feet on it, or sliding baskets in and out, smooth surfaces suddenly matter.
Think of your first sanding session as “rough cleanup” and plan a second, slower pass once the stand is assembled. That’s when you can round corners, soften edges, and make it feel like furniture instead of a shipping crate.
Lesson 2: Plan Your Cables Before You Close the Back
Many people love the idea of a fully enclosed pallet entertainment centeruntil it’s time to plug in one more HDMI cable. If you’re tempted to add a solid back panel right away, pause for a moment and imagine future you crawling behind the stand while holding a flashlight in your mouth.
A smarter approach is to leave the back open or create large, neatly cut openings behind each shelf. You can always add thin panels or decorative slats later if you want a more finished look, but you can’t magically create access holes once everything is screwed together and painted.
Lesson 3: Don’t Underestimate the Weight
A fully built pallet TV stand, loaded with electronics, can be heavylike “phone a friend” heavy. That’s not a problem as long as you build it where it will live or plan ahead for moving it.
Casters can be a game changer, especially in small spaces where you may need to pull the stand out to access outlets or cables. If you skip wheels, consider building the stand in two sections (like a base and a hutch) that you can move separately and then attach in place.
Lesson 4: Imperfections Become Part of the Charm
No matter how carefully you plan, your pallet TV stand is not going to look like a factory-made media consoleand that’s exactly the point. The boards won’t all match, some nail holes will still show, and the grain will vary from piece to piece.
Many DIYers say that the parts they originally saw as “flaws” ended up being their favorite details: a knot that looks like a swirling galaxy, a slightly darker board that breaks up the pattern, or an old stamp that hints at the pallet’s previous life. Lean into those quirks instead of fighting them.
Lesson 5: The Project Rarely Ends at Just One Piece
Here’s a funny thing that happens once you build a pallet TV stand: you start noticing all the other places in your home that could use pallet wood. A small console table behind the sofa. A matching coffee table. A set of shelves by the entryway. Suddenly you’re grabbing every decent pallet in a five-mile radius and your friends are sending you photos of stacks behind local stores.
If you enjoy the process, consider planning a mini “pallet collection” for your living rooma TV stand, a side table, and maybe a matching wall shelf. Keeping the finishes similar (same stain or paint color) makes the room feel cohesive, not cluttered.
Lesson 6: The Story Becomes Part of Your Decor
One of the best parts of a pallet TV stand is the story that comes with it. When guests see a unique piece of furniture, they almost always ask, “Where did you get that?” Being able to say, “I built it from a couple of old pallets” is a lot more fun than “It was on sale at a big-box store.”
The stand becomes more than a place to drop remotesit’s proof that you can roll up your sleeves, design something from scratch, and turn scrap wood into a centerpiece. And every ding, scuff, or new coat of paint just adds another chapter to that story.
Conclusion: Your Hometalk-Style Pallet TV Stand
A pallet TV stand might start as a budget-friendly solution, but it often ends up becoming one of the most complimented pieces in the room. With a little planning, some basic tools, and a willingness to embrace imperfections, you can create a custom entertainment center that suits your TV, your layout, and your personal style.
Measure carefully, choose safe pallets, build a solid frame, and take your time on sanding and finishing. From there, the design possibilities are wide opencorner stands, wall-mounted backdrops, minimal consoles, or full-blown pallet entertainment centers. And along the way, you’ll gain DIY confidence that spills over into every other room of your home.