There are two kinds of backyards (or balconies, or patios, or “that one sunny windowsill”): the kind where plants live, and the kind where toys live.
A Toy Garden is what happens when you stop making them compete for territory and let them become roommates.
Think: a kid-friendly garden space where vegetables, flowers, and sensory plants share the stage with dinosaurs, tiny cars, fairy doors, action figures,
and whatever plastic creature currently rules the household. It’s part gardening project, part imagination zone, and part “Wow, that actually grew!”
In this guide, we’ll build a Toy Garden from the ground up: choosing a layout, picking plants that cooperate with little hands, designing playful themes,
and keeping the whole thing realistic (read: not a 3-hour daily chore). Expect practical steps, specific examples, and a little humorbecause soil under your
nails is inevitable, but joy is optional. Let’s choose joy.
What Exactly Is a Toy Garden?
A Toy Garden is a small, intentional garden space designed for kids’ playwhere the garden isn’t “off limits” and the toys aren’t
“ruining the aesthetic.” Instead, the toys become part of the garden’s storytelling.
It can be as simple as one large container with herbs and a few toy figurines, or as elaborate as a themed raised bed with miniature paths, signs,
and “habitats” for toy animals. The secret isn’t sizeit’s the design choice to make gardening feel like play, not a lecture.
The best Toy Gardens usually combine three ingredients:
- A plant plan (easy, resilient, and safe choices)
- A play plan (themes, zones, and toys that can get dirty without drama)
- A grown-up plan (maintenance that fits real life)
Why a Toy Garden Works (Even If You “Have a Black Thumb”)
Kids don’t fall in love with gardening because someone explained chlorophyll. They fall in love because something tiny became something bigand they
got to be the boss of it.
It turns responsibility into a game
Watering stops being a chore when it’s “giving the dinosaur jungle a drink.” Harvesting herbs feels like “collecting potions.” Pulling weeds becomes
“clearing the racetrack.”
It sneaks in STEM learning without announcing it
Measuring plant growth, noticing what sunlight does, learning what roots need, and comparing which container dries out fasterthese are science lessons
hiding in plain sight.
It invites sensory exploration (the good kind)
A sensory garden doesn’t have to be fancy: fragrant herbs, fuzzy leaves, crunchy seed pods, smooth stones, and edible “taste-safe” plants can create
an experience that’s calming and engagingespecially for kids who learn best through touch and movement.
It keeps the peace between “garden rules” and “kid energy”
Instead of constantly saying “Don’t touch,” a Toy Garden gives kids a place where touching is the pointand where it’s okay if the garden looks like
it’s hosting a tiny action movie.
Step 1: Pick Your Toy Garden Style
Before you buy anything, choose a format that matches your space and your patience level. Here are the most Toy Garden–friendly options:
1) Container Toy Garden (best for beginners)
One big pot (or a few) is the easiest way to start. Containers are great for kids because they feel like a defined “project,” and you can control the
soil quality and drainage. If you’ve got a patio, balcony, or front stepscongrats, you have a garden.
2) Raised Bed Toy Garden (best for ongoing play)
A small raised bed (even 4×4 feet) creates a clear “zone” for digging, planting, and decorating. It also helps keep pathways and boundaries obvious,
which can reduce accidental trampling (for both plants and grown-up sanity).
3) Theme Corner (best if your yard is already busy)
If your yard is already doing a lot (grill area, laundry line, dog zoomies), carve out a “Toy Garden Corner.” Add edging, a stepping-stone path,
and a few sturdy plants that can handle curious hands.
Step 2: Choose a Location That Makes the Garden Possible
A Toy Garden doesn’t need the “perfect” spotbut it does need a spot that won’t guarantee failure. Look for:
- Sunlight: Many vegetables and flowering plants prefer lots of sun; herbs can handle partial shade depending on the type.
- Water access: If watering requires a 12-step obstacle course, it won’t happen consistently.
- Visibility: Put it where kids naturally play or pass bybecause out of sight becomes out of mind (and then into “Why is it crunchy?”).
- Surface safety: For containers, stable ground matters; for beds, avoid low spots that turn into puddle kingdoms.
Pro tip: If you’re gardening with little ones, convenience beats perfection. A “good enough” spot you’ll actually use is better than the “ideal” spot
that becomes a seasonal guilt monument.
Step 3: Build the Foundation (Soil, Drainage, and the “No Swamp” Rule)
Containers: drainage is non-negotiable
If you’re using a pot, bucket, or repurposed container, make sure excess water can escape. That usually means drainage holes at the bottom. Without them,
roots sit in water and plants sulk dramatically.
Use quality soil (not mystery dirt)
For a kid-friendly Toy Garden, clean potting mix or raised-bed soil is usually easier to work with than heavy ground soil. It drains better, is lighter
for small hands, and typically has fewer surprises (like rocks the size of a potato, or a potato the size of a rock).
Mulch can be your secret helper
A thin layer of mulch (or even shredded leaves) can help hold moisture and reduce weeds. In a Toy Garden, fewer weeds means fewer “Is this a plant or a
villain?” debates.
Step 4: Pick Plants That Reward Kids Fast
The biggest Toy Garden mistake is planting things that take forever and require perfect conditions. Kids love momentum. Choose plants that are:
fast, visible, and forgiving.
Fast growers that keep motivation alive
- Radishes: Quick to sprout and quick to harvestgreat “first win” crop.
- Leaf lettuce: Many types grow quickly and can be harvested gradually.
- Beans or snap peas: Vining plants are fun because they climb and change noticeably.
Kid-friendly plants with big visual payoff
- Sunflowers: The poster child of “I planted this and now it’s taller than me.”
- Marigolds: Tough, colorful, and often used around veggie gardens.
- Zinnias: Bright blooms and a good cut-flower option.
Herbs that make the garden smell like success
- Basil: A sensory superstar with an obvious scent.
- Mint: Very aromatic (but best in a pot because it can spread).
- Chives: Fun to snip, mild flavor, and easy to grow.
Sensory garden favorites (touch, smell, sound)
A sensory garden can include soft leaves, fragrant plants, and interesting textures. The goal is to invite safe exploration and build connection with
nature through the senses. If you include edible plants, be clear about what’s okay to taste and what’s not.
Safety note: avoid “pretty but toxic” surprises
Many common ornamental plants can be toxic if eaten. In a Toy Gardenwhere curiosity is part of the dealchoose plants thoughtfully, supervise tasting,
and keep a simple rule: Only eat what an adult says is edible.
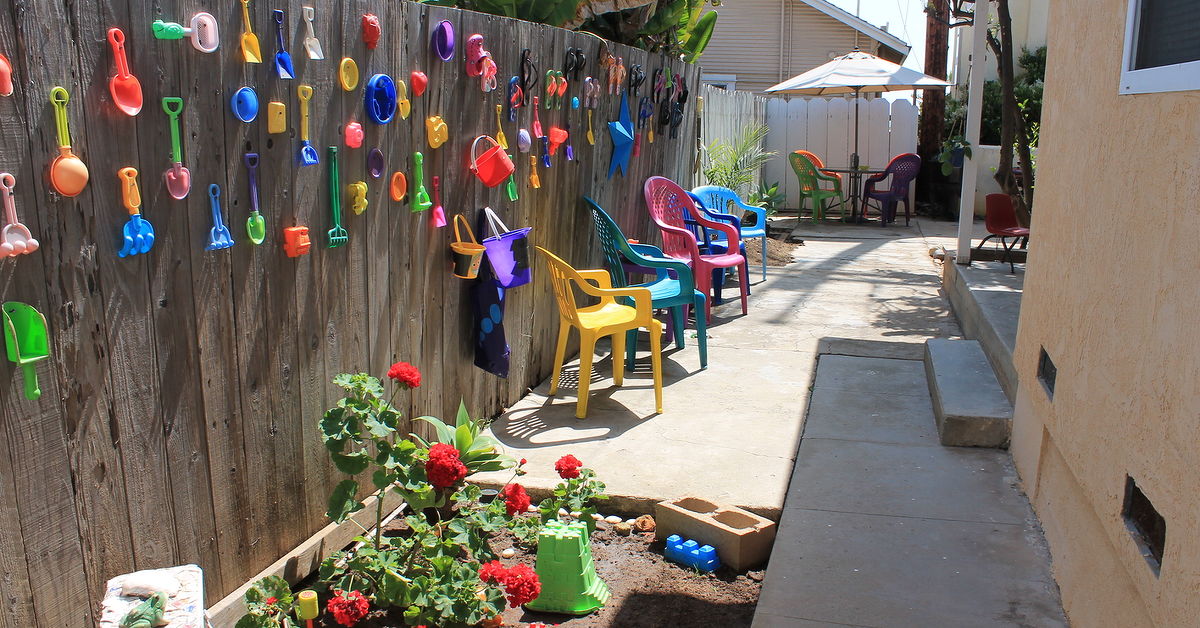
Step 5: Add the “Toy” Without Turning It Into Plastic Chaos
The magic trick is making toys feel intentional. That doesn’t mean expensive. It means:
repeat a theme, create small zones, and give toys a job.
Theme ideas that kids instantly understand
- Dinosaur Garden: Fern-like plants, “prehistoric” textures, little dinosaur figures, and a “fossil dig” sand tray nearby.
- Fairy Garden / Miniature Garden: Tiny doors, pebble paths, miniature “houses,” mossy corners, and small-leaf plants.
- Construction Zone Garden: Toy trucks, a “mulch pile,” and sturdy plants that can handle traffic nearby.
- Storybook Garden: Pick a favorite book and build plant choices and decorations around the characters.
- Pollinator Welcome Garden: Bright flowers, simple signs, and “bee hotel” crafts (with adult supervision).
Create mini “sets” inside the garden
Instead of scattering toys everywhere, place them in little scenes:
- A pebble “river” where toy animals drink
- A twig “bridge” near a container edge
- A stepping-stone “road” for toy cars
- A tiny “market stand” sign near herbs or cherry tomatoes
Use natural materials so it blends (and costs less)
Sticks, stones, pinecones, bark, seed pods, and shells can become fences, paths, roofs, and borders. Nature supplies a lot of the best Toy Garden props
and it looks better than a neon plastic castle (unless neon is the theme, in which case, commit to the bit).
Step 6: Make Maintenance Kid-Doable (and Parent-Survivable)
A Toy Garden should be maintained with a routine so simple it can survive a busy week. Try the “3-Minute Garden Check”:
- Look: Any droopy plants? Any obvious pests? Any toy stuck in the soil like Excalibur?
- Touch: Is the top inch of soil dry? If yes, water.
- Do one thing: Water, harvest, pull a few weeds, or add a pinch of compost.
Let kids lead (even if it’s not perfect)
Gardening is a gentle teacher: plants provide feedback whether the lesson is “too dry,” “too wet,” or “you planted 47 seeds in one hole.”
If kids do the work, let them see the results. That’s how confidence growsalong with everything else.
Build in “wins”
Plan for quick rewards: harvest herbs for pizza night, pick lettuce for sandwiches, or cut zinnias for a jar on the table. When the garden shows up in
daily life, it feels realand kids feel proud.
Step 7: Toy Garden Organization (Because Outdoor Toys Multiply)
Let’s be honest: toys in the garden can either feel whimsical… or like your yard is losing a battle against plastic.
A simple storage plan keeps the Toy Garden fun instead of frantic.
Easy storage strategies that actually work
- One “Garden Toy Bin”: A lidded outdoor container near the garden becomes the official home for Toy Garden props.
- Zones: Keep “dirty toys” (trucks, digging tools) separate from “tiny scene toys” (fairy doors, mini figures).
- Hooks and racks: Hang watering cans, small shovels, and spray bottles where kids can reach.
- Rotation: Put half the props away and swap monthly. It keeps interest high and clutter low.
Bonus: less clutter means you can spot problems earlierlike a wilted basil plant hiding behind a toy T. rex doing yoga.
Toy Garden Project Ideas (Copy-Paste These Into Real Life)
The “Pizza Pot” (container garden)
Plant basil, oregano, and a compact cherry tomato variety in a large pot. Add a tiny “Pizza Shop” sign and a few toy customers. Harvest herbs, make pizza,
and let kids announce they are now “farm-to-table entrepreneurs.”
The “Dino Dig & Grow” (raised bed corner)
Plant ferns (or fern-like plants), sturdy flowers, and a few easy veggies nearby. Add a small sand tray for “fossil digs,” and use smooth stones as
“dino eggs.” Keep digging in the sand, not the rootsyour future self will thank you.
The “Fairy Path Mini Garden” (shallow container)
Use pebbles for a path, mossy textures, and miniature accessories made from sticks and bark. Choose small plants that fit the scale. Add tiny “rules”
like: fairies only live where we water.
The “Five Senses Patch” (sensory garden zone)
Include one plant for each sense: something fragrant (mint), something soft (fuzzy leaves), something colorful (zinnia), something edible (strawberry),
and something that makes sound (ornamental grasses rustling in the breeze). Add labeled signs so kids learn what they’re experiencing.
Common Toy Garden Problems (and Fixes That Don’t Require a Degree)
“Everything died.”
Start smaller, use better soil, and confirm drainage. Choose hardy plants and water consistentlyespecially containers, which dry faster.
Also: some seasons are just rude. Gardening teaches resilience, including to adults.
“My kid watered it… aggressively.”
Give kids a small watering can or a spray bottle setting for seedlings. Create a “water line” rule: stop when the soil looks moist, not when it becomes
a pond with ambitions.
“Critters ate everything.”
Use simple barriers (netting, fencing) and consider companion flowers or herbs near veggies. Harvest early and often. Also, accept that squirrels believe
your garden was planted specifically for their enjoyment.
“Toys are everywhere.”
Reduce the number of props in the garden at once and introduce storage as part of the “closing the garden” routine. If the garden is a stage, the toys
need a backstage.
Wrap-Up: A Garden That Feels Like Childhood
A Toy Garden is not about perfect rows or magazine-worthy symmetry. It’s about giving kids a place where they can be curious, capable, and connected to
naturewhile still being, well, kids.
Start with one container. Add a theme. Choose plants that reward effort quickly. Let toys tell stories among the leaves. And when something goes sideways
(because something always does), treat it like part of the experimentnot a failure.
The goal isn’t just to grow plants. It’s to grow confidence, attention, wonder, and those tiny moments where your kid points at a sprout and says,
“I made that.”
Extra: Our “Toy Garden” Experiences (The Funny, the Real, the Actually Useful)
The first time we set up our Toy Garden, we imagined a peaceful little corner where herbs gently swayed in the breeze while toy animals politely posed
for photos. What we got was… a miniature drama series with dirt involved.
We started with a container garden because it felt manageable: one big pot, clean potting mix, a few herbs, and a handful of toy dinosaurs. On day one,
the “planting plan” went beautifully. On day two, our dinosaurs had a new mission: protect the basil from invisible enemies. That meant the toys
were constantly being repositioned, sometimes pushed into the soil like tiny flags claiming territory. The basil didn’t mind. The oregano, however, was
personally offended by being used as a parking lot.
Our first real lesson was about scale. Kids think in stories, not spacing requirements. So we added “zones”: one side of the container became the “jungle”
(mint and basil), and the other side became the “market” (chives and a small label sign). Suddenly, the toys had places to belong, and the plants weren’t
getting trampled every five minutes. It wasn’t strict. It was more like gentle choreography: “Dinosaurs can patrol the pebbles, not sit on the seedlings.”
Then came watering. We learned quickly that a full-size hose in the hands of an excited kid is basically a weather event. The solution was simple:
a smaller watering can and a spray bottle for seedlings. We made a game called “sip, don’t splash,” and we practiced watering until the soil looked dark
and moist, not like a swamp auditioning for a movie. Once watering became a skill instead of a free-for-all, the plants perked upand so did everyone’s mood.
The biggest win was choosing fast-growing plants. When radishes sprouted, it felt like magic. Every morning became a “garden check,” and even on busy days,
we could manage three minutes: look for droopy leaves, feel the soil, and do one small task. Kids loved seeing changes they could measuretiny leaves becoming
real plants. We added a simple height chart on a popsicle stick and let the toys “report” the growth like tiny garden journalists. Silly? Yes. Effective? Also yes.
We also learned that the Toy Garden is a perfect excuse to bring the harvest into daily life. Snipping basil for pizza night wasn’t just cookingit was
a victory lap. Picking flowers for a table jar made the garden feel important, not optional. And when something didn’t work (like the lettuce that bolted
after a hot week), we treated it like data, not disaster: “Okay, lettuce likes cooler weather. What should we try next?”
Finally, we accepted the truth: outdoor toys multiply when nobody’s looking. So we created one “Garden Toy Bin” that lived near the plants. The rule was
simpleif the toys want to visit the garden, they also have to go home. The bin didn’t make us perfect, but it kept the Toy Garden feeling like a magical
space instead of a clutter museum. And honestly? The best part wasn’t a perfect setup. It was watching imagination and nature overlaptiny stories happening
among real leaves, with kids feeling like the garden belonged to them.
