If you’ve ever stared at an old, dust-covered workbench and thought, “You know…you’d look pretty cute in my kitchen,” congratulationsyou have true DIY vision. The idea of putting an old workbench in the kitchen sounds a little wild at first, but once you see it as a rustic kitchen island, extra prep station, or storage hero, it starts to feel downright genius.
From Hometalk-style makeovers to real homeowners turning flea market finds into showpiece islands, vintage workbenches are quietly becoming the secret weapon of cozy, character-filled kitchens. In this guide, we’ll walk through why an old workbench works so well in the kitchen, how to restore and customize it, and what to expect when you actually live with one as the hardworking heart of your home.
Why an Old Workbench Belongs in the Kitchen
A kitchen island made from an old workbench doesn’t just give you more counter spaceit gives your kitchen a story. That worn wood, the dents, the old vise holes and paint drips all whisper, “I’ve seen things.” Instead of buying a factory-fresh island, you’re rescuing something with history and giving it a second life where everyone can enjoy it.
Character You Can’t Fake
New furniture can try to look “distressed,” but nothing beats the real patina of a workbench that’s spent decades in a garage, workshop, or school woodshop. The softened edges and worn top instantly warm up a modern kitchen, especially if you’re leaning into a rustic farmhouse, cottage, or industrial look. Interior designers regularly use reclaimed wood and vintage pieces in kitchen islands for exactly this reason: they add depth and personality that plain white cabinets just can’t compete with.
Sustainable and Budget-Friendly
Repurposing a workbench as a kitchen island is basically eco-friendly design in action. Instead of buying a brand-new unit, you’re keeping a solid piece of furniture out of the landfill and reducing demand for new materials. In many cases, a vintage bench from a flea market, antique mall, or online marketplace will cost less than a custom-built island, even after you add finishes, casters, and a new top if needed.
Surprisingly Practical
An old workbench is built for hard use. It’s designed to handle pounding, clamping, spills, and messes, which translates very well to real-world cooking. Many benches already have:
- Deep drawers that become instant storage for utensils, towels, or gadgets.
- Lower shelves for heavy pots, mixing bowls, or baskets.
- Sturdy frames that support butcher block, stone, or metal tops.
With a little thoughtful planning, that “garage relic” can become a rock-solid prep station, buffet zone, or baking center in your kitchen.
Planning Your Old Workbench Kitchen Island
Before you drag that beast upstairs, take a minute to plan. A vintage workbench kitchen island is only charming if it actually fits and functions in your space.
Check Size and Clearance
Measure the workbench and your kitchen carefully. As a rule of thumb, try to keep at least 36 inches (about 3 feet) of clearance on all sides so people can walk around comfortably. If you regularly cook with someone elseor your kitchen is a highway for kids, pets, and snack huntersaim for 42–48 inches of space if you can.
Think about:
- Work triangle: Will the island help or block the flow between your sink, stove, and fridge?
- Door swings: Will it interfere with appliance doors or pantry doors?
- Traffic: Can someone stand at the island while another person passes behind them?
Decide Its Main Job
A vintage workbench in the kitchen can play more than one role, but it helps to pick a primary purpose:
- Prep station: Keep it close to the fridge and sink, with chopping boards, knives, and mixing bowls nearby.
- Baking center: Add a smooth top (butcher block, stone, or a marble slab inset) and store baking tools and flours in the drawers.
- Coffee or beverage bar: Load the top with coffee gear or drinkware, and use drawers for pods, tea, or bar accessories.
- Storage island: Focus on drawers, bins, and shelves for extra pantry space, while the top acts as overflow counter.
The clearer you are on the job description, the easier it is to design smart upgrades and storage solutions.
Match (or Intentionally Contrast) Your Style
An old workbench leans naturally rustic and industrial, but it can blend with a surprising range of styles:
- Farmhouse: Pair the wood with white or cream cabinets, black hardware, and simple lighting.
- Modern: Keep the base wood raw or stained and top it with sleek quartz, concrete, or a simple butcher block.
- Cottage: Paint the base a soft color (sage, buttercream, or dusty blue) and leave the top natural.
- Industrial: Highlight metal legs, casters, or vintage hardware; keep the wood darker and more rugged.
Don’t be afraid of contrast: a warm, scarred old workbench often looks best against smooth, modern cabinets and clean countertops.
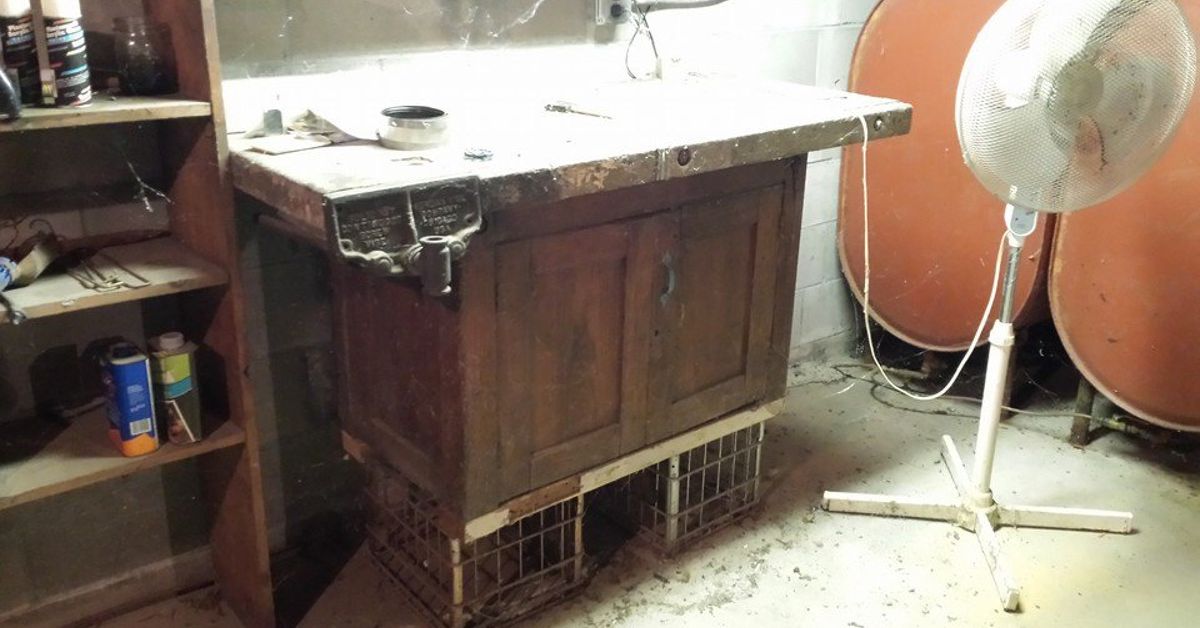
Cleaning, Repairing, and Making It Kitchen-Safe
Most old workbenches are not exactly “kitchen-ready” when you find them. They’re dusty, oily, and occasionally home to a few retired spiders. The goal is to clean and seal the bench without erasing all its hard-earned character.
Step 1: Deep Clean and De-gunk
Start with a vacuum or soft brush to remove dust and loose debris. Then:
- Scrub the surface with warm water and a gentle degreasing cleaner.
- Use a stiff brush to work into cracks, holes, and dents.
- Let it dry completelythis can take 24 hours or more, depending on humidity.
If there are unknown old finishes or oily patches, light sanding will help remove the top layer, but don’t go overboard; you want to keep the patina, not create a new cutting board from scratch.
Step 2: Repair Only What Matters
Some imperfections are part of the charm. Focus your repairs on safety and stability:
- Tighten or replace loose screws and bolts in the frame.
- Check that the legs are solid and the bench doesn’t wobble.
- Fill deep gouges that could trap food or liquid using wood filler.
- Remove rust from metal parts with a wire brush if it’s flaking or staining.
If there’s a large vise attached, decide whether it’s decorative or a shin-banging hazard. Some people leave the vise or screw as a conversation piece; others remove it and plug the holes for a cleaner, safer edge.
Step 3: Sand Just Enough, Then Seal
Use medium-grit sandpaper to smooth the top, then finish with a finer grit for a comfortable, splinter-free surface. Avoid sanding so aggressively that you lose the color variations and wear marksthey’re the reason you fell in love with the bench in the first place.
For the finish, you have two main strategies:
- Sealed work surface: Use a clear water-based polyurethane or polycrylic for a durable, easy-clean surface. This is great if most food prep will be done on cutting boards or on a separate stone/marble slab.
- Food-contact surface: If you want to chop directly on the top, use a food-safe oil or wax designed for butcher block. Be prepared for more upkeep and occasional sanding and re-oiling.
Many homeowners compromise by sealing the entire bench with a durable finish and then using dedicated chopping boards or a removable butcher-block insert on top for messy food prep.
Smart Upgrades for a Kitchen-Ready Workbench
The beauty of using an old workbench in the kitchen is that you can customize it to your exact routine. A few well-chosen upgrades can turn it from a cool décor piece into your favorite thing in the whole house.
Add Storage and Organization
If your bench has only a flat top and legs, think of it as a blank canvas. Consider:
- Installing a lower shelf for baskets, pots, or small appliances.
- Adding hooks or rails on the sides for towels, utensils, or mugs.
- Mounting a slim spice rack or knife strip to one end (away from heavy traffic).
- Sliding crates or bins under the bench for pantry overflow.
If it already has drawers, line them and assign each one a jobbaking tools, everyday utensils, linens, or kids’ snack supplies.
Consider Casters or Height Adjustments
Some vintage benches are a bit low or high for kitchen use. You can:
- Add locking casters to raise the height and make the island movable.
- Install new, taller legs or leg extenders if the bench is quite short.
- Lower it slightly by trimming legsbut measure twice and cut once; you can’t put those inches back.
Moveable islands are perfect for small kitchens, renters, or multipurpose spaces where you might slide the island out of the way for parties or cleaning.
Upgrade the Top (If Needed)
If the work surface is too damaged or narrow, you can layer a new top over it. Popular options include:
- Butcher block (for a warm, farmhouse feel).
- A piece of stone or quartz cut to size.
- A thick, well-sealed wood plank top that overhangs slightly for seating.
You can also inset a marble or stone slab into one section for pastry and baking while keeping the rest of the wood visible. This gives you a practical work zone while preserving the vintage character.
Power and Lighting Considerations
If your workbench island will host small appliances like mixers, blenders, or coffee gear, plan for power. A licensed electrician can add a floor outlet or wall outlet nearby, or you can mount a discreet power strip under the overhang away from water sources. Overhead, a pair of pendant lights or a single statement fixture can visually center the island and make prep work easier.
Design Ideas Inspired by Real-Life Workbench Islands
Need some visual direction for your “old workbench in the kitchen” dream? Here are a few design vibes that show how flexible this idea can be:
- Industrial farmhouse: Keep the workbench base raw or slightly stained, add black or iron hardware, and top it with butcher block. Pair with black pendant lights and white cabinets for contrast.
- Soft cottage charm: Paint the base in a muted pastel or off-white, keep the old wood top visible, and layer in open shelves and baskets underneath.
- Modern rustic mix: Combine a rugged workbench base with a sleek, minimalist countertop and simple bar stools. Keep décor minimal so the wood’s patina stands out.
- Rental-friendly hack: Use a newer, store-bought workbench (like a heavy-duty adjustable bench with drawers) and treat it as a freestanding island. Style it with plants, trays, and everyday dishes so it feels intentional rather than “garage overflow.”
Whether your kitchen is small and cozy or wide and open, a workbench island can be scaled to fit. Narrow benches can serve as snack bars or coffee stations, while longer, deeper benches become full-fledged cooking hubs.
Pros, Cons, and What to Expect Day-to-Day
Before you commit to hauling 200 pounds of vintage wood into your kitchen, it’s worth being honest about the pros and cons.
The Upsides
- Unique look: No one else has the exact same island you do.
- Durability: These benches are built to take abuse.
- Flexible function: Prep station today, buffet table for a party tomorrow.
- Sustainability: Reusing old furniture is great for your budget and the planet.
The Trade-Offs
- Old wood can stain more easily than modern sealed countertops.
- You may have to maintain the finish with occasional re-oiling or resealing.
- Sizes are not always “standard,” so you adjust your layout to the piece, not the other way around.
- Heavy benches can be hard to move once in place (casters help a lot here).
For most people, the character, storage, and workspace more than make up for the quirksas long as you go in knowing you’re adopting a vintage, not buying something straight off a showroom floor.
Real-Life Experiences with an Old Workbench in the Kitchen
It’s one thing to admire photos of a gorgeous old workbench in the kitchen; it’s another to live with one day in and day out. Here are some real-world style experiences and scenarios that can help you picture how this might work in your home.
The Weekend Baker’s Favorite “Sous-Chef”
Imagine a narrow kitchen where the regular counters are always jammed with appliances. A vintage workbench moves into the center of the room and suddenly baking has its own dedicated stage. The lower shelf holds big mixing bowls, cake stands, and a bin of flour and sugar. The top is sanded smooth and sealed, with a marble slab parked on one end for pastry.
On Saturday mornings, the baker sets up shop entirely at the workbench: stand mixer at one corner, ingredients lined up on a tray, cooling racks waiting on the lower shelf. Everything happens in a small, efficient footprint. When the baking session is over, a quick wipe-down and the island goes back to holding fruit bowls, flowers, and tomorrow’s lunch boxes.
The Busy Family Command Center
In a bigger family kitchen, an old workbench island can become the unofficial command center. The drawers catch all the little things that used to clutter the counters: pens, chargers, homework, coupons, snack bars, and dog treats. A basket on the lower shelf becomes the “drop zone” for reusable shopping bags and lunch containers.
During the week, someone’s chopping vegetables at one side while another person is packing lunches at the other. Kids can sit on stools while doing homework, and there’s still room at the far end for a cutting board and dinner prep. The workbench earns a few new nicks from dropped utensils and spilled juice, but honestly, that just blends into the story it was already telling.
The Small Apartment Space-Saver
In an apartment with limited counter space, a workbench-style island can act like a Swiss Army knife. A slightly narrower bench slides between the kitchen and living area. On weekdays, it’s all about function: a coffee station, toaster parking spot, and prep area. On weekends, a runner and some candles transform it into an informal buffet or cocktail station when friends come over.
Because the bench is on locking casters, it can be nudged aside for cleaning or repositioned when you want more floor space. It’s not just a piece of furniture; it’s a flexible zone that makes the apartment feel bigger and more intentional.
The Renter-Friendly Workshop Bench Hack
Not everyone finds a charming antique. Some people start with a brand-new garage-style workbench from a home improvement store. With a bit of imagination, these utilitarian pieces can still translate beautifully into a kitchen.
Picture a fresh, metal-framed bench with a thick wood or composite top. Once assembled, it gets a coat of paint on the legs to match the kitchen cabinets, a strip of peel-and-stick tile or contact paper on the drawer fronts, and some handsome hardware. A durable cutting board or butcher block sits on top for prep. Because it’s freestanding and not permanently attached, it works perfectly for renters who want more function without altering the landlord’s cabinets or countertops.
What People Commonly Say After the Switch
People who’ve embraced the “old workbench in the kitchen” idea often report the same thing: it becomes the most-used and most-loved piece in the room. Guests gravitate to it. Holiday buffets make sense again because there’s a natural spot to set out dishes. Everyday tasks like chopping vegetables, making school lunches, or kneading dough feel less cramped and more enjoyable.
Sure, it may show water marks over time, the top might need to be resealed, and you’ll probably apologize at least once for a stubborn stain that never fully came out. But more often than not, those quirks are what make the island feel like it truly belongs in your home, rather than something that was wheeled in and might be wheeled out again next year.
Final Thoughts: Is a Workbench in the Kitchen Right for You?
If you love the idea of a kitchen that feels warm, lived-in, and uniquely yours, an old workbench in the kitchen is an inspired option. It blends function and personality, adds valuable storage and prep space, and tells a story every time you set down a mixing bowl or cup of coffee.
With realistic expectations, a bit of elbow grease, and a good plan for cleaning, sealing, and styling, you can transform a dusty, forgotten workbench into the focal point of your home. It’s part DIY project, part design statement, and part conversation starterand once you’ve lived with it for a while, you may wonder how you ever cooked without it.