There are breads that show up politely, make nice toast, and leave without a fuss. And then there’s oatmeal bread with
molasses and honeythe loaf that walks into your kitchen wearing a cozy sweater, smells like a farmer’s market candle
(in a good way), and somehow makes plain butter feel like a life upgrade.
This recipe gives you a soft, sliceable sandwich loaf with a hearty oat vibe, a warm molasses depth, and honey sweetness
that doesn’t shout. You’ll also get the “why” behind each step (so you can bake like you meant it), plus troubleshooting,
storage tips, and simple variations.
Why Oats, Molasses, and Honey Work So Well Together
Oats bring tenderness and a gentle chew, but they also soak up moisture like tiny edible sponges. That’s why oatmeal bread
stays soft longerwhen you hydrate the oats first, they hold onto water inside the crumb instead of stealing it from your
dough later.
Molasses adds color and a deep, almost toasty sweetness (think: brown sugar’s moodier cousin). Honey adds aroma and a smooth
sweetness that plays nicely with oats. Together, they make a loaf that tastes “old-fashioned” without being dry, heavy, or
stuck in 1897.
Oatmeal Bread With Molasses and Honey (Two-Loaf Recipe)
Yield: 2 standard loaves (9×5-inch pans)
Total time: About 3.5–4.5 hours (mostly rising)
Skill level: Beginner-friendly, as long as you can wait for dough to rise without staring it down.
Ingredients
- Rolled oats: 1 cup (about 90g), plus 2–3 tablespoons for topping
- Boiling water: 1 3/4 cups (about 415g)
- Unsalted butter: 4 tablespoons (56g), cut into pieces
- Honey: 1/3 cup (about 110g), plus 1–2 tablespoons for brushing (optional)
- Unsulfured molasses: 3 tablespoons (about 60g) (dark/robust is ideal)
- Salt: 2 teaspoons (12g)
- Instant yeast: 2 1/4 teaspoons (7g) or active dry yeast 2 1/4 teaspoons (7g)
- Warm water (only if using active dry yeast): 1/2 cup (120g), about 105–110°F
- Bread flour: 5 1/2 to 6 cups (about 660–720g), divided
- Whole wheat flour (optional, for nuttier flavor): 1/2 cup (60g) (replace 1/2 cup bread flour)
- Vital wheat gluten (optional, helps loft with oats): 1 tablespoon
- Neutral oil (for the bowl and pans): 1–2 teaspoons
Step-by-Step Instructions
1) Hydrate the oats (the “don’t-skip-this” step)
In a large mixing bowl (or the bowl of a stand mixer), combine the rolled oats, boiling water, butter, honey, molasses,
and salt. Stir well. Let the mixture sit until it cools to warmnot hotabout 20–45 minutes.
If you have a thermometer, aim for 105–110°F.
Why this matters: oats need time to soften, and yeast does not enjoy hot-tub temperatures. Warm is cozy. Hot is yeast karaoke
night in the afterlife.
2) Activate yeast (only if using active dry)
If using active dry yeast, stir it into 1/2 cup warm water and let stand for 5–10 minutes
until foamy/creamy. If using instant yeast, you can mix it right in with the flour in the next step.
3) Mix the dough
Add the yeast (instant: add it with the flour; active dry: pour in the yeast mixture) to the cooled oat mixture.
Add 3 cups of the bread flour (plus the optional whole wheat flour and vital wheat gluten, if using).
Mix until you get a thick, shaggy dough.
Gradually add more flour, 1/2 cup at a time, mixing well after each addition. You’re aiming for dough that is
soft and slightly stickyit should pull from the sides of the bowl, but still feel tacky.
Oatmeal dough often looks a little “craggy” at first; that’s normal.
4) Knead until elastic (but don’t turn it into a flour brick)
Knead with a dough hook on medium-low for 8–10 minutes, or by hand for 10–12 minutes
on a lightly floured surface.
Pro tip: If the dough is very sticky, let it rest for 10 minutes before kneading again.
Oats keep absorbing moisture as they sit, and the dough often becomes easier to handle without dumping in extra flour.
5) First rise
Lightly oil a bowl. Place the dough inside, turn to coat, and cover. Let rise in a warm spot until doubled,
about 60–90 minutes.
6) Shape and pan
Grease two 9×5-inch loaf pans. Punch down the dough and divide it into two equal pieces.
Shape each into a loaf: pat into a rectangle, roll into a log, pinch the seam closed, and place seam-side down in the pan.
7) Second rise
Cover pans lightly and let rise until the dough crowns about 1 inch above the rim, usually
40–75 minutes depending on your kitchen temperature.
8) Bake
Preheat oven to 350°F. Lightly brush the tops with water (or a little milk) and sprinkle with a few oats.
Bake for 30–38 minutes, rotating pans once halfway through for even browning.
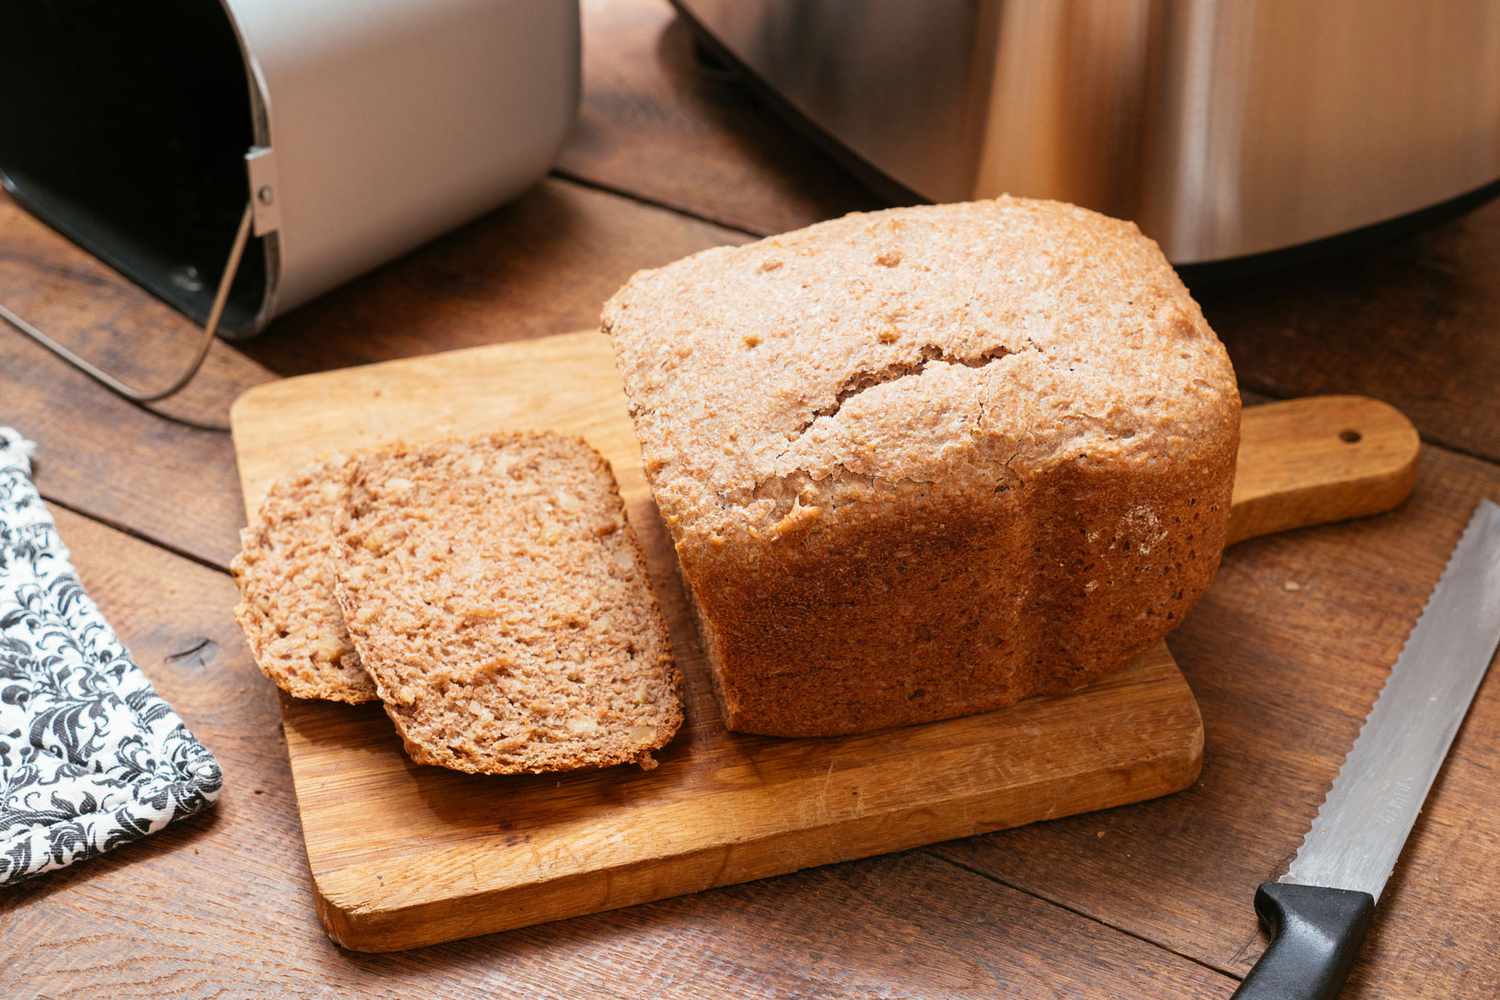
The loaves are done when they’re deeply golden and the internal temperature reaches about 190°F.
If the tops are browning too fast, loosely tent with foil for the last 10 minutes.
9) Finish and cool (yes, coolthis is where patience pays rent)
Remove loaves from pans and cool on a rack for at least 1 hour before slicing.
If you want a glossy top, brush with 1–2 tablespoons honey while warm.
Flavor Notes and Ingredient Choices
Which molasses should you use?
For this bread, unsulfured dark molasses is the sweet spot: rich flavor without bitterness.
Blackstrap is stronger and more bitter, so use it only if you love a bold, almost espresso-like edgeand consider using a bit less.
Rolled oats vs quick oats
Old-fashioned rolled oats give the best “hearty” texture. Quick oats work in a pinch, but the loaf will be
slightly less chewy. Avoid steel-cut oats here unless you cook them into a porridge first (different method, different loaf).
Why bread flour helps
Oats don’t form gluten, and they can weigh down the dough. Bread flour’s higher protein supports a better rise and a more
sliceable crumbespecially important if your goal is sandwich bread that doesn’t fold like a sad piece of cardboard.
Troubleshooting (Because Bread Has Opinions)
Dough feels too sticky
- Wait 10 minutes, then knead againoats continue absorbing water.
- Add flour gradually, 1 tablespoon at a time, not in dramatic snowstorms.
- Lightly oil your hands instead of adding flour if you’re shaping by hand.
Loaf didn’t rise much
- Make sure the oat mixture cooled before yeast went in (hot = yeast’s villain origin story).
- Give it more timecool kitchens slow fermentation.
- Check yeast freshness; if it’s been living in your pantry since middle school, replace it.
Bread is dense
- Don’t over-flour. A slightly tacky dough often bakes up lighter than a stiff one.
- Knead until elasticgluten structure is your scaffolding.
- Consider the optional vital wheat gluten if you consistently get heavy loaves.
Crumb is gummy
- Let it cool fully before slicing. Steam needs time to escape.
- Confirm doneness with temperature (around 190°F is a reliable target for sandwich loaves).
Easy Variations (Same Cozy Bread, Different Outfits)
Seeded breakfast loaf
Add 1/2 cup sunflower seeds or pepitas, plus a tablespoon of flax or chia. Great toasted with butter and a little extra honey.
Cinnamon-raisin version
Add 1 teaspoon cinnamon with the flour and fold in 3/4 cup raisins near the end of kneading. You’ll get “oatmeal cookie energy,” but in bread form.
One-loaf option
Halve all ingredients and bake in one 9×5-inch pan. Start checking doneness around 28–32 minutes.
Serving Ideas (Besides “Standing at the Counter Eating It”)
- Toast: butter + flaky salt = instant personality.
- Sandwiches: turkey, cheddar, apple slices, and mustard is surprisingly perfect.
- With soup: pairs beautifully with chili, lentil soup, or anything smoky.
- French toast: the molasses note turns “breakfast” into “brunch that gets compliments.”
Storage and Make-Ahead Tips
For best texture, store cooled bread at room temperature in a moisture-resistant bag or wrap.
Bread generally keeps well for a couple of days at room temp; refrigeration can slow mold but tends to make bread stale faster,
so freezing is the best choice for longer storage.
- Room temperature: enjoy within 2–4 days for best quality.
- Freezer: slice first, then freeze with parchment between slices for easy toast-on-demand.
- Reheating: toast slices straight from frozen, or thaw a loaf at room temp still wrapped.
Final Thoughts
Oatmeal bread with molasses and honey is the kind of recipe that makes your kitchen feel like a small victory. It’s practical
(sandwich-ready), comforting (toast-ready), and forgiving enough to become part of your weekly routine. Once you nail the
“cool the oats” step and learn what “soft, slightly sticky dough” feels like, you’ll be baking this loaf like it’s no big deal
and then acting modest when everyone asks for “just one more slice.”
Real-World Baking Experiences and Notes (Extra )
Home bakers often say this is the loaf that turns “I’ve never baked bread” into “I guess I’m a bread person now.” The process
feels calm and logical: hydrate oats, mix dough, let it rise, bake. And yet, the first time you make it, there’s usually a
dramatic moment where the dough seems too sticky and your brain whispers, “This is soup. I made soup.” That’s normal.
Oatmeal dough changes as it rests because the oats keep drinking up moisture. Many people find that pausing for 10 minutes
before adding more flourturns the dough from chaotic to cooperative.
Another common experience: the aroma. Molasses smells bold in the bowl, but once baked, it mellows into something warm and
slightly toasty. Honey adds a softer sweetness that shows up more in the crust and the finish, especially if you brush the
top lightly after baking. If you’ve ever wanted your house to smell like “cozy,” this is one of the more delicious ways to do it.
Bakers also notice that the crust can brown quickly because of the natural sugars. The simple fix is to tent with foil near the
end if the top is getting darker than you want.
Slicing is where patience earns its paycheck. Fresh bread is steamy; if you cut too soon, the crumb can look gummy even if it’s
baked through. Lots of bakers learn to treat the cooling rack like a “do not disturb” zone for at least an hour. The payoff is a
neat slice that holds up to peanut butter without tearing, plus a crumb that feels moist but not wet. On day two, this bread often
tastes even better because the oat hydration settles in and the flavors round out. Toasting brings back that fresh-baked personality:
the edges crisp, the center stays tender, and the molasses note becomes more noticeable in the best way.
People also love how adaptable this recipe is to real kitchens. If someone’s flour brand is thirstier, the dough needs a splash
more water. If the kitchen is chilly, the rise takes longer. If oats are extra absorbent, the dough tightens as it stands.
The “experience” of this bread is learning to watch the dough instead of the clock. When it doubles, it’s ready. When it crowns
above the pan, it’s bake time. That habittrusting what you see and feeltends to spill into other baking projects, too.
Suddenly you’re the person casually saying, “We’ll just let it proof a bit longer,” like you’ve been doing this forever.