The IKEA INGOLF bar stool is one of those “blink and you’ll miss it” pieces: it looks simple, it’s sturdy, and somehow it
ends up in a thousand kitchensthen gets scuffed, dinged, and quietly demoted to the garage like it owes somebody money.
The good news? INGOLF is basically begging to be hacked. With the right prep and a little design confidence (or at least
design courage), you can turn a basic stool into a custom piece that looks intentional, expensive, and very much not
“I assembled this at 11:47 p.m. with one Allen key and a dream.”
In the spirit of Hometalk-style makeoverspractical, photo-friendly, and heavy on the “why didn’t I do this sooner?”this
guide walks you through a durable paint refresh, optional upholstery, and a few smart upgrades that make INGOLF feel more
comfortable and more “designer” without requiring a second mortgage or a woodworking apprenticeship.
Why INGOLF Is a Perfect IKEA Hack Candidate
It’s built for real life (and real humans)
INGOLF stools are designed for everyday use and have a reputation for feeling solid under youimportant for a seat that
gets used during rushed breakfasts, homework marathons, and “we’re just having one drink” nights that turn into three.
Many versions are tested to hold up to typical household wear, and the classic shape plays nicely with farmhouse,
traditional, coastal, and even modern spaces when you tweak the finish.
Solid wood parts = paint and stain friendly
Lots of IKEA furniture is fantastic… and also covered in laminate that can be fussy to paint. INGOLF is friendlier. Depending
on the version you own, you may have solid wood components and/or a painted finish that can be refreshed with proper
sanding and primer. That’s exactly what you want for a makeover: a surface that will actually hold onto your hard work
instead of peeling like a sunburn.
It has built-in “upgrade zones”
The seat, the backrest, and the footrest are prime targets for upgrades. Add a cushion. Repaint the frame. Two-tone the
seat. Wrap the footrest. Customize the finish to match your cabinets. INGOLF doesn’t fight you; it just sits there,
patiently waiting to become cooler.
Before You Start: Choose the Right Stool Height (So Your Knees Don’t File a Complaint)
Quick fit check: counter height vs. bar height
INGOLF commonly comes in at least two useful seat heights. A “counter-height” option is great for standard kitchen counters
and islands, while a “bar-height” option is better for taller bar tables. If you’re buying secondhand or mixing sets, check
the seat height before you commit to a full makeover. Otherwise you’ll finish painting, step back proudly… and realize your
stools are either too short or tall enough to require a climbing permit.
Comfort math that actually matters
Aim for enough legroom between the seat and the underside of your counter/table so people can sit without feeling folded in
half. Also consider the depth: stools that stick too far out can create a traffic jam in narrow walkways. A makeover won’t
change the measurementsbut it can make a cramped layout feel more cohesive by visually “quieting” the stools with the right
color and finish.
3 Makeover Directions That Work Beautifully on INGOLF
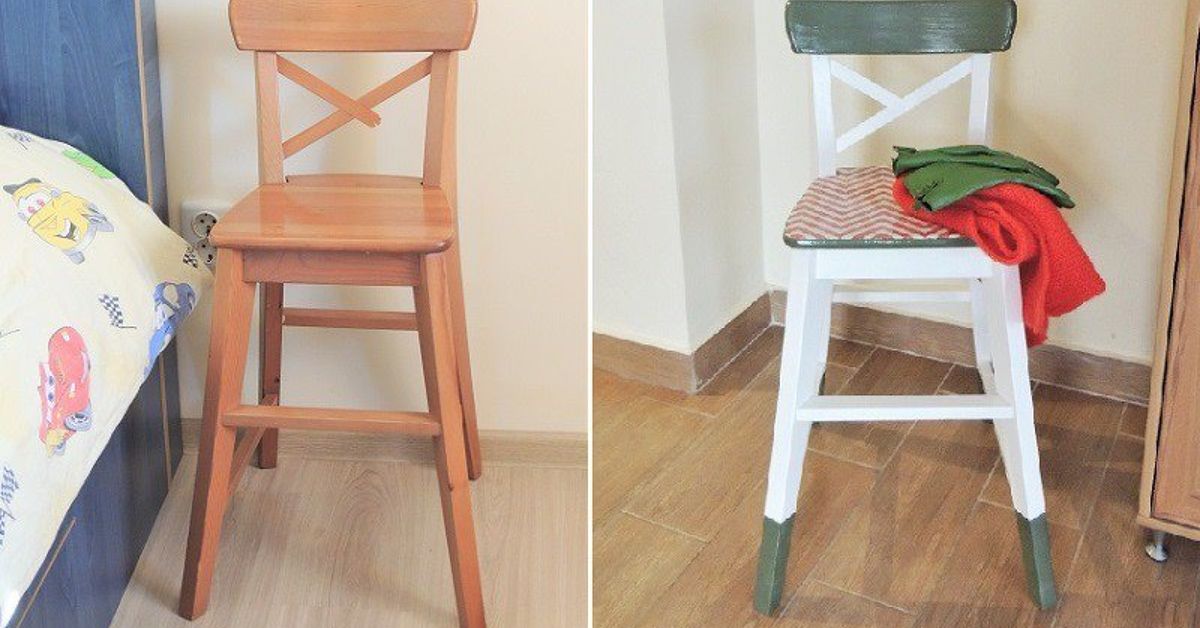
1) The “Custom Cabinet Match” paint makeover
Paint the stool frame a cabinet-matching color (or a complementary trim color), then seal for durability. This is the
fastest path to “these were made for this kitchen.”
2) The “Wood, But Better” refresh
If you like a natural look, you can refresh scuffs, deepen the tone, or unify mismatched secondhand stools. The goal is a
consistent finishwarm, clean, and intentionalnot “I found these on three different curbs.”
3) The “Comfy Upgrade” upholstery add-on
INGOLF can look great but feel a little firm for long sits. A simple padded seat (even a slim one) makes a big difference.
Upholstery also gives you a chance to bring in pattern, texture, or a wipeable performance fabric that stands up to spills.
Tools and Materials Checklist
For paint and finish
- Degreasing cleaner (or mild soap + water) and clean rags
- Sandpaper (medium + fine grit) or a sanding sponge
- Tack cloth or a slightly damp cloth for dust removal
- Bonding primer (especially if the surface is glossy or previously finished)
- Durable paint (trim/cabinet enamel style paints are popular for chairs and stools)
- Optional topcoat (water-based protective finish for extra durability)
- Painter’s tape, drop cloth, and a high-quality brush/foam roller (or spray paint if you prefer)
For the upholstery add-on
- Staple gun + staples (electric makes life easier)
- Upholstery foam (thin to medium thickness)
- Batting (soft layer that smooths edges and helps fabric lay nicely)
- Fabric (performance fabric, vinyl, or a tight weave for kitchens)
- Scissors, screwdriver, and a staple remover or flathead
- Optional: thin plywood insert if you’re building a new seat panel
Step-by-Step: IKEA INGOLF Bar Stool Makeover
Step 1: Stabilize first (aka tighten the “mystery wobble”)
Before you sand or paint anything, flip the stool over and tighten all screws. If the stool was recently assembled, it may
need a re-tightening after it has settled. If it’s older, it may simply be loose from regular use. Tighten now so you’re
not painting a moving target.
Pro move: label parts if you’re disassembling, and keep hardware in a cup. Tiny screws love to vanish like they have better
plans.
Step 2: Clean like you mean it
Paint hates grease. Kitchens produce grease. Therefore: clean thoroughly. Wipe the stool down, especially the seat edges,
footrest, and backrest where hands naturally go. Let it dry completely.
Step 3: Scuff sand (you’re not carving a statue)
The goal is to dull the sheen and give primer something to grip. You don’t need to remove every speck of the existing finish,
but you do want a uniformly scuffed surface. Pay extra attention to high-touch areas: seat edges, the top of the backrest,
and the footrest rung.
Step 4: Choose the right primer for the surface
Primer is what turns “looks good today” into “still looks good after 200 breakfasts.” If the stool is glossy, previously
painted, or prone to bleed-through (knots, tannins), a strong bonding or stain-blocking primer can save your sanity.
- Bonding primer: great for slick or glossy surfaces where adhesion is the main concern.
-
Stain-blocking primer: helpful if you’re painting light colors over wood that might show stains or
tannins.
Apply primer in thin, even coats. Let it dry fully. If it feels rough after drying, lightly sand and wipe away dust before
paint. This small step is what separates “smooth factory-ish finish” from “slightly fuzzy craft project.”
Step 5: Paint in thin coats (thick paint is where regrets begin)
Use a brush for corners and spindles, and a small foam roller for flatter areas to minimize brush marks. Two to three thin
coats typically look better and wear better than one heavy coat. Allow proper drying time between coats; rushing is how you
end up with fingerprints fossilized into your finish like ancient artifacts.
Step 6: Optional but smart: add a protective topcoat
For kitchen stools, a protective finish can help resist scuffs, spills, and the daily drama of shoes on footrests. Use a
compatible clear finish (often water-based for a clear look), and follow cure-time guidance. “Dry” is not the same as
“cured,” and stools don’t get a gentle life.
Step 7: Reassemble, add pads, and re-tighten later
Once everything is fully dry (and ideally beginning to cure), reassemble carefully. Add felt pads to the feet to protect
floors and reduce scraping. Then set a reminder to re-tighten screws after a couple of weeks of useespecially if the stools
get used daily.
Optional Upholstery Upgrade: A Cushioned Seat That Still Looks Sleek
The simplest method: padded seat panel
- Remove the seat (if your version allows) or create a separate seat topper panel.
- Cut foam to match the seat shape. A slimmer foam can look more modern; thicker foam feels more plush.
- Add batting over the foam to soften edges and prevent “hard lines” under fabric.
- Wrap with fabric, pulling snugly and stapling on the underside. Work opposite sides to keep tension even.
- Handle corners by folding neatlythink “hospital corners,” but for furniture.
- Attach the upholstered piece securely back onto the stool.
Fabric picks that survive kitchens
- Performance fabric (often stain-resistant): great for households with kids, pets, or clumsy adults.
- Vinyl or faux leather: wipeable and durable, especially near cooking zones.
- Tight weaves: generally hold up better than loose weaves that snag easily.
Design tip: mix texture, not chaos
If your kitchen is already visually busy (strong backsplash, patterned floors, bold counters), use upholstery to add texture
in a solid colorthink linen-look performance fabric or a subtle weave. If your kitchen is neutral, this is your chance to
add a small pattern that feels curated, like a stripe, a tiny check, or a modern geometric.
10 INGOLF Makeover Ideas That Look High-End
- Two-tone classic: black frame + natural seat (or a warm upholstered pad).
- Modern farmhouse: soft white frame + oatmeal upholstery + matte clear finish.
- Moody kitchen: charcoal or deep green paint + brass nailhead trim on a padded seat.
- Coastal clean: pale blue-gray paint + textured ivory fabric.
- Scandi minimal: light neutral paint + slim upholstered pad in a solid, warm tone.
- Statement stools: bold color paint (one strong hue) + simple seat to keep it balanced.
- Vintage vibe: satin black with a subtle distressing on edges (keep it controlled, not “oops”).
- Hotel bar look: deep stain tone + faux leather seat + footrest protector for polish.
- Kid-proof neutral: greige paint + wipeable vinyl seat + tough topcoat.
- Soft glam: creamy paint + velvet-look performance fabric (yes, that exists) + clean lines.
Troubleshooting: Common Problems and Easy Fixes
“My paint is chipping on the footrest.”
That’s the highest-wear zone. Make sure you scuff sanded thoroughly, used a bonding primer, and added a durable topcoat. If
it keeps happening, consider a metal footrest cover or a wrap designed to take the abuse so your paint doesn’t have to.
“I can see brush marks.”
Use thinner coats, level the paint with a foam roller where possible, and don’t overwork it as it dries. Light sanding
between coats can help. Also: a good brush matters more than we want to admit.
“My finish feels sticky.”
Often this is cure time (or humidity) talking. Give it more time before heavy use. A fully cured finish is dramatically
tougher than a merely “dry to the touch” finish.
“The stool wobbles again after a week.”
Re-tighten screws. This is normal for many assembled seating pieces, especially after the first couple weeks of real use.
Maintenance: Keep Your Makeover Looking Fresh
- Wipe spills quickly, especially around seams and seat edges.
- Re-tighten screws occasionally to maintain stability.
- Add felt pads and replace them when worn.
- Avoid harsh cleaners that can dull or soften some finishes.
Conclusion
A great IKEA hack doesn’t just look good on day oneit holds up to real life. With smart prep, the right primer, thin coats,
and a little patience, an INGOLF bar stool makeover can look custom and feel more comfortable without turning your kitchen
into a month-long construction zone. Whether you paint to match your cabinets, add upholstery for comfort, or do both, the
result is the same: stools that look like you bought them on purpose.
Common “Real-World” Experiences DIYers Have With This Hack (and What They Learn)
Here’s the part nobody puts in the glamorous after-photo: an INGOLF makeover is simple, but it’s not “zero effort.” Most
DIYers discover pretty quickly that the real project isn’t paintingit’s everything around painting. The cleaning step, for
example, feels boring right up until you skip it and your finish starts acting suspicious. Kitchens are basically a
fine-mist oil diffuser that runs 24/7, so stools pick up invisible grime in all the places hands land: the top edge of the
backrest, the seat rim, and the footrest rung. The “experience” a lot of people have is learning that one extra wipe-down
can prevent weeks of annoyance later.
Another classic moment: the first coat. It almost always looks worse than you hoped. Patchy. Uneven. Slightly terrifying.
This is normal. Thin coats are supposed to look unimpressive at first because they’re building a finish that cures hard and
resists chips. Many people report the emotional arc goes like this: “I ruined it” → “Wait, coat two is kind of nice” →
“Okay, this is actually gorgeous” → “Why did I ever live with the old finish?” The trick is not panic-painting a heavy coat
to “fix it,” because that’s how you get drips, sticky spots, and a stool that looks like it’s wearing a sweater two sizes
too big.
Hardware surprises are also common. When you disassemble or even just tighten things, you may find one stool is a little
more dramatic than the othersslightly out of square, missing a felt pad, or wobbling like it’s trying to communicate in
Morse code. DIYers often learn to fix the wobble before paint (tighten screws, check the floor, add pads), because once the
finish is fresh, any wobble feels personal. People also learn that stools should be re-tightened after they’ve been used
for a couple of weeks, because the joints settle with weight and movement. It’s not a failure; it’s just furniture doing
furniture things.
Upholstery brings its own set of “ohhhh, that’s how it works” experiences. The first time you staple fabric under a seat,
you’ll probably staple one side too tight and the opposite side too loose, creating a tiny wrinkle that somehow becomes the
only thing you can see. Most DIYers get better fast: pull a few staples, re-center, and work in an opposite-sides pattern.
Another common lesson is fabric choice. Pretty fabric is greatuntil it pills, snags, or absorbs every spill like it’s
trying to become a permanent record. Many people end up loving wipeable options or performance fabrics because they feel
“adult” in the best way: you can host friends without guarding the stools like museum exhibits.
Finally, there’s the patience experience: cure time. A freshly painted stool can look ready, feel dry, and still not be
fully hardened. DIYers learn (sometimes the hard way) that sliding a stool under a counter too soon can leave scuffs, and
stacking stools before a finish cures can create stick marks that look like ghost fingerprints. The payoff for waiting is
huge, though. Once fully cured, the makeover stops feeling like a delicate craft project and starts feeling like actual
furniture againthe kind you can live on, not just photograph.