Dorm rooms are basically a real-life puzzle game where every piece is slightly the wrong sizeespecially your stuff.
Raising your dorm bed is one of the fastest ways to “unlock” storage, make the room feel bigger, and stop playing
Tetris with your laundry basket. But before you start shopping for risers like it’s a competitive sport, you’ll want
to pick the right method (and avoid the ones that get confiscated faster than a hot plate).
This guide walks through the safest, most common ways to raise a dorm bedusing built-in bed height settings,
approved bed risers, and dorm-provided lofting kitsplus practical storage ideas, comfort upgrades, and a
500-word “what it’s actually like” section at the end to help you plan like a seasoned campus survivor.
First: Check Your Dorm Rules (Yes, Really)
Here’s the thing: many U.S. campuses allow beds to be raised only in specific ways, while others prohibit
add-on risers or DIY lofts entirely. Policies can limit how high the bed can go, who’s allowed to adjust it,
and whether lofting/bunking hardware must come from housing staff. Translation: your “brilliant” idea might
be a violation before you even unwrap the packaging.
Quick dorm policy checklist
- Are bed risers allowed? Some schools ban them (especially homemade setups or anything that could damage floors).
- Is lofting/bunking allowed? Often only in certain buildings or bed models, and usually with approved hardware.
- Who can adjust the bed? Some campuses require staff to raise/lower beds for safety and liability reasons.
- Is there a maximum height? Even when raising is permitted, there’s often a hard cap.
- Are outlet risers banned? Some policies specifically disallow risers with built-in electrical outlets.
If you don’t know where to find these rules, check your housing handbook, move-in email, or resident portal.
It’s a lot easier to read a policy than to re-lower a bed at midnight while your roommate holds a flashlight.
Measure Before You Lift
You don’t need advanced mathjust a tape measure and 3 minutes of patience. Measuring helps you avoid buying risers
that don’t fit, raising the bed too high for comfort, or discovering your storage bins are 0.5 inches too tall
(a tragedy in slow motion).
What to measure
- Mattress size: Most dorm beds are Twin XL (about 39" x 80"), but not always.
- Under-bed clearance now: Measure from the floor to the lowest solid part of the frame.
- Target clearance: Measure your biggest storage bin (or mini fridge) height and add 1–2 inches for breathing room.
- Ceiling and head space: If you’re lofting, make sure you can sit up without bonking your head.
- Bed leg shape: Square posts vs. round legs affects which risers fit securely.
Option 1: Use the Bed’s Built-In Height Settings (Safest & Most Common)
Many dorm bed frames are designed to be raised without extra parts. The mattress platform (sometimes called the “bed deck”)
can often be repositioned on notches, pins, or channels in the bed posts. This method is popular because it’s
usually the most stable and least likely to violate housing rules.
How it typically works
- Strip the bed: Remove bedding and lift off the mattress (get helpawkward beats heroic).
- Locate the support system: Look for notches, hooks, pins, or a channel that holds the deck in place.
- Lift and reposition: Raise the bed deck to the desired notch/slot on all corners.
- Double-check level: Make sure all corners are at the same height before putting the mattress back.
- Test stability: Press down and gently shake the frame. If it rocks, fix it nownot after you’re asleep.
Pro tip: If your school says only staff can adjust beds, follow that rule. Besides being safer, it keeps you from
damaging the frame (or discovering that you accidentally created a bed that leans like a dramatic movie set).
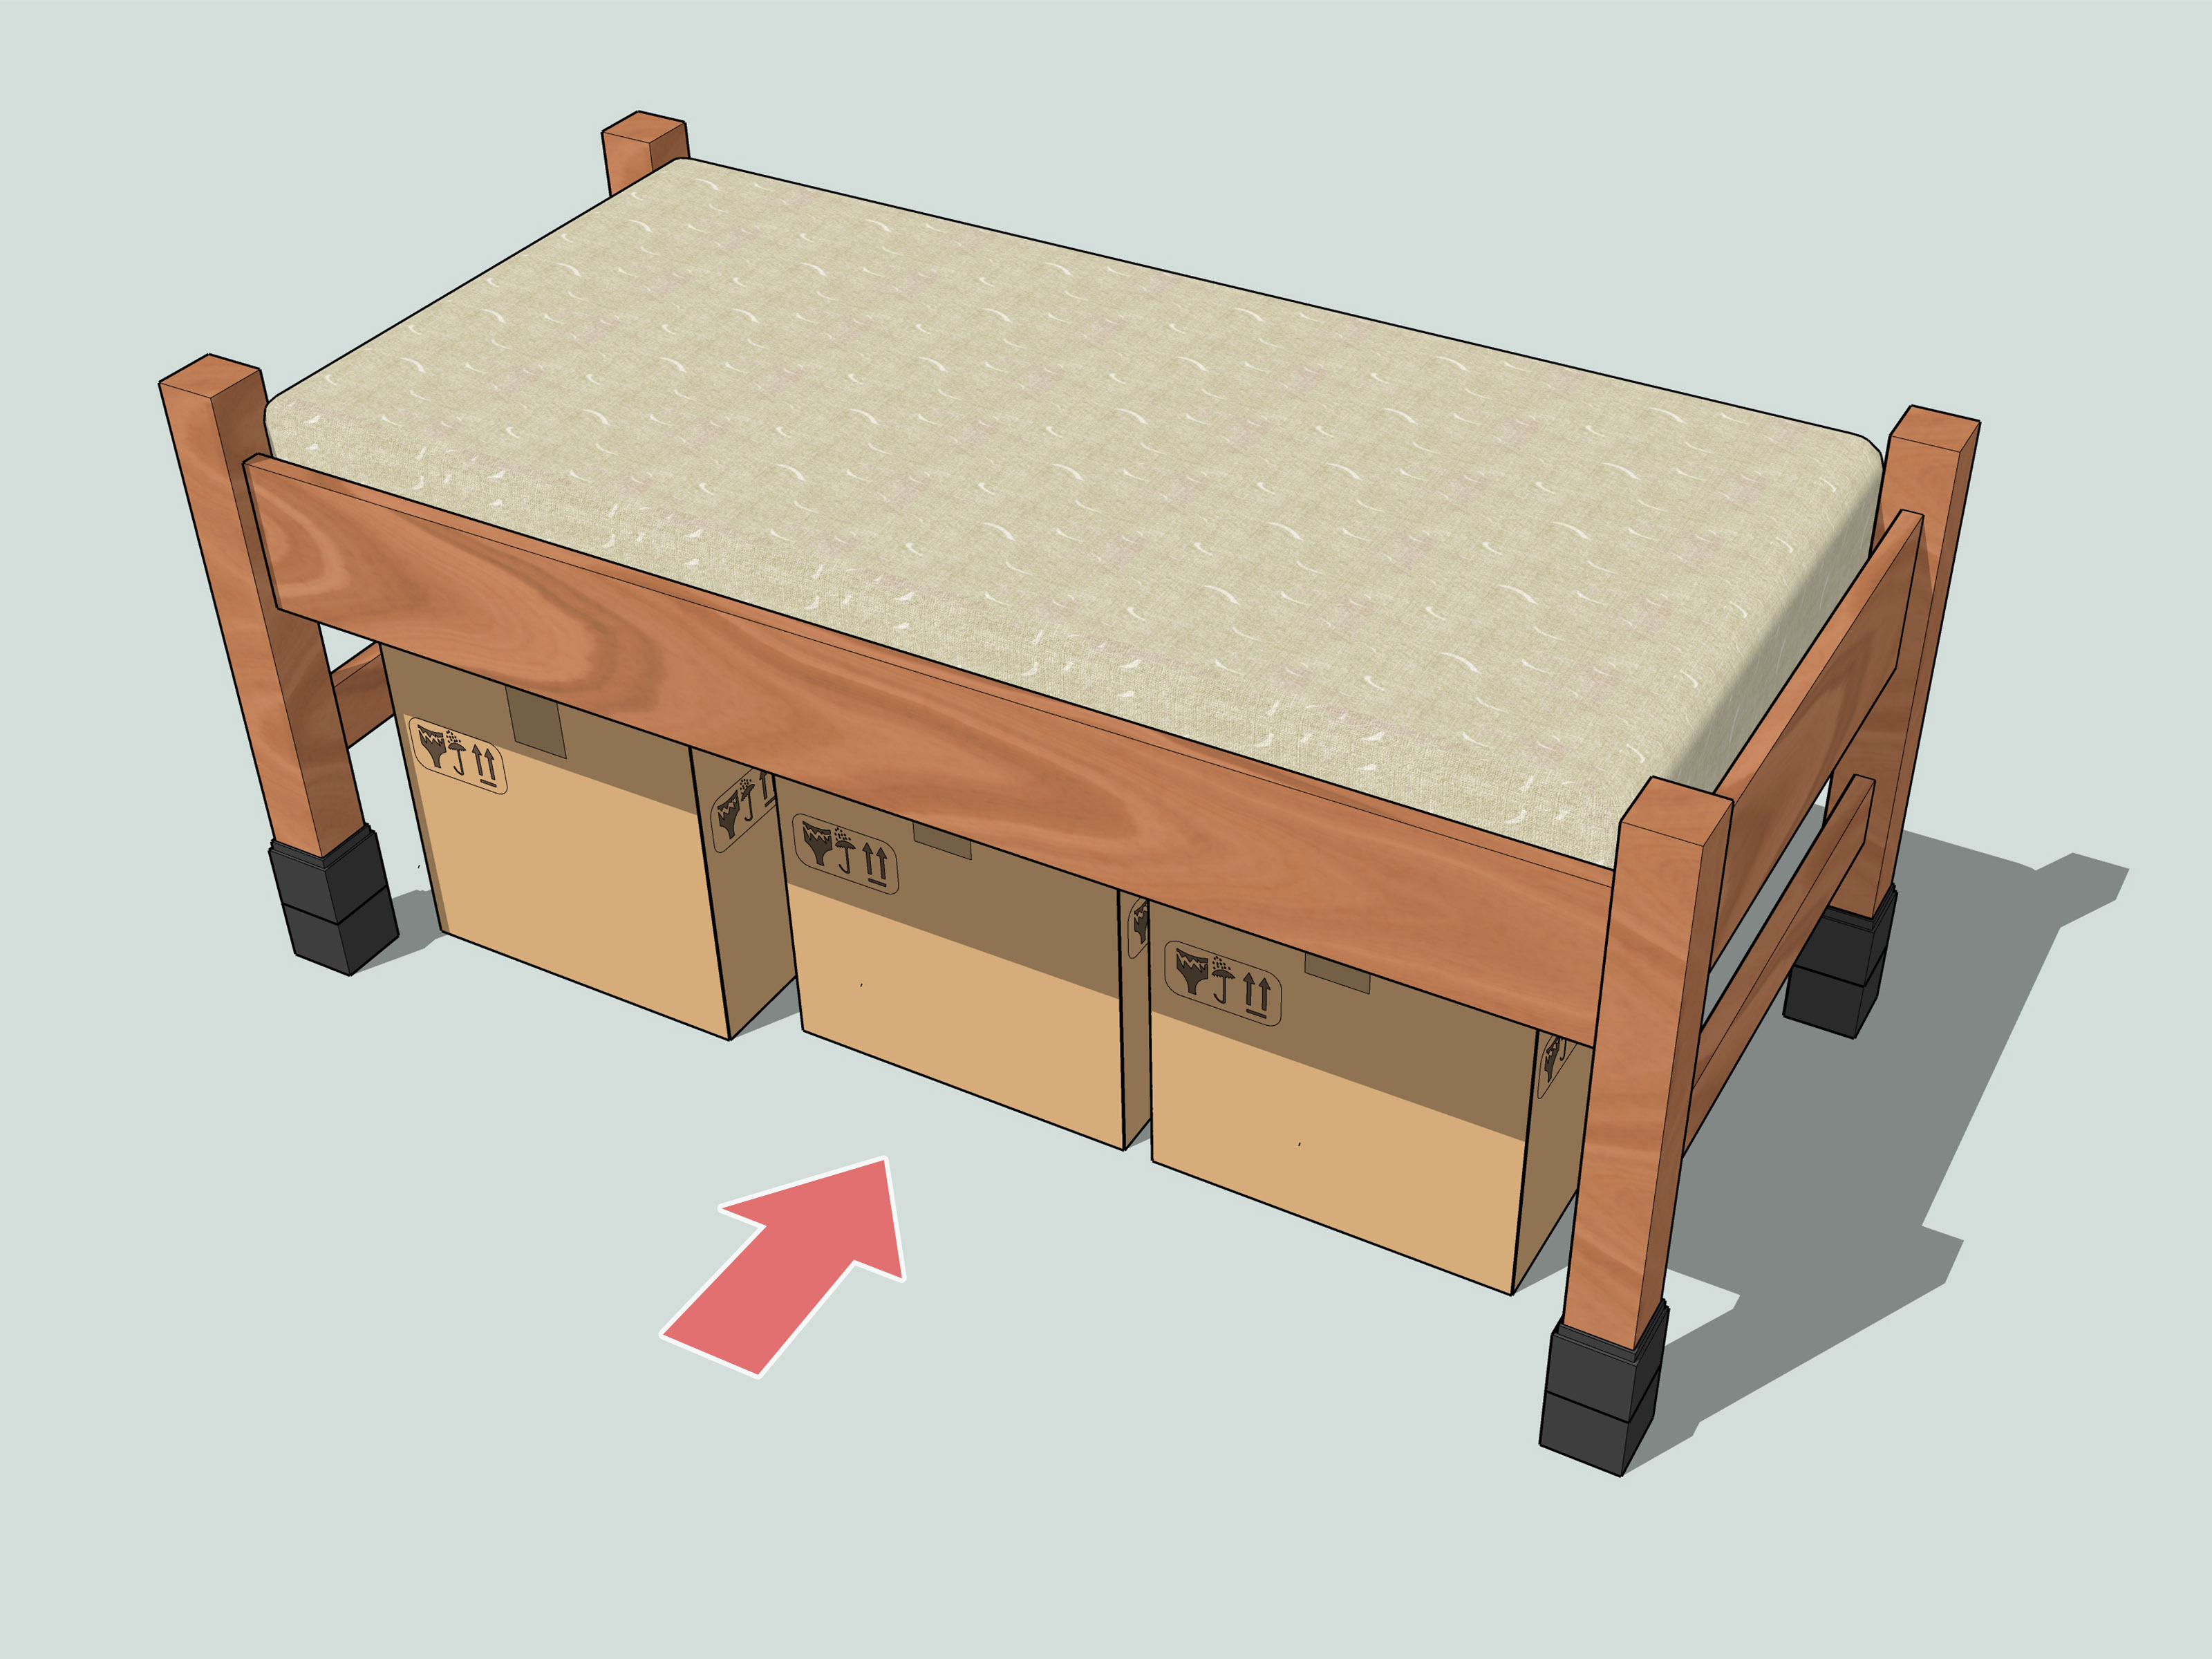
Option 2: Bed Risers (Only If Allowed)
Bed risers are blocks or cones that go under the bed legs or posts to add heightusually 3 to 8 inches, sometimes stackable.
They’re a favorite for quick under-bed storage upgrades, but they’re also the option most likely to be restricted by housing.
How to choose bed risers that won’t betray you
- Match the bed legs: Choose risers designed for the shape and width of your frame’s feet/posts.
- Choose a realistic height: If 3" gets your bins under the bed, you don’t need 8" (and your ankles will thank you).
- Check weight rating: “Bed + mattress + humans + backpacks + questionable late-night snacks” adds up fast.
- Look for anti-slip features: Rubberized tops, wide bases, or grippy pads reduce shifting on smooth floors.
- Avoid sketchy stacking: Only stack risers that are explicitly designed to stack together.
Installing risers the stable way
- Clear the area around the bed and remove anything under it.
- With a helper, lift one side of the bed just enough to slide risers into place.
- Set the bed down slowly, ensuring each leg/post is centered in its riser.
- Repeat for the other side, then gently push the bed in different directions to test for slipping.
- Add non-slip pads under risers if your floor is slick (and if housing allows floor-protective pads).
When risers are a bad idea: If your bed frame already wobbles, if the floor is uneven, if the legs don’t sit securely,
or if your housing rules prohibit them. In those cases, use the built-in adjustment or request a housing-approved solution.
Option 3: Lofting or Bunking With Dorm-Provided Hardware
Lofting raises the bed high enough to create a usable zone underneaththink desk, dresser, or a cozy chair setup.
Some dorms provide loft kits (rails, pins, bolts, tools) or allow you to sign them out. Others don’t allow lofting at all.
The safe path is always: use only approved hardware designed for your specific bed model.
Common lofting setups
- Partial loft (mid-rise): Enough height for storage bins, a compact dresser, or a mini fridge.
- Full loft: Space for a desk or lounge area underneath (most dramatic storage upgrade).
- Bunked beds: Two beds stacked using connector pins/pegs and railstypically for rooms with two residents.
Lofting safety must-haves
- Proper connectors: Pins/pegs/bolts designed for your bed frame (no “it seems fine” engineering).
- Guard rails: Especially on higher settingsrolling out of bed is not a campus tradition worth starting.
- A sturdy step stool or ladder: Climbing like a mountain goat gets old by week two.
- Clear access to exits: Don’t block doors or create a furniture obstacle course.
Reality check: Lofting can be a two-person job even with tool-free systems. If your housing office offers installation
or tool checkout, take it. You’ll save time and reduce the odds of assembling a bed that squeaks with emotional damage.
Option 4: “Alternative” Methods (What Not to Do)
You may hear rumors of students raising beds with random heavy objects or DIY platforms. Many schools explicitly prohibit
things like concrete blocks, bricks, homemade lofts, or improvised supports because they can damage property and create safety hazards.
Even if you’ve seen it on social media, that doesn’t mean it’s allowedor stable.
Avoid these common mistakes
- Using cinder blocks/bricks: Often prohibited and risky on both safety and floor damage.
- Homemade loft frames: Typically banned unless provided/approved by housing.
- Stacking unapproved risers: Instability increases fast with height.
- Raising one side higher than the other: Congratulations, you invented a bed slide.
- Ignoring rails on higher settings: Nighttime falls are a lot less funny than they sound.
Make the Extra Space Actually Useful
Once your bed is raised, the under-bed zone becomes prime real estate. The trick is to organize it so you can
access things without dragging everything out like you’re auditioning for a storage-themed reality show.
Under-bed storage ideas that work in real dorm life
- Clear bins with labels: Easy to see what’s inside and faster to find during finals week panic.
- Rolling drawers: Great if you have hard floors and enough clearance.
- Soft zip bags: Ideal for off-season clothes and extra bedding.
- Shoe organizers: Either under-bed bins or hanging organizers if you’re short on floor space.
- A “grab box” near the front: Medicine, chargers, snacks, and essentials for quick access.
Plan your “zones”
A simple system: put daily-use items closest to the edge, weekly items toward the middle,
and rarely used items farthest back. This one habit keeps you from excavating your storage every time you need a hoodie.
Comfort & Safety Upgrades After You Raise the Bed
Raising a bed changes how it feels to get in and outand how safe it is. A few small add-ons can make the setup
more comfortable, quieter, and less wobbly.
Worth-it add-ons
- Bed rails (if height increases): Especially helpful for restless sleepers.
- Step stool: Look for a stable, non-slip top. Bonus points if it doubles as storage.
- Mattress topper: Dorm mattresses are famously “fine” in the same way instant noodles are “fine.”
- Bed skirt or fitted sheet with deeper pockets: Hides storage and makes the room look cleaner instantly.
- Anti-squeak fix: Tighten bolts (if allowed) and add felt pads where metal rubs metal.
Troubleshooting: Common Problems (and Fixes That Don’t Get You in Trouble)
Problem: The bed wobbles after raising
- Confirm all corners are at the same notch/height.
- Check that the bed deck is fully seated in its slots or hooks.
- If using risers, ensure legs are centered and the floor is level.
- Move heavy items lower (under the bed), not on top of it.
Problem: You can’t lift the bed deck (it feels stuck)
- Remove the mattress and any items on the frame.
- Look for locking clips or a pin channel system that must be disengaged first.
- Ask housing staff if your bed model has a specific adjustment method.
Problem: You raised it… and now it feels too high
- Use a step stool and add rails if you’re keeping the height.
- Consider dropping one notch if sitting up or getting in/out feels awkward.
- Remember: the “highest possible” setting isn’t automatically the “best possible” setting.
A Quick Decision Guide
Pick the method that matches your dorm reality
- If your dorm is strict: Use the built-in height settings (or request staff help).
- If risers are allowed and your bed legs fit them well: Choose a modest height and prioritize stability.
- If lofting is allowed and you need maximum space: Use dorm-approved loft kits with rails and proper connectors.
- If you’re unsure: Start with built-in raising. You can always add organization upgrades after.
Real-World Experiences: What It’s Like Raising a Dorm Bed (and Living With It)
Raising a dorm bed sounds like a simple weekend projectuntil you’re doing it during move-in, surrounded by cardboard boxes,
a roommate you just met, and at least one parent holding a tiny screwdriver like it’s an ancient artifact. Here are common,
very human experiences students run into, so you can plan smarter (and laugh a little).
The Move-In Day “Why Is This So Heavy?” moment
The first surprise is the mattress. Dorm mattresses are often vinyl-covered and awkwardly floppy, which is a polite way of saying
they’re shaped like a sleepy whale. The easiest fix? Teamwork. One person lifts the mattress while the other adjusts the bed deck
or slides in risers. Students who try to solo it usually end up taking a break to “rethink their choices,” which is code for
“my arms are tired and I’m not telling anyone.”
The “We Raised It… Now How Do I Get In?” phase
After the bed goes up, there’s a short adjustment period where getting into bed becomes a mini workout. Some students hop like they’re
boarding a boat. Others do the careful sit-and-scoot. The ones who win dorm life quickly are the ones who buy a small step stool early.
It’s not just convenienceit’s safety. A sturdy step makes midnight water trips less chaotic and reduces the odds of the dreaded
“shin-to-bed-frame” collision.
The under-bed storage honeymoon
For about two weeks, under-bed storage feels like a miracle. Suddenly your room looks cleaner, you can see the floor, and you feel like
a minimalist influencer (even if you own seven hoodies). Then reality shows up: bins get shoved in without labels, random items migrate,
and you forget what you put where. The students who keep the “miracle” alive use a simple rule: label bins and keep a “front row”
for daily itemslaundry stuff, toiletries backup, extra notebooksso you don’t have to crawl halfway under your bed like you’re exploring
a cave system.
The squeak mystery
Raised beds can squeak moreespecially if the frame wasn’t perfectly seated in its notches or connectors. Many students discover this at
2:00 a.m. when they roll over and the bed announces it to the entire building. The fix is usually straightforward: re-check that the bed
deck is fully locked into place and that any bolts (if your housing allows adjustments) are snug. A little felt padding where metal rubs
can help, too. The key lesson: squeaks are often “movement + friction,” not “your bed is haunted.”
The surprise policy lesson (a.k.a. the RA visit)
A classic dorm storyline: someone buys risers online, installs them, and feels accomplishedthen learns their building doesn’t allow them.
This is why checking housing policies first saves money and stress. Students who avoid this drama either confirm the rules up front or choose
the built-in height adjustment method that housing expects. The funny part is that many campuses already offer a way to raise beds safely;
the not-so-funny part is having to undo your work right before your first week of classes.
The “loft life” vibe shift
Students who loft their beds often describe it as a room transformation. The desk-under-bed setup creates a tiny “work cave” that helps
separate study from sleep, which can be great for focus. The trade-off is that loft life demands a little more organization: climbing up
and down for every forgotten pencil gets old fast. Loft veterans keep essentials in two placesone set at the desk (chargers, pens, water)
and one set up top (lip balm, glasses, earbuds). That way, you’re not constantly commuting between levels like you live in a very small
apartment building.
Bottom line: raising your dorm bed can genuinely make dorm life easier, but the best setups come from planningknowing the rules, choosing
stable methods, and organizing the space you create. You’ll feel the difference every day… and especially when you can finally find your
other shoe without a full room excavation.
Conclusion
Raising a dorm bed is one of the most practical upgrades you can makewhen you do it the right way. Start by checking housing rules, then
choose the safest method your dorm allows: built-in bed adjustments, approved risers, or dorm-provided lofting kits. Measure first, prioritize
stability, and add small upgrades like rails and a step stool for comfort and safety. Once your bed is up, organize the under-bed space into
zones so the “extra storage” doesn’t become “extra clutter.” A little planning now pays off all semester long.