Putting the bit in a horse’s mouth sounds simple until you’re standing next to 1,100 pounds of opinion, eyelashes, and excellent memory. Some horses open politely like they’re at a fancy dinner party. Others clamp shut like a bank vault. The difference usually is not stubbornness. More often, it comes down to handling, comfort, fit, timing, and whether the horse has learned that bridling feels calm or clunky.
If you want to put the bit in a horse’s mouth the right way, the goal is not to “win.” The goal is to make bridling smooth, safe, and predictable so the horse stays relaxed and the tack goes on without drama. In practical terms, that means using gentle hands, good setup, and a bit that actually fits the horse instead of starting each ride with a metallic argument.
This guide walks through exactly how to put the bit in a horse’s mouth, what to avoid, how to check fit, and what to do if your horse resists the bridle. Whether you ride English, Western, or somewhere in the wonderfully dusty middle, the basics are the same: patience first, pressure second, force never.
Why the Bit Matters in the First Place
The bit is the part of the bridle that sits in the horse’s mouth and helps the rider communicate through pressure and release. Depending on the design, that pressure may affect the lips, tongue, bars of the mouth, chin groove, and even the poll. That is why experienced horse people obsess over bit fit and soft hands. A bit is not just hardware. It is a communication tool, and like any communication tool, it works best when it is used with tact instead of brute force.
That also explains why some horses are easy to bridle and others suddenly become difficult. If the bit pinches, hangs too low, sits too high, bangs teeth, or reminds the horse of discomfort, the horse may lift its head, tighten its lips, toss, yawn, chew anxiously, or refuse to open. In other words, a horse that “won’t take the bit” may be trying to tell you something worth hearing.
Before You Start: Set Yourself Up for Success
Check your tack first
Before the bridle goes anywhere near the horse’s face, make sure the bit is clean, smooth, and correctly attached. A dirty bit is the horse version of being handed a sticky spoon. Look for dried saliva, feed residue, rust, twisted straps, cracked leather, or cheek pieces adjusted unevenly. If the bit is upside down, crooked, or attached to mismatched holes, your horse will notice before you do.
Use a calm location
Bridling is easier in a quiet area where the horse is not distracted by feeding time, turnout chaos, or that one dramatic barn cat who behaves like management. Cross-ties can work for some horses, but many riders prefer to keep a halter around the horse’s neck while bridling so there is still a layer of control without trapping the horse’s head.
Read the horse’s body language
A relaxed horse usually stands softly, blinks normally, and keeps the neck and jaw loose. A worried horse may raise the head, tighten the lips, brace through the poll, swish the tail, or step away. If the horse is already tense before the bit appears, slow down. Rushing at that point is how a two-minute task turns into a 20-minute negotiation.
Step-by-Step: How to Put the Bit in a Horse’s Mouth
1. Stand on the horse’s left side
Traditionally, bridling is done from the left side. Stand near the horse’s shoulder, facing slightly toward the head. Stay close enough to be stable, but not so far away that you are pulling on the bridle from arm’s length like you are casting a fishing line.
2. Secure the horse before removing the halter from the head
If the horse is wearing a halter, unbuckle it and slide it off the nose, then refasten it loosely around the neck. Another option is to keep the reins over the neck before you fully change equipment. The key is simple: do not leave yourself with zero control and a loose horse halfway through the process.
3. Hold the crownpiece in your right hand
Gather the bridle so the crownpiece is in your right hand and the bit is supported in your left hand. Many riders rest their right forearm or wrist lightly over the horse’s poll while lifting the crownpiece. That gives the bridle stability and helps you guide it upward without poking, flapping, or fumbling.
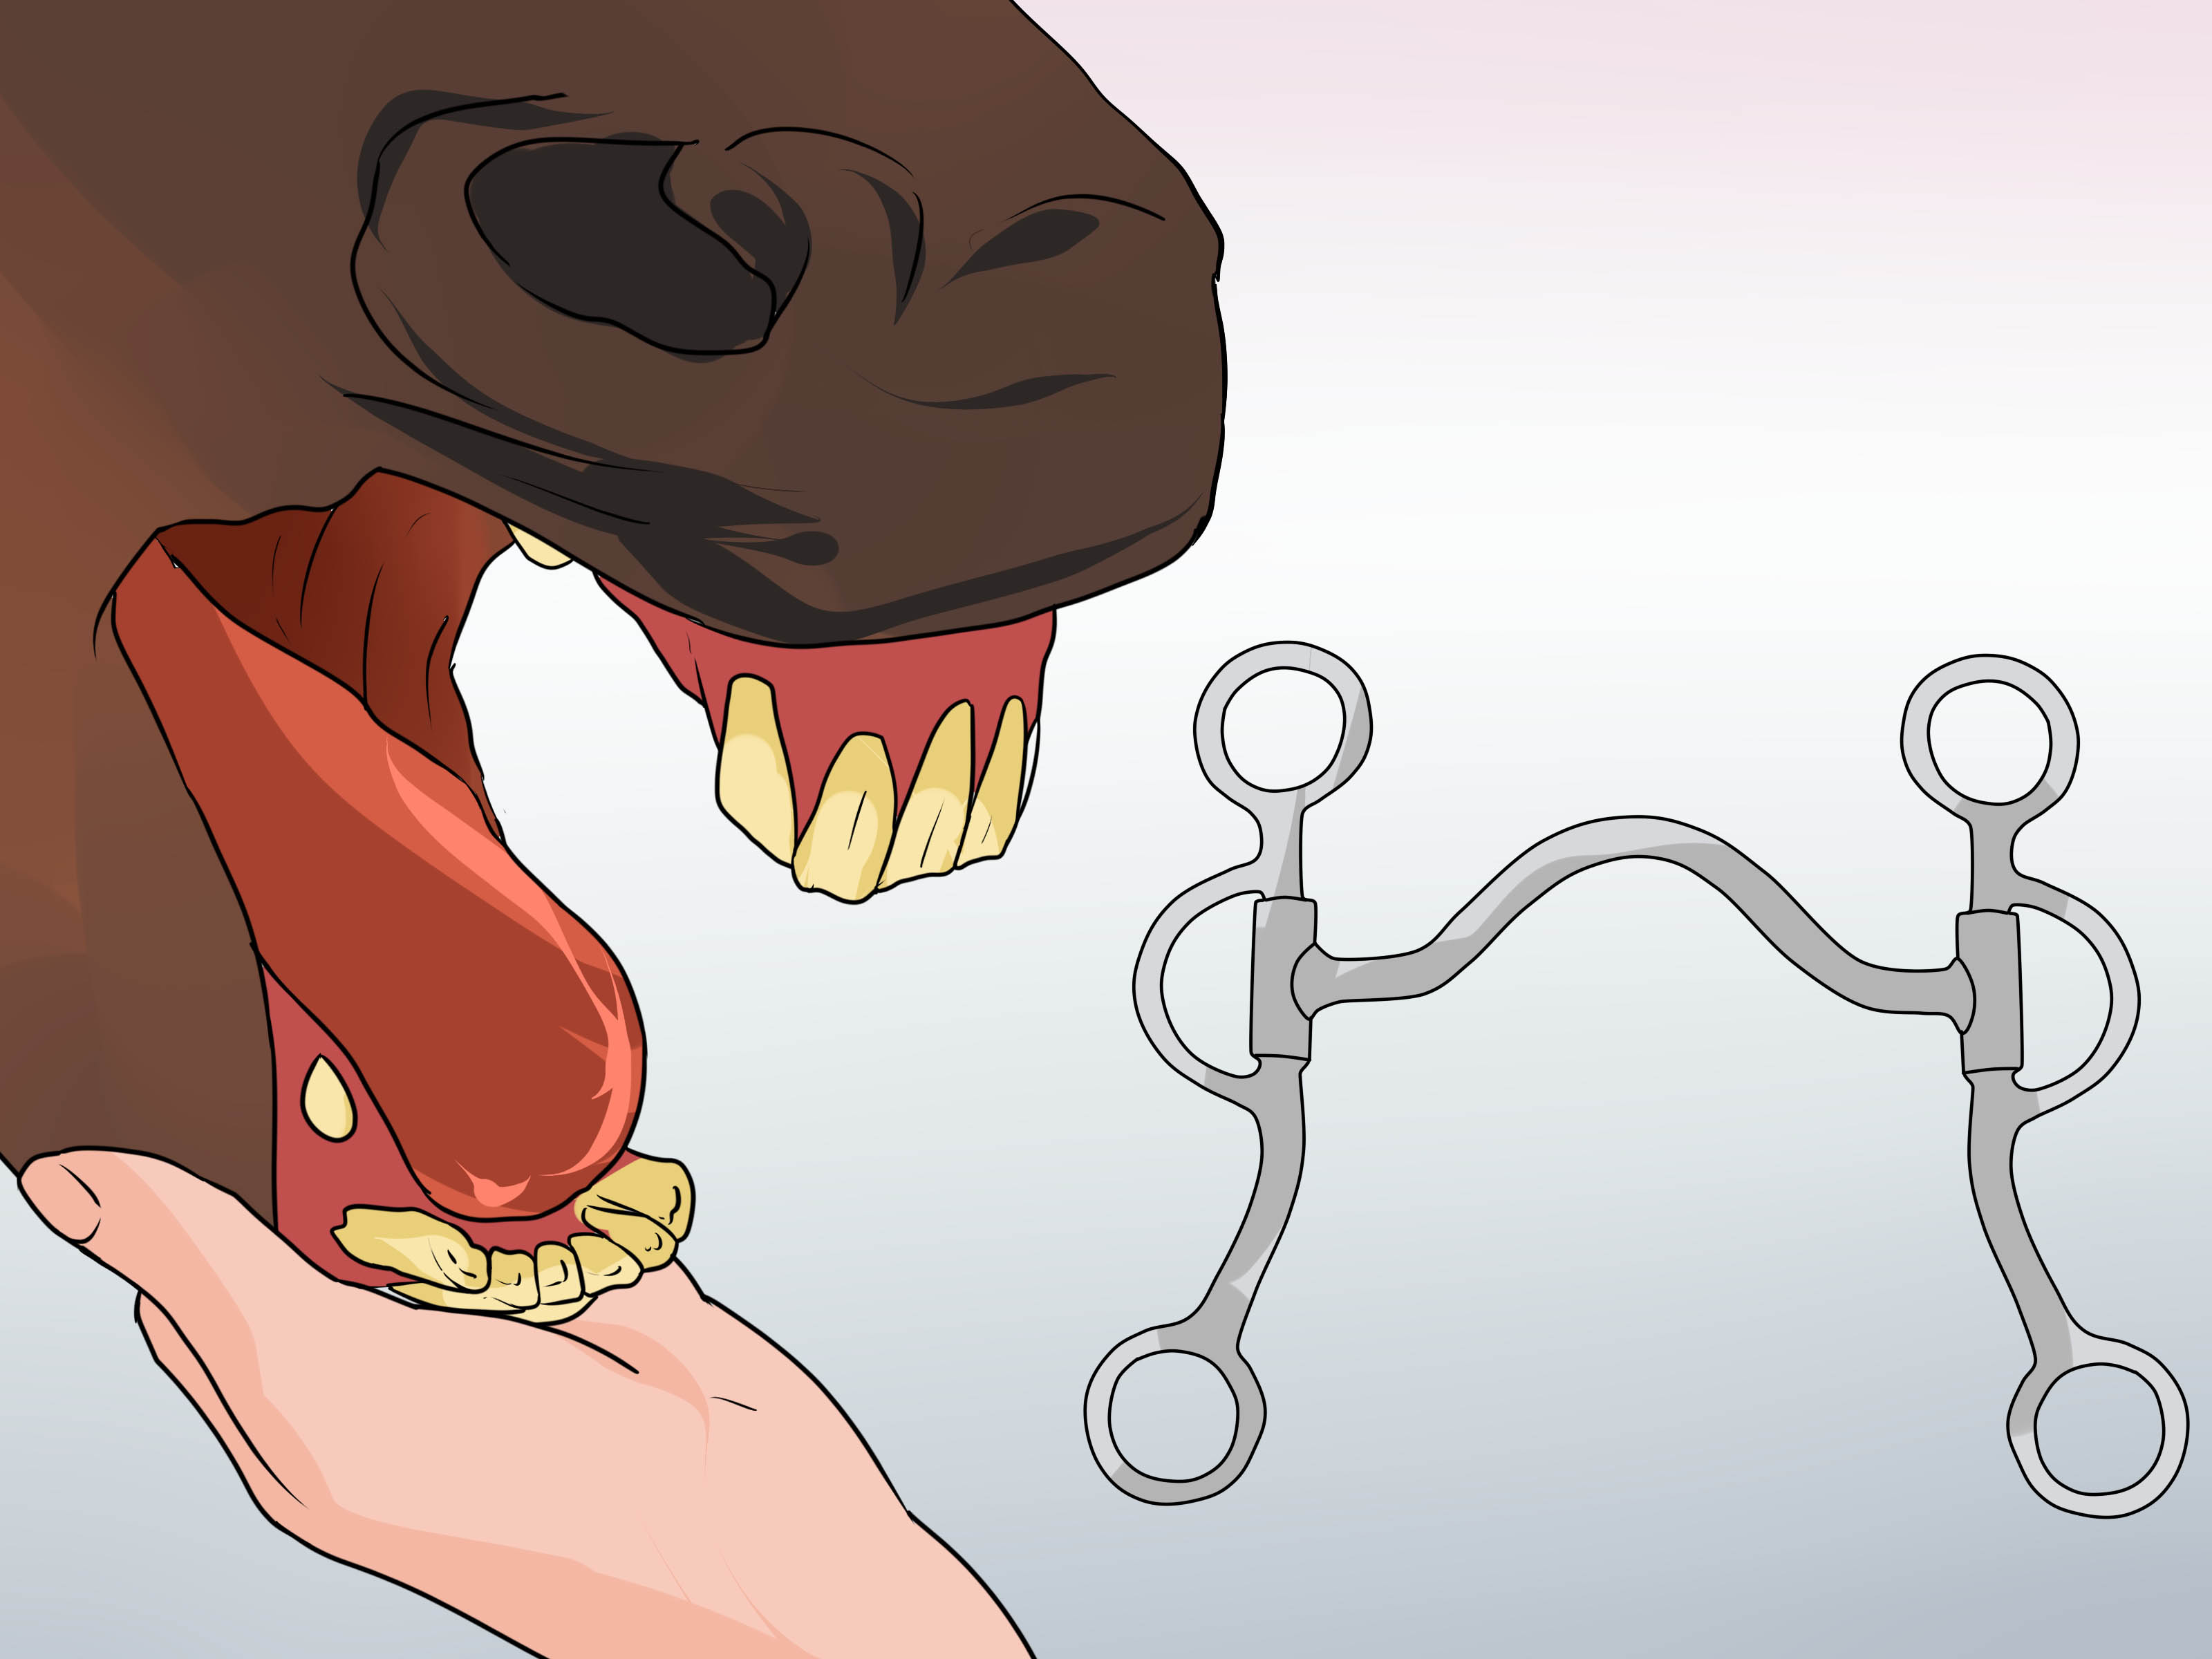
4. Bring the bit to the horse’s lips gently
Use your left hand to present the bit quietly at the horse’s mouth. Do not jab it forward, do not clack it against the incisors, and do not use the mouthpiece like a tiny battering ram. The horse should feel the bit arrive, not survive it.
5. Ask the horse to open the mouth
If the horse does not open right away, use your left thumb at the corner of the mouth where there are no front teeth. A gentle wiggle or light pressure on the bars often encourages the horse to part the lips. The moment the horse opens, reward that try by softening your hand and sliding the bit in smoothly. Timing matters here. Horses learn from release faster than from nagging.
6. Lift the bit into place without hitting teeth
As the horse opens, raise the bit carefully so it passes between the front and back teeth and settles on the bars and tongue. This is the most important moment to be neat. A horse that gets clunked in the teeth a few times can become “bridle shy” in a hurry.
7. Slide the crownpiece over the ears
Once the bit is in place, use your right hand to lift the crownpiece up and over the horse’s poll. Gently guide one ear, then the other, under the headstall. Fold the ears forward naturally rather than bending them roughly backward. Ears are not coat hooks.
8. Straighten everything before buckling
Check that the browband lies flat, the crownpiece is centered, the cheek pieces are even, and the throatlatch and noseband are not twisted. Then fasten the throatlatch and noseband if your bridle uses them. Nothing should look skewed, pinched, or like it was assembled during a small earthquake.
9. Do a final fit check
Look at the bit on both sides. It should sit evenly and quietly in the horse’s mouth. The exact height depends on the horse, the bit style, and the riding discipline, but the bit should not hang so low that it bumps the teeth or canines, and it should not be cranked so high that it pinches the corners of the lips.
How to Know the Bit Fits Properly
Bit fit is one of the biggest reasons bridling goes well or goes sideways. As a general rule, the mouthpiece should be slightly wider than the horse’s mouth so it does not pinch. Many fit guides suggest roughly a quarter-inch of extra room overall, or about one-eighth to one-quarter inch on each side, depending on the bit and horse. That is a starting point, not a universal law carved into the barn wall.
The height matters, too. Some riders want a bit to sit with no wrinkle at the corners for certain setups, while others look for one soft wrinkle, especially with particular bit types or disciplines. The more useful rule is this: the bit should rest quietly, evenly, and comfortably. If the horse looks like it is smiling for a school photo, the bit may be too high. If it droops and taps the teeth, it is too low.
Also check the rest of the bridle. A browband that is too short can pinch behind the ears. A noseband that is too tight can add tension before you even pick up the reins. A curb strap or chain should lie flat and be adjusted correctly, not hanging like a necklace or squeezing like a zip tie.
Common Mistakes to Avoid
Forcing the mouth open
If you pry, yank, or shove, the horse learns to brace against you. Force may get the bridle on today, but it usually creates a harder horse tomorrow.
Clanging the bit on the teeth
This is the classic beginner mistake. It happens when the rider rushes the insertion or lifts the headstall before the horse has actually opened. Be deliberate and slow.
Pulling the head up into the clouds
When a horse lifts its head, many people instinctively reach upward and start a game of giraffe tag. That rarely ends well. It is better to retrain the horse to lower its head and accept the bridle calmly than to battle for altitude.
Ignoring resistance
A horse that suddenly resists the bit may have dental pain, wolf teeth issues, poll discomfort, a pinching bit, a badly fitted bridle, or simple negative association from rough handling. Do not label the horse “naughty” before ruling out pain and fit.
Using a harsher bit as a shortcut
A tougher bit does not fix poor bridling manners. In many cases, it makes the horse more defensive. Better handling and better fit solve more problems than stronger metal ever will.
What to Do If Your Horse Refuses the Bit
If your horse clamps its mouth shut, throws the head up, backs away, or acts worried, take a step back and troubleshoot rather than escalating. First, review your own timing and hands. Are you bumping the teeth? Are you moving too fast around the ears? Is the bit cold, dirty, or crooked?
Next, assess the tack. Check that the bit is the right width and height, that the cheek pieces are even, and that the browband is not tight. Then consider the horse’s mouth and body. Horses with sharp enamel points, wolf teeth, sore bars, poll pain, or other discomfort may resist bridling for completely legitimate reasons.
For training issues, go back to basics. Teach the horse to lower the head from light poll pressure. Reward calm standing. Present the bridle quietly. Touch the lips gently, ask for a small try, and release immediately. Some horses also benefit from carrying the bit calmly during short groundwork sessions so the bridle stops feeling like the opening scene of a tense movie.
If resistance appears suddenly or gets worse, involve a veterinarian, dentist, or skilled trainer. There is a big difference between “needs practice” and “something hurts.” Good horsemanship knows the difference.
English, Western, and Young Horses: Does the Technique Change?
The basic bridling process stays the same, but details can change with the type of equipment. English riders often use a snaffle bridle and light rein contact, so bit placement and evenness are especially important. Western riders may use a snaffle on younger horses or a curb on more finished horses, and curb strap adjustment becomes part of the final fit check. Horses in training may also begin with simpler, milder equipment before graduating to more specialized setups.
Young horses deserve extra patience. They are still learning what the bit is, what it feels like, and why humans keep showing up with leather and opinions. A quiet introduction matters. Letting a young horse accept the bit gradually, without banging teeth or escalating pressure, can prevent a lot of bad habits later.
How to Make Bridling Easier Over Time
The best bridling tip is boring, which is how you know it works: be consistent. Approach the same way, handle the ears gently, keep the bit clean, reward the smallest cooperation, and stop making the horse guess what comes next. Horses love patterns almost as much as they love noticing when you skip one.
It also helps to practice calm mouth and head handling outside of riding time. If the only time a horse feels pressure around the lips or ears is right before work, tension can build. A little quiet practice in the aisle or stall can make the actual bridling routine far less dramatic.
Barn Experience: What This Looks Like in Real Life
In real barns, the bridling lesson usually shows up in patterns rather than big revelations. One common example is the sweet lesson horse who opens instantly for one rider and turns into a statue for another. Usually the difference is not magic. It is that the first rider steadies the crownpiece, touches the lips softly, waits for the mouth to open, and lifts the bit without touching the teeth. The second rider rushes, fumbles, bumps the incisors, then wonders why the horse suddenly believes the bridle is an instrument of betrayal.
Another familiar situation is the horse that seems “bad” only after a dental issue starts brewing. A gelding might have gone politely in the bridle for months, then begin lifting his head, chewing anxiously, and backing away when the bit appears. Once the mouth is checked, sharp points or a tender area may explain the whole story. The useful lesson there is humbling: horses are often more honest than we are. They do not always have the words, but they do have reactions.
Young horses teach a different version of the same truth. A green horse taking a bit for the first few times often does best with a slow, repetitive routine. Touch the lips. Wait. Reward. Lift softly. Stand quietly. End on a relaxed note. Riders who expect a baby horse to behave like a seasoned schoolmaster usually create tension by accident. Riders who break the task into tiny steps tend to end up with a horse that opens its mouth calmly a month later, almost as if it had been reading the training plan in secret.
Then there are the ear-sensitive horses. These are the ones who do not object to the bit at all; they object to the crownpiece sliding over the poll and ears. In those cases, people sometimes misdiagnose a “bit problem” when the real issue is rough ear handling, a tight browband, or anxiety from previous bridling. Once the rider slows down and treats the ears like delicate equipment instead of speed bumps, the whole routine improves.
One of the most useful barn-side experiences is learning that bridling success usually starts before the bit reaches the mouth. A horse that lowers its head, stands square, breathes normally, and trusts your hands is already halfway bridled. That is why experienced horse people spend so much time on ordinary things: leading politely, standing still, yielding the head, and accepting touch around the face. None of that looks flashy, but it pays off every single ride.
The long-term takeaway is simple. Horses remember how bridling feels. If every session is rushed, awkward, or uncomfortable, they prepare for trouble. If every session is quiet, clear, and fair, they begin to meet the bit with much less tension. In the horse world, that is not a small victory. That is the beginning of better rides, better communication, and fewer pre-ride debates conducted entirely through eyebrows.
Conclusion
Putting the bit in a horse’s mouth correctly is less about strength and more about skill. The safest, most effective routine is calm, organized, and considerate of the horse’s comfort from start to finish. Stand in the correct position, keep control of the horse, present the bit gently, ask for the mouth to open without force, lift the bit carefully into place, and check the final fit before you ride.
If your horse accepts the bridle quietly, great. If not, take the resistance seriously. Poor fit, rough handling, dental discomfort, and negative associations can all turn a simple task into a struggle. With patience, proper tack, and consistent handling, most horses can learn to accept the bit willingly. And that is the real goal: not just getting the bridle on, but starting every ride with trust already in place.