Note: Body-only HTML for direct publishing.
If your rubber plant is starting to look less like a stylish houseplant and more like a leafy lamp post with commitment issues, it may be time for a trim. Learning how to prune a rubber plant is one of the easiest ways to keep this bold, glossy beauty looking balanced, healthy, and beautifully shaped indoors.
Rubber plants, also known as Ficus elastica, can grow surprisingly tall inside a home. That is part of their charm, of course. But without occasional pruning, they can become leggy, top-heavy, uneven, or just plain dramatic. The good news is that pruning a rubber plant is not complicated. You do not need a greenhouse, a horticulture degree, or a soundtrack from a gardening show. You just need clean tools, a little patience, and a plan.
In this guide, you will learn exactly how to prune a rubber plant in 12 clear steps. We will also cover when to prune, how much to remove, what mistakes to avoid, and how to encourage fuller, bushier growth without stressing the plant. Whether you have a tall single-stem rubber tree or a smaller plant that has grown a little wild, these tips will help you shape it with confidence.
Why Pruning a Rubber Plant Matters
Pruning is not just a cosmetic touch-up. Done correctly, it helps control height, improves the shape of the plant, removes weak or damaged growth, and encourages branching. That last part is especially important if your rubber plant has been growing straight up like it is trying to win a race against your ceiling fan.
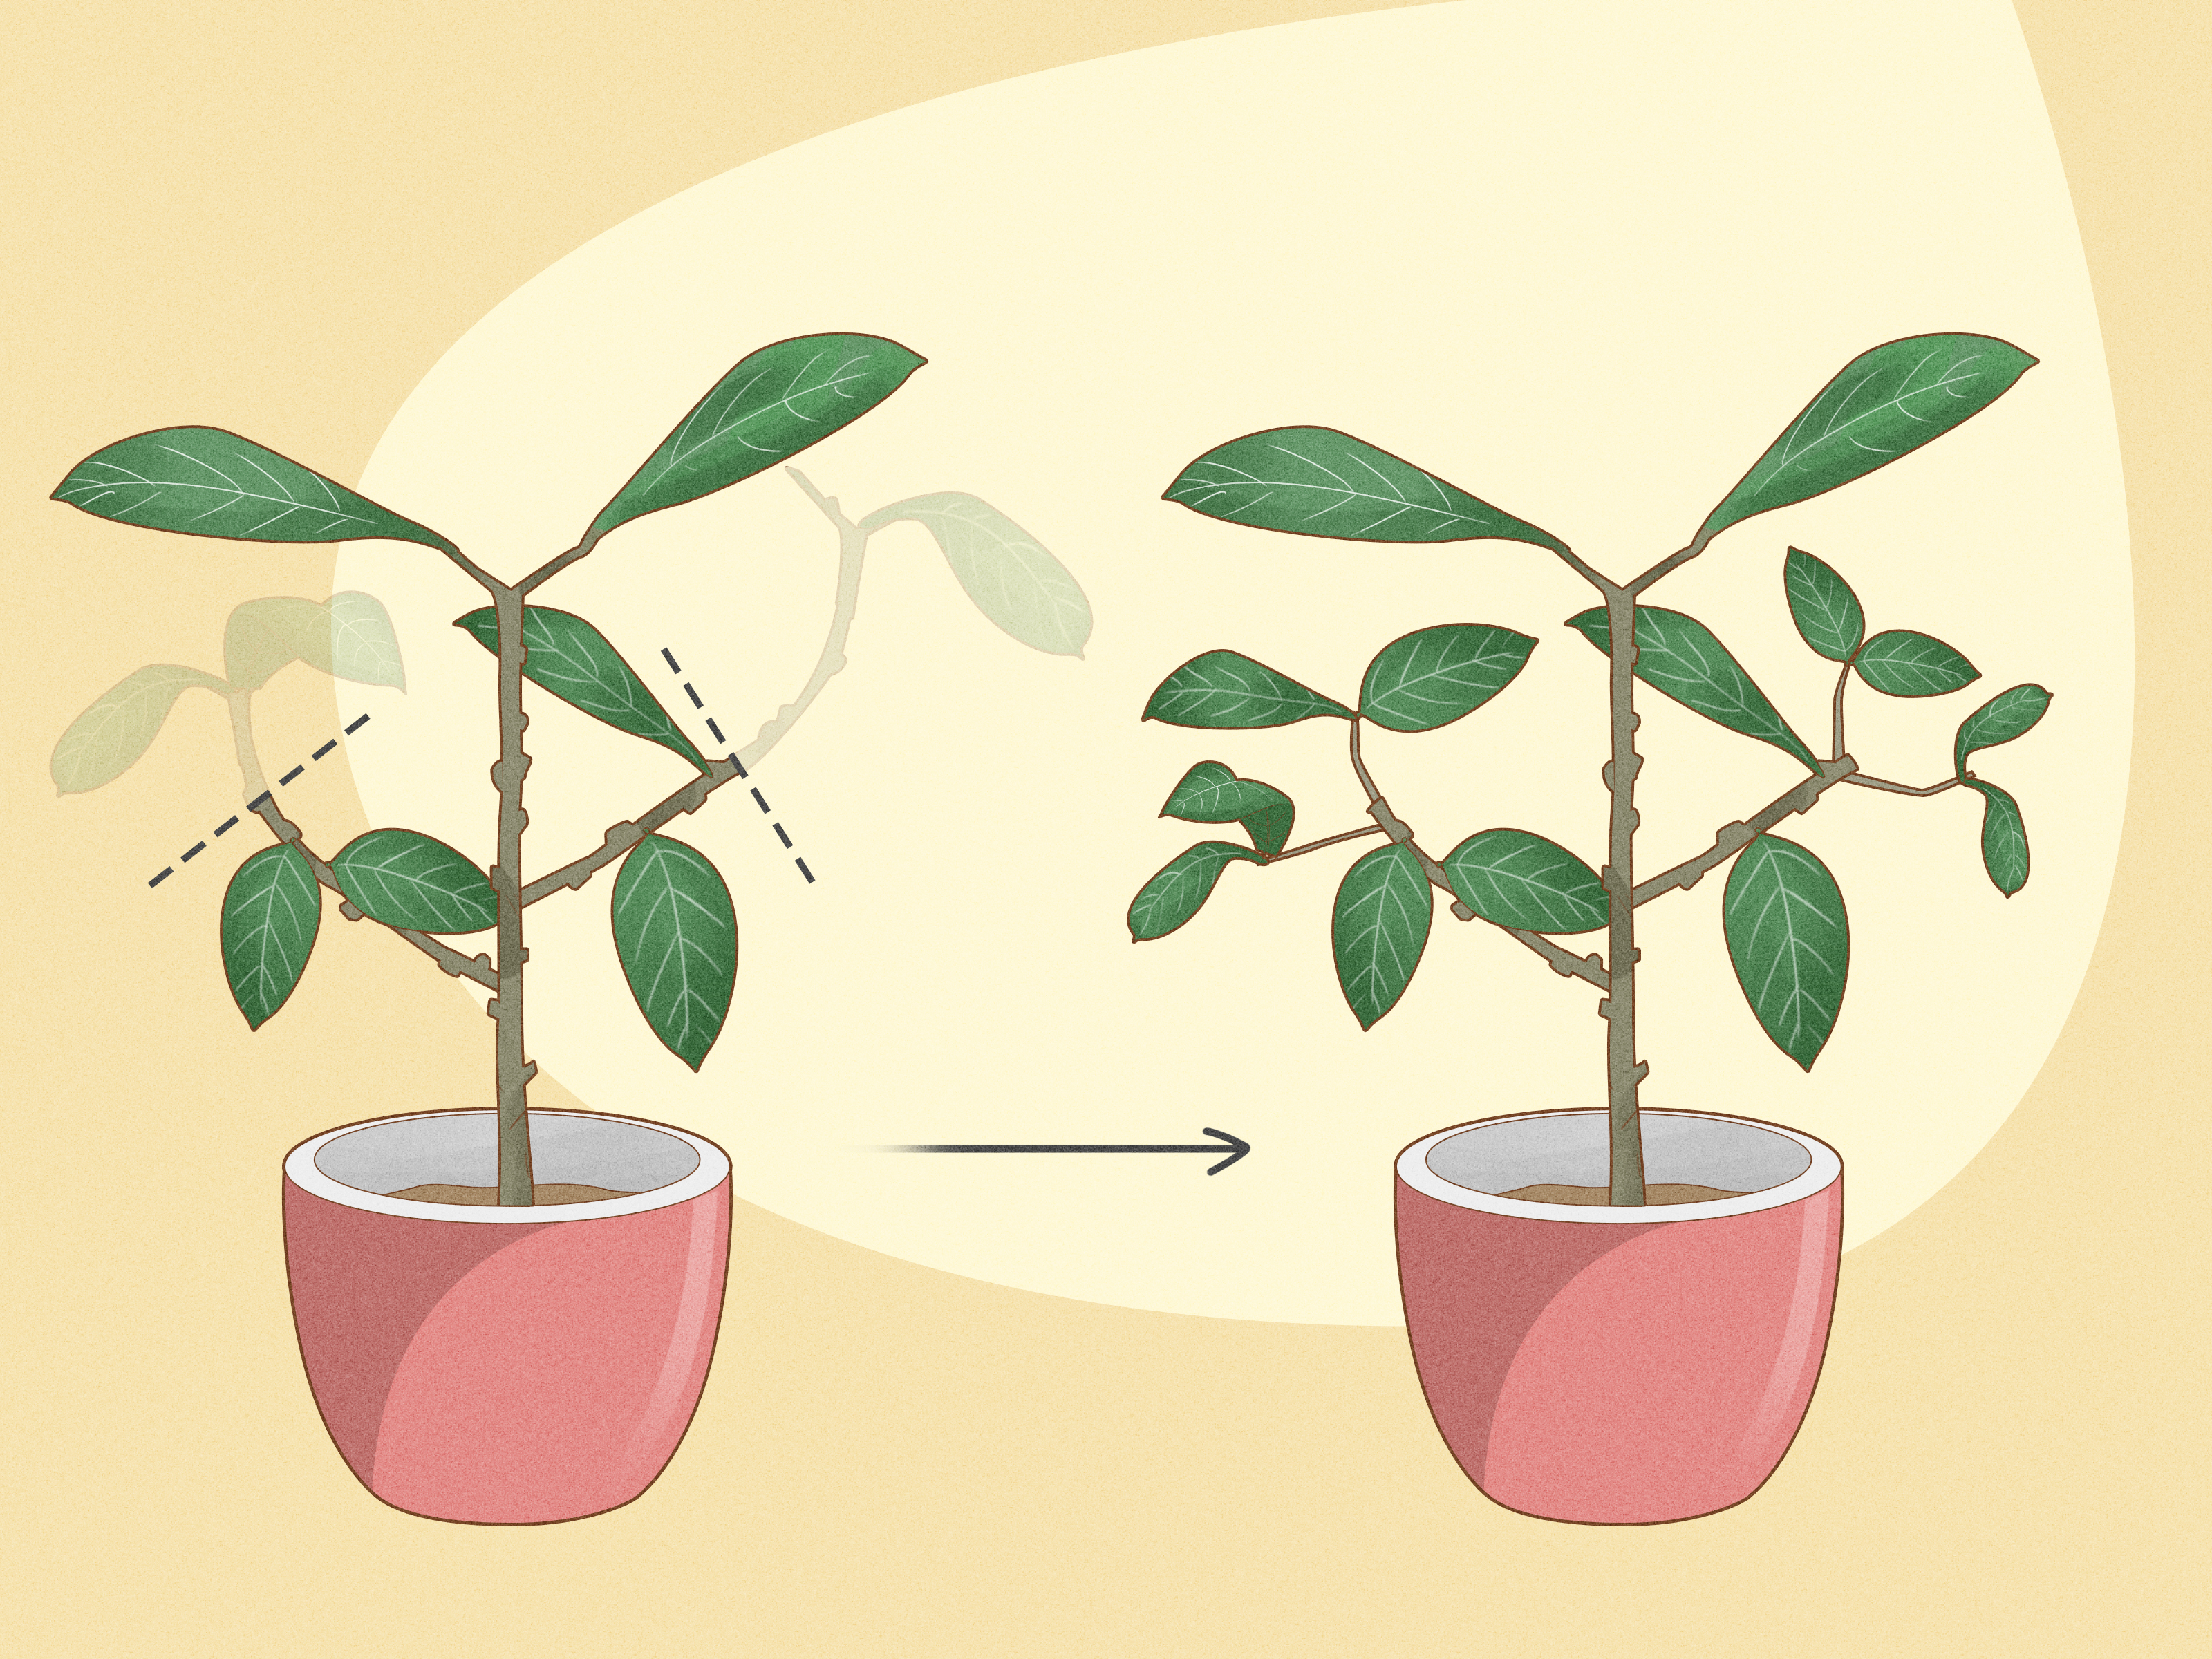
When you cut just above a node, which is the point on the stem where leaves or buds form, the plant often responds by producing new shoots below the cut. That is how you turn a lanky rubber plant into a fuller, more balanced indoor tree. Pruning can also make it easier to manage light exposure, reduce the risk of a top-heavy lean, and improve the overall look of the plant in your space.
Before You Start: What You Will Need
Before you make the first cut, gather a few basics. Clean pruning is better for the plant and much easier for you.
- Sharp pruning shears or clean scissors
- Rubbing alcohol or disinfectant for the blades
- Gloves, because rubber plant sap can irritate skin
- A soft cloth or paper towel to catch milky sap
- A trash bag or container for cuttings and leaves
- A clear idea of the shape you want
That last item matters more than people think. Random snipping may feel productive, but it is how a lovely indoor plant ends up looking like a bad haircut with roots.
How to Prune a Rubber Plant in 12 Steps
Step 1: Choose the Right Time
The best time to do major rubber plant pruning is during the active growing season, usually spring through early summer. That is when the plant is most likely to recover quickly and produce strong new growth. Light cleanup, like removing damaged leaves, can be done any time. But if you plan to reshape the plant or reduce its height, aim for warmer months when growth is naturally more vigorous.
Step 2: Inspect the Plant From All Sides
Do not start cutting the first stem that annoys you. Step back and look at the plant from every angle. Notice whether it is leaning toward the light, carrying too much weight at the top, or putting out awkward side growth. This helps you decide whether your goal is to make the plant shorter, bushier, cleaner, or more symmetrical.
It also helps you spot dead leaves, weak stems, or damaged branches that should come off first. Think of this as the planning stage. Even great pruning starts with a tiny bit of staring.
Step 3: Clean and Sanitize Your Tools
Always prune with clean, sharp blades. Dull tools can crush stems instead of making clean cuts, and dirty tools may spread disease. Wipe the blades with rubbing alcohol before you begin and again if you move from one plant to another. This step takes less than a minute and can save a lot of trouble later.
Step 4: Put On Gloves and Protect the Area
Rubber plants produce a milky sap when cut. It is normal, but it can irritate skin and make a mess on floors, furniture, and clothing. Wear gloves and keep a paper towel nearby to blot sap as it appears. If you are pruning indoors, place something under the pot or work in an easy-to-clean area. Your future self will be grateful.
Step 5: Remove Dead, Damaged, or Diseased Growth First
Start with the obvious cleanup. Trim off yellowing leaves, broken stems, soft or blackened growth, and anything that looks weak or unhealthy. This instantly improves the appearance of the plant and helps direct energy toward healthy growth. Make clean cuts close to the point of origin without tearing tissue.
If a leaf is only slightly damaged, you can leave it. But if it is mostly spent, it is just taking up space and adding drama.
Step 6: Identify the Nodes Before You Cut
Nodes are the key to successful pruning. On a rubber plant, a node is the bump or point on the stem where a leaf attaches or where dormant growth can emerge. If you want the plant to branch, cut just above a node. That encourages the plant to push out new growth below the cut instead of leaving a bare stump.
This is one of the most important rubber plant care tips to remember. If you cut too far above the node, you leave a useless stub. If you cut too low, you may damage the node you want to keep.
Step 7: Trim the Top to Control Height
If your plant is getting too tall, top it by cutting the main stem just above a healthy node. This reduces height and often encourages a fuller shape. For a tall, single-stem rubber plant, this is usually the move that changes everything. Instead of growing like a skinny indoor tree with a leaf crown, it may begin to produce side shoots and look much more balanced.
Be conservative if this is your first major prune. It is easier to remove more later than to wish you had not taken off quite so much.
Step 8: Cut Back Leggy Side Branches
If your rubber plant has long, awkward stems reaching toward the light, trim those back too. Make each cut just above a node facing the direction where you want new growth to go. This helps shape the plant and prevents that one-sided, stretched-out look that often happens when light is uneven.
Pruning a leggy rubber plant works best when you also improve lighting afterward. Otherwise, the plant may simply repeat the same behavior and stretch right back toward the nearest window like nothing happened.
Step 9: Do Not Remove Too Much at Once
A good rule is to avoid removing more than about one-third of the plant during one pruning session. Heavy pruning can stress the plant, especially if it is already adjusting to low light, irregular watering, or a recent move. If your rubber plant is very overgrown, reshape it over a few rounds instead of trying to force a total makeover in one afternoon.
Plants appreciate ambition. They do not always appreciate overconfidence.
Step 10: Blot the Sap and Let Cuts Dry
After each cut, you may see white sap ooze from the stem. Gently blot it with a paper towel or soft cloth. Do not panic. Your plant is not falling apart. This is normal for ficus species. Let the cut surfaces dry naturally. Avoid sealing them with random household products or sprays unless a plant professional specifically recommends it.
Step 11: Save Healthy Cuttings if You Want to Propagate
If you removed healthy stem sections, you may be able to use them for propagation. A cutting with a node can sometimes be rooted and turned into a new plant. This is a nice bonus when you prune a rubber plant, especially if you removed the top growing section. Instead of tossing it, you can try turning it into a second plant for another room or a generous gift for a friend who will now owe you a coffee.
Step 12: Give the Plant Smart Aftercare
Once pruning is finished, place the plant in bright, indirect light and keep its routine steady. Do not drown it with water out of guilt. Let the top layer of soil dry appropriately before watering again, and avoid fertilizing heavily right away if the plant seems stressed. Good aftercare is what helps your pruning work pay off. Within time, you should see fresh growth from the nodes below your cuts.
If the plant is especially tall or heavy, rotate it every week or two so it grows more evenly. Clean leaves also help, so wipe dust off occasionally with a damp soft cloth.
Common Mistakes to Avoid When Pruning a Rubber Plant
Even easy-care houseplants have opinions. Here are a few common pruning mistakes that can set your rubber plant back:
- Pruning with dirty tools: This increases the risk of spreading disease.
- Cutting in the wrong place: Cuts far above a node leave ugly stubs and poor regrowth.
- Removing too much at once: Hard pruning can shock the plant.
- Ignoring light problems: Pruning helps shape, but poor light often causes legginess in the first place.
- Handling sap carelessly: The milky latex can irritate skin and is not something pets should investigate.
- Expecting instant fullness: New branching takes time, patience, and decent growing conditions.
How to Encourage a Bushier Rubber Plant After Pruning
If your goal is a fuller plant, pruning is only part of the equation. Light matters just as much. A rubber plant kept in bright, indirect light is more likely to grow compactly and respond well after trimming. Rotate the pot regularly so one side does not do all the work. During the active growing season, consistent care also helps, including appropriate watering, stable temperatures, and moderate feeding.
Some plant owners also pinch or trim the top growth of young stems to encourage branching earlier. That can be especially helpful if your plant is still small and you want a shrubbier look rather than a tree form.
Experience and Real-Life Lessons From Pruning a Rubber Plant
One of the most common experiences people have with rubber plant pruning is waiting far too long to do it. The plant looks fine for months, maybe even a year, and then one day it has a bare lower stem, a heavy cluster of leaves at the top, and a lean that makes it look like it is eavesdropping on conversations across the room. That is usually the moment people realize pruning is not cruelty. It is maintenance.
Many first-time plant owners also worry that cutting the top off a rubber plant will ruin it. In practice, the opposite is often true. Once the top growth is removed above a healthy node, the plant usually has a chance to redirect energy and create new shoots. The result can be a much more attractive shape over time. It may not happen overnight, but the improvement is real. A plant that once looked sparse can slowly become fuller and more balanced.
Another very relatable experience is underestimating the sap. People go in thinking, “I will just make one quick cut,” and then suddenly discover a sticky white drip heading toward the rug like it pays rent there. Gloves, paper towels, and a protected workspace make the whole process much less annoying. This is one of those lessons that sounds small until you learn it the hard way.
There is also the light issue. A lot of indoor gardeners prune a leggy rubber plant and then wonder why it gets leggy all over again. The answer is usually simple: the plant is still reaching for better light. If the growing conditions do not improve, the pruning becomes a temporary fix instead of a long-term solution. Moving the plant closer to bright, filtered light often changes everything. Suddenly, the leaves space out more naturally, the stem stays sturdier, and new growth looks healthier.
Another interesting pattern is that people tend to discover their preferred shape only after they prune once or twice. Some love the look of a tall, sculptural rubber tree with a clean trunk and a leafy canopy. Others want a shorter, bushier plant that feels dense and lush. Neither is wrong. Pruning lets you steer the plant toward the look that works best in your home, which is honestly one of the most satisfying parts of rubber plant care.
Many growers also end up surprisingly attached to the cuttings. What begins as routine maintenance can become an unexpected propagation project. That top cutting you almost tossed out may turn into a second plant, which is how one rubber plant mysteriously becomes two, and then three, and eventually your windowsill starts looking like a ficus fan club.
Perhaps the biggest lesson from real-world pruning experience is that confidence matters. The first cut is always the hardest. After that, most people realize the plant is sturdier than expected. Rubber plants are not fragile divas. They respond well when pruned thoughtfully, cared for consistently, and placed in a good spot. Once you see fresh growth emerging from below a cut, the whole process feels much less intimidating. It starts to feel like collaboration instead of rescue.
So if your plant has grown too tall, too sparse, too crooked, or just too weird, do not panic. That is exactly what pruning is for. With a little planning and a steady hand, you can help your rubber plant look healthier, grow fuller, and fit your space far better than before.
Conclusion
Learning how to prune a rubber plant is less about perfection and more about direction. You are not trying to turn your Ficus elastica into a tiny masterpiece in ten minutes. You are simply guiding it toward healthier, stronger, better-shaped growth. Start with clean tools, cut above nodes, avoid over-pruning, and give the plant good light afterward. With those basics in place, even a leggy or top-heavy rubber plant can become a beautiful, balanced showpiece again.
In other words, prune with purpose, not panic. Your plant can handle it. And your living room may finally stop looking like it is being shaded by one extremely ambitious leaf factory.