
There is something strangely satisfying about an apothecary cubby. It looks like it wandered out of an old general store carrying secrets, tiny bottles, handwritten labels, and possibly one mysterious drawer labeled “miscellaneous.” The good news is that you do not need a historic pharmacy, a cabinetmaker’s apprenticeship, or a mustache wax collection to build one. With basic lumber, careful measuring, and a little patience, you can make your own apothecary cubby for craft supplies, seed packets, tea tins, jewelry, office odds and ends, or small decorative storage.
This guide walks you through a practical DIY apothecary cubby project that blends vintage charm with beginner-friendly construction. We will cover design choices, materials, tools, cutting, assembly, finishing, labeling, mounting, and real-world lessons that help your cubby look intentional instead of “I fought a board and the board won.”
What Is an Apothecary Cubby?
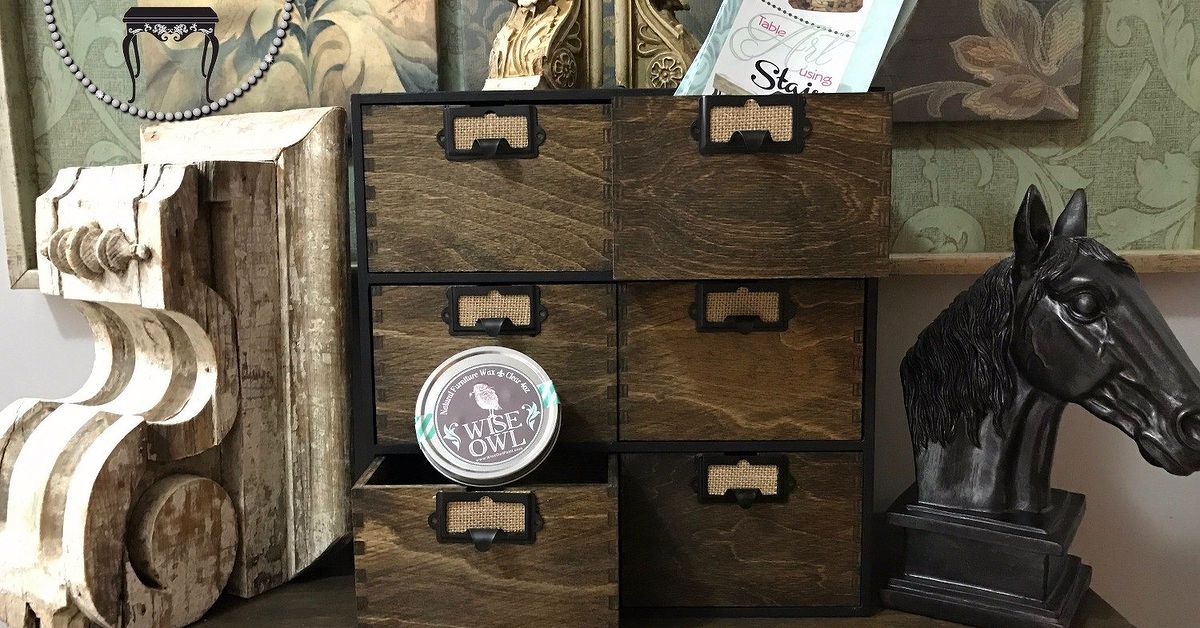
An apothecary cubby is a small compartment-style storage unit inspired by old apothecary cabinets once used to organize herbs, powders, tinctures, tools, and remedies. Traditional apothecary cabinets often had many small drawers with label holders. A cubby version keeps the same organized, vintage look but uses open compartments, small boxes, or optional drawer fronts.
The beauty of a DIY apothecary cubby is flexibility. You can build a wall-mounted unit for a kitchen, a desktop cubby for stationery, a craft-room organizer, or a small entryway shelf for keys and sunglasses. It can be rustic, polished, farmhouse, cottage, industrial, or dark-academia dramatic enough to make your pens feel scholarly.
Best Uses for a DIY Apothecary Cubby
Before cutting wood, decide what the cubby will actually hold. A cubby built for seed packets does not need the same depth as one designed for jars, mugs, small tools, or folded fabric. Planning the contents first keeps the project useful after the compliments wear off.
Great items to store in an apothecary cubby include:
- Craft paints, thread, ribbon, buttons, stamps, and glue sticks
- Tea bags, spice jars, coffee pods, or small pantry packets
- Seed packets, garden markers, twine, and plant labels
- Jewelry, watches, sunglasses, and small accessories
- Desk supplies such as clips, sticky notes, pens, and chargers
- Bathroom items like cotton rounds, soaps, and rolled washcloths
- Decorative mini collections, shells, stones, or tiny treasures
A quick safety note: if you use the cubby for herbs, supplements, essential oils, or medicine-related items, label everything clearly and keep anything potentially harmful away from children and pets. Do not store prescription medications in a humid bathroom or near heat unless the product directions say it is safe. Vintage style is charming; accidental mystery pills are not.
Design Plan: Choose Your Size and Layout
For a manageable first project, a wall-mounted apothecary cubby around 24 inches wide, 18 inches tall, and 5 to 6 inches deep is a sweet spot. It is large enough to feel useful but small enough to build on a workbench or sturdy table.
A simple layout is a 4-by-3 grid, giving you 12 compartments. You can also build a 5-by-4 grid for 20 smaller cubbies, or make uneven compartments for a more antique, collected-over-time look. If your style leans vintage, slight variation can look charming. If your style leans modern, keep the grid symmetrical and clean.
Recommended beginner-friendly dimensions:
- Overall size: 24 inches wide by 18 inches tall
- Depth: 5 1/2 inches using 1×6 boards
- Grid: 4 columns by 3 rows
- Material thickness: 3/4-inch pine, poplar, or plywood
- Back panel: 1/4-inch plywood or hardboard
If you want a lighter unit, use 1/2-inch plywood for the dividers and shelves. If you want a sturdier, chunkier piece, 3/4-inch stock is easier to fasten and more forgiving. For a rustic look, pine is affordable and easy to work with. For a smoother painted finish, poplar is a nice upgrade. For a clean, stable cabinet-like build, cabinet-grade plywood is a strong choice.
Materials You Will Need
The exact quantity depends on your design, but for a 24-by-18-inch cubby, this list will get most DIYers started.
- Two 1×6 boards, 6 feet long, or one sheet of 3/4-inch plywood cut to size
- One 1/4-inch plywood or hardboard panel for the back
- Wood glue
- 1 1/4-inch brad nails, finish nails, or wood screws
- Fine-thread pocket-hole screws if using a pocket-hole jig
- Sandpaper in 120-, 180-, and 220-grit
- Wood filler
- Paint, stain, or tinted finishing wax
- Clear protective topcoat if needed
- Small label holders, cup pulls, brass pulls, or decorative tags
- French cleat, D-ring hangers, or wall-mounting hardware
- Wall anchors or screws suitable for studs
Tools You Will Need
You do not need a professional shop, but accurate cuts and square assembly matter. A crooked cubby has personality, yes, but usually the kind that makes jars roll downhill.
- Tape measure
- Pencil
- Combination square or speed square
- Miter saw, circular saw, table saw, or handsaw with a guide
- Drill and drill bits
- Clamps
- Brad nailer or hammer
- Pocket-hole jig, optional
- Orbital sander or sanding block
- Stud finder if wall mounting
- Level
- Safety glasses, hearing protection, and dust mask
Always wear eye protection when cutting, sanding, drilling, or nailing. Clamp your work whenever possible, and use ventilation when sanding or applying paint, stain, or finish. The goal is an apothecary cubby, not a dramatic emergency-room origin story.
Cut List for a 12-Cubby Apothecary Unit
This cut list assumes you are using 3/4-inch-thick material and building an outside box that is 24 inches wide, 18 inches tall, and about 5 1/2 inches deep.
Main case pieces:
- Top: 24 inches long
- Bottom: 24 inches long
- Left side: 16 1/2 inches long
- Right side: 16 1/2 inches long
- Two horizontal shelves: 22 1/2 inches long
- Vertical dividers: measure to fit between shelves after the case is dry-assembled
- Back panel: 24 inches by 18 inches, trimmed to fit
The side pieces are 16 1/2 inches because they fit between the top and bottom boards. If you place the sides outside the top and bottom instead, adjust the dimensions. This is why drawing a simple sketch before cutting is not optional. It is the adult version of looking at the map before insisting you know the shortcut.
Step-by-Step: How to Make Your Own Apothecary Cubby
Step 1: Sketch the Cubby Layout
Draw the front view of your cubby on paper. Mark the overall width, height, depth, number of rows, and number of columns. Decide whether all compartments will match or whether you want a mix of tall, short, narrow, and wide openings.
For the cleanest beginner build, make the outer case first, then install two horizontal shelves, then add vertical dividers inside each row. This approach is easier than trying to assemble a giant interlocking grid all at once.
Step 2: Cut and Sand the Pieces
Cut the top, bottom, sides, shelves, dividers, and back panel. Label each piece lightly with pencil on the back or underside. Sand all faces with 120-grit sandpaper before assembly. Sanding now is easier than trying to wedge your hand into a tiny cubby later while muttering about past decisions.
Do not round over the ends that will be glued together. Keep those edges square so the joints meet cleanly. After the cubby is assembled, you can soften the exposed edges slightly for a finished feel.
Step 3: Build the Outer Box
Lay the top, bottom, and side pieces on a flat surface. Apply wood glue to the joints. Clamp the case together and check for square by measuring diagonally from corner to corner. If both diagonal measurements match, the case is square. If not, adjust it before fastening.
Secure the joints with brad nails, finish nails, screws, or pocket-hole screws. If you use screws near the end of a board, pre-drill pilot holes to reduce splitting. Wipe away glue squeeze-out with a damp cloth before it dries.
Step 4: Mark Shelf Locations
Inside the case, mark where the two horizontal shelves will go. For three equal rows, divide the interior height into thirds, remembering to account for the thickness of the shelves. Use a square to draw level lines across both side panels.
A scrap block cut to the height of your desired compartment can act as a spacer. This trick keeps shelves consistent without measuring the same distance 20 times and slowly questioning reality.
Step 5: Install the Horizontal Shelves
Apply wood glue to the shelf ends, slide each shelf into place, and clamp if possible. Fasten through the outside of the case into the shelf ends using brad nails or screws. Check that each shelf is flush at the front and level from side to side.
If the cubby will hold heavier objects, screws provide more strength than nails alone. For lightweight decorative storage, glue and brad nails are usually enough when the back panel is also attached securely.
Step 6: Add the Vertical Dividers
Measure each row separately before cutting vertical dividers. Wood is honest, but rooms, saws, and humans are not always perfectly precise. A divider that fits the top row may be slightly loose in the middle row.
Mark the divider locations. For four columns, you will need three vertical dividers per row. Apply glue to the top and bottom edges of each divider, slide it into place, and fasten with brad nails through the shelves where possible. You can also use a pin nailer or simply clamp until the glue cures if the pieces fit snugly.
Step 7: Attach the Back Panel
A back panel does more than close the cubby. It helps keep the entire unit square and adds strength. Place the case face down, apply a thin bead of glue around the back edges, position the back panel, and fasten it with small nails or staples.
If you want a decorative background, paint or wallpaper the inside face of the back panel before attaching it. A botanical print, vintage ledger paper, beadboard panel, or soft neutral paint can make the cubbies look custom without adding much work.
Step 8: Fill, Sand, and Smooth
Fill visible nail holes, screw holes, and small gaps with wood filler. Let it dry fully, then sand the entire piece with 180-grit and finish with 220-grit for a smooth surface. Vacuum the dust and wipe with a tack cloth or slightly damp rag.
Do not skip dust removal. Finish applied over dust creates the charming texture of a stale cracker. Nobody asked for that.
Step 9: Paint, Stain, or Age the Finish
Your finish defines the personality of the apothecary cubby. For a classic old-shop look, use a medium or dark stain, then add a satin clear coat. For farmhouse charm, paint the cubby in cream, sage, black, navy, or warm gray, then lightly distress the edges with sandpaper. For a cleaner modern version, use natural wood with a matte topcoat.
Apply thin coats rather than one heavy coat. Let each coat dry according to the product directions. If using oil-based stain, stain-poly blends, or strong-smelling finishes, work in a ventilated area and follow all label precautions. For indoor projects, low-odor and low-VOC finishes can make the process more pleasant.
Step 10: Add Labels, Pulls, or Mini Drawers
The apothecary look comes alive with labels. Small metal label holders, brass cup pulls, leather tabs, stamped tags, or handwritten kraft labels make the cubby feel intentional. Even open compartments can have labels attached below each opening.
If you want faux drawers, attach small drawer-front panels to shallow boxes that slide into the cubbies. Leave about 1/8 inch of clearance around each drawer so it does not bind. For the simplest version, use small premade wooden boxes and add matching fronts. Your guests will think you built 12 tiny drawers from scratch. Let them. Some mysteries deserve protection.
Step 11: Mount or Place the Cubby Safely
If your apothecary cubby will sit on a desk or counter, add felt pads to the bottom. If it will hang on a wall, mount it securely. A French cleat is one of the strongest and cleanest options for a wall-mounted cubby. D-ring hangers can work for lightweight pieces, but make sure the hardware is rated for the weight.
Whenever possible, fasten into wall studs. Use a stud finder, mark the stud locations, level the cubby, and use appropriate screws. If studs are not available where you need them, choose wall anchors rated for the loaded weight of the piece. If the cubby is tall, heavy, or accessible to children, anchor it to reduce tip-over risk.
Style Ideas for an Apothecary Cubby
Vintage General Store
Use dark walnut stain, brass label holders, cream paper labels, and slightly distressed edges. Add small glass jars, brown bottles, twine, and seed packets for a collected look.
Modern Craft Room
Paint the cubby white or soft gray. Use clear labels and sort items by color. Store paints, markers, washi tape, thread, and tiny tools where you can see them.
Kitchen Tea and Spice Station
Build deeper compartments for tins and jars. Use uniform containers and label everything clearly. Keep frequently used teas or spices at eye level so the cubby is decorative and useful.
Garden Shed Organizer
Use a durable finish and label compartments for seeds, markers, gloves, plant clips, and twine. A slightly rougher rustic finish works beautifully here because garden tools already look like they have survived a tiny battle.
Common Mistakes to Avoid
Skipping the Layout Math
Small errors multiply quickly in a grid. Always account for board thickness when calculating cubby openings. If you want four equal openings across, remember that three internal dividers take up space.
Using Warped Boards
Check boards before buying. Sight down the length and avoid twisted, bowed, or cupped lumber. A small cubby needs straight material because the compartments reveal every wobble.
Overloading the Unit
An apothecary cubby is ideal for small storage, not bowling balls, bricks, or your emotional baggage. Use stronger joinery and wall mounting if the piece will hold heavier items.
Finishing Too Fast
Paint and stain need drying time. Rushing the finish can lead to tacky surfaces, fingerprints, uneven sheen, and deep regret. Thin coats and patience create a better result.
Budget-Friendly Tips
You can keep this project affordable by using common pine boards, scrap plywood, leftover paint, and thrifted hardware. Old brass pulls, label frames, and small boxes can often be found at flea markets, salvage shops, or craft stores. If matching hardware is too expensive, mix similar finishes intentionally. Antique cabinets rarely looked perfectly uniform anyway, which is convenient for the rest of us.
For a no-drawer version, open cubbies are faster and cheaper. For a higher-end look, add trim around the outer case, thin face-frame strips on the front edges, or a small crown detail across the top. These additions make the cubby look more like furniture and less like a weekend rectangle.
Experience Notes: What Building an Apothecary Cubby Teaches You
The first thing you learn when making your own apothecary cubby is that small projects are not automatically simple. A large bookshelf may have four or five big parts, while a cubby has many little parts that all want to be the boss. Every divider has to fit, every shelf wants to stay level, and every tiny opening announces your measuring habits to the world. That is not a warning; it is part of the fun. The project rewards careful work without requiring advanced joinery.
One of the best experiences is watching the piece transform from plain boards into something with character. At the dry-fit stage, it may look like a wooden spreadsheet. After sanding, paint, stain, labels, and hardware, suddenly it feels like an object with a past. Even if you made it yesterday, it can look like it once stored lavender, sealing wax, or secret cookie recipes.
Another lesson is that clamps are quieter than arguments. When a shelf slips out of line, the natural instinct is to hold it with one hand, grab a nailer with the other, balance the case with your elbow, and hope physics is taking the afternoon off. Use clamps instead. A few small clamps make assembly calmer, cleaner, and more accurate. Scrap spacer blocks are equally helpful. Cut one block to the width or height of your desired opening and use it again and again. It turns repetitive measuring into a simple placement system.
The finish is where many DIYers discover their style. A stained cubby feels warm and old-world. A painted black cubby feels elegant and dramatic. A cream or sage cubby feels soft and cottage-inspired. Distressing the edges can hide minor imperfections while adding age, but restraint matters. Lightly worn corners look charming; attacking the whole piece with sandpaper can make it look like it lost a fight with a gravel driveway.
The most practical experience is learning what you actually use. After living with the cubby for a week, you may realize that the top row is best for display and the lower rows are better for everyday items. Labels may change. Compartments may shift from “buttons” to “batteries” to “things I swear I will sort later.” That adaptability is the point. A handmade apothecary cubby is not just decor. It is a small command center for the objects that usually disappear into drawers and return only when you buy replacements.
Finally, there is real satisfaction in building storage that looks good enough to display. Many organizing solutions hide clutter inside plastic bins. An apothecary cubby invites you to make small things visible, labeled, and easy to reach. It turns organization into decoration. And yes, you may occasionally open a tiny drawer or rearrange a label just because it feels pleasing. That is not procrastination. That is quality control with vintage flair.
Conclusion
Making your own apothecary cubby is a rewarding DIY woodworking project that combines practical storage with timeless character. Start with a clear layout, use straight boards, measure carefully, assemble the grid square, and finish it in a style that suits your space. Whether you use it for craft supplies, tea, seeds, office tools, or tiny treasures, the finished cubby adds order and charm without looking like ordinary storage. It is useful, customizable, and just dramatic enough to make paper clips feel important.