Long reclaimed wood shelves are the sweet spot between “I have excellent taste” and “I can’t believe I made that with boards that used to be in a barn.” They add warmth, character, and just enough rustic swagger to make your coffee mugs feel emotionally supported. But there’s a catch: when you go long, you’re also signing up to fight three villainswarp, sag, and gravity. (Gravity is undefeated, but we can negotiate.)
This guide walks you through building long reclaimed wood shelves the right way: selecting safe lumber, prepping it without destroying your tools, engineering a shelf that won’t banana over time, finishing it without turning it orange-red-confusing, and installing it so it stays put. Whether you want chunky rustic shelves with visible brackets or sleek reclaimed floating shelves, you’ll have a plan that works.
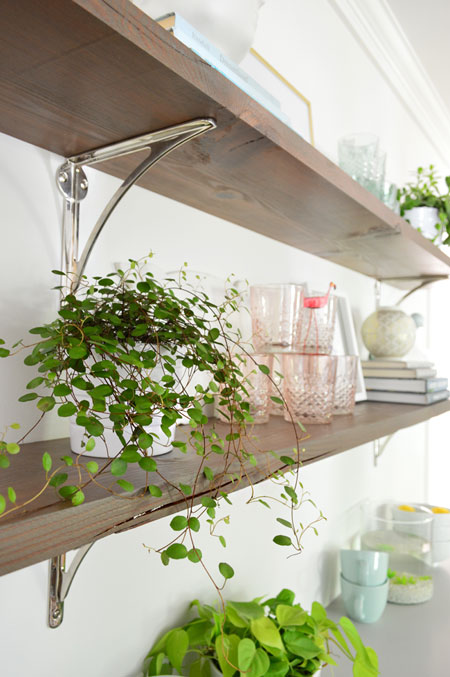
Quick Plan: Decide What “Long” Means in Your House
- Length: 6–10 feet is common for kitchens, dining rooms, and living rooms.
- Depth: 8–12 inches for decor; 10–14 inches for kitchen dishes; deeper needs better support.
- Thickness: 1" looks substantial; 1 1/4" to 1 1/2" resists sag better and looks “custom.”
- Style: bracketed (easier, stronger), cleat-based “floating box” (clean look), or hidden rod hardware (slick but picky).
- Load: cookbooks and cast iron are shelf bulliesplan supports accordingly.
Before You Start: Sourcing Reclaimed Wood Without the Regrets
Where to find reclaimed boards (and what to ask)
Great reclaimed shelf boards come from architectural salvage yards, reclaimed lumber dealers, old decking, barn siding, beams, and even factory pallets (only if you know what you’re doingsome pallets are chemically treated or just… gross). If you’re buying from a dealer, ask if they can detect metal and plane to thickness. That one service can save your planer knives and your mood.
Safety reality check: lead paint and mystery finishes
Reclaimed wood can come with old paint, varnish, or “historic gunk.” If the wood is painted and old-home-adjacent, treat it with respect. If your home (or the wood’s original home) could be pre-1978, assume lead paint is possible and work lead-safe: contain dust, protect yourself, minimize sanding dust, and clean thoroughly. When in doubt, don’t dry-sand mystery paint like it’s a competitive sport.
Metal is everywhere. Nails. Staples. The occasional surprise.
Reclaimed boards love hiding hardware the way toddlers hide snacks: everywhere and with confidence. Start with a visual scan, then remove obvious nails/screws. After that, use a magnet or handheld metal detector and scan again. Pro tip: if you’re about to run reclaimed lumber through a planer, you should be absolutely certain it’s metal-free. One missed nail can turn your beautiful project into a dramatic sound effect.
Design: Long Shelves That Don’t Sag (or Humiliate You in Front of Guests)
Understand sag: it’s not “if,” it’s “how much”
Wood shelves deflect under load, and the longer the span, the more they sag. The trick is keeping sag below what your eye notices and below what time makes worse. The shelf that looks fine today can slowly develop a center diplike it’s sighing from carrying your cookbook collection.
Three levers that matter most
- Shorten the span. Add supports more frequently (brackets into studs, a continuous cleat, or a hidden frame).
- Increase stiffness. Thicker shelves help a lot; adding a taller front “lip” (edging) helps even more.
- Reinforce strategically. Hidden steel, a torsion box build, or a stiffening strip underneath can dramatically reduce sag.
A practical cheat code: add a front edge (aka a “lip”)
If you want a shelf to look sleek but behave strong, add a taller front edging strip. It can be subtle (a 1 1/4" tall strip on a 3/4" shelf) or bold (a chunky face that makes the shelf appear thicker). This doesn’t just look goodit increases stiffness where it counts.
How many supports do you need for a long wall shelf?
If you’re mounting to studs, you’ll often find studs spaced 16" on center (sometimes 24"). For heavy loads, add a bracket at every stud you can. For lighter decor loads, you can sometimes skip studsjust don’t skip physics. Continuous cleats or shelf “boxes” can distribute load across multiple studs and make long shelves feel rock-solid.
Pick your mounting style
- Visible brackets (strongest + simplest): Best for long reclaimed wood shelves holding dishes, books, or anything heavy. Bonus: brackets are a style choice now. Industrial? Farmhouse? Minimal black steel? Yes.
- Cleat-based floating box (clean look, very customizable): A wall-mounted cleat/frame supports a hollow shelf that slides over it. Great for long shelves because you can attach the cleat to multiple studs.
- Hidden rod hardware (sleek, but precise): Metal posts/rods anchor into studs and slide into drilled holes in the shelf. Looks amazing, but alignment must be dead-on and the shelf must be built to fit the hardware.
Tools & Materials Checklist
Tools
- Measuring tape, pencil, straightedge, and a long level (or laser level)
- Stud finder (and/or a strong magnet)
- Drill/driver + bits, countersink bit
- Sander + sandpaper (80/120/180 grit is a good start)
- Clamps (more than you think), plus a few scrap boards for cauls
- Optional but helpful: circular saw with guide, miter saw, router, planer/jointer access
Materials
- Reclaimed boards (or reclaimed wood panel blank)
- Wood glue
- Screws appropriate for studs and brackets/cleats
- Brackets OR cleat lumber (2×2 / 1×2 / plywood strips) OR floating hardware
- Finish: hardwax oil, polyurethane, wiping varnish, or shellac (depending on look/use)
Step-by-Step: How To Make Long Reclaimed Wood Shelves
Step 1: Choose boards like a picky chef chooses tomatoes
For long shelves, start with the straightest boards you can find. Some twist and cup can be milled out, but severely warped lumber becomes thin fast (and your “chunky shelf dream” becomes a “sad plank reality”). If you can source boards already planed to thickness, even better.
Step 2: Clean and de-metal the wood (your tools will thank you)
- Scrub off dirt with a stiff brush. Let the wood dry fully before machining.
- Pull nails/screws with end nippers, a cat’s paw, or pry bar.
- Scan for hidden metal with a magnet or detectorespecially near ends and knots.
- Mark trouble spots and dig out staples or broken fasteners before you mill.
Step 3: Flatten and square (even if you love “rustic”)
“Rustic” should be a style choice, not a structural problem. You can keep saw marks and nail holes while still making the shelf sit flat. Your goal: one reasonably flat face that meets the wall cleanly and one flat-ish top so your items don’t wobble.
- Best case: jointer + planer to establish a flat face and parallel thickness.
- No planer? Use a hand plane, belt sander carefully, or have a lumber shop plane it.
- Don’t over-mill. Removing too much material can erase the character you bought reclaimed wood for in the first place.
Step 4: Make it long (three smart ways)
Option A: Use one continuous board
This is the simplest and often the strongest option. If you can buy a single reclaimed board at your target length and thickness, do it. Fewer joints = fewer future questions.
Option B: Edge-glue boards to make the shelf deeper (panel glue-up)
If you have narrower reclaimed boards, glue them edge-to-edge to create the depth you want (say, two 1x6s to create a ~11" deep shelf). Key glue-up habits:
- Dry fit first. Arrange boards for the best grain and color flow before glue enters the chat.
- Clamp evenly, don’t overdo it. Crushing the joint doesn’t make it stronger; it just makes a mess.
- Use cauls. Cauls help keep boards aligned and reduce “steps” between boards.
- Alternate clamp direction. It helps keep the panel flat.
Option C: Splice boards to create the length
Need 8 feet but you only have 5-foot reclaimed boards? You can splice. The strongest-looking approach is to place the seam where a bracket or stud support lands, and reinforce underneath. Common splices include scarf joints, half-laps, or even a tight butt seam backed by a hidden strap. If you’re doing a splice on a shelf that will carry weight, reinforce it like you mean it.
Step 5: Reinforce so the shelf acts “stiff,” not “dramatic”
For long reclaimed wood shelves, reinforcement is what separates “handmade heirloom” from “banana plank in six months.” Choose the reinforcement that matches your shelf style:
Reinforcement ideas (pick one)
- Taller front lip (edging strip): A classic trick. A glued and well-attached front strip can greatly reduce sag and also makes the shelf look thicker.
- Laminated thickness: If your shelf is very long and expected to hold heavy items, laminating boards to create a thicker shelf is a brute-force win.
- Hidden steel: Rout a shallow channel on the underside and embed a steel flat bar or angle. It’s invisible once installed and incredibly effective for long spans.
- Torsion box “floating shelf” build: A lightweight hollow shelf over an internal frame can be stiff without being bulky. Great for long, clean-lined shelves.
Step 6: Choose a mounting method that matches your load
Method 1: Heavy-duty brackets into studs (best for kitchens)
For a long shelf holding dishes, glassware, or cookbooks, visible brackets anchored into studs are the gold standard. Use enough brackets to shorten the span between supports, and follow the bracket manufacturer’s load ratings. If you’re building workshop-style shelves or anything heavy, use serious fasteners into studs.
Method 2: Cleat-based “floating box” shelf (clean look, great for long runs)
This method uses a wall-mounted cleat/frame secured to studs, then a hollow shelf slides over it. It’s an excellent choice for long reclaimed shelves because you can attach the cleat at multiple studs across the wall. Build the shelf box, build the cleat, mount the cleat level, then slide and lock the box.
Method 3: Hidden rod hardware (sleek, modern, precision required)
Hidden rod systems anchor to studs and slide into drilled holes in the shelf. The look is amazing; the layout must be accurate. Measure carefully, drill straight, and keep everything square. This is the method where “close enough” becomes “why does it wobble.”
Step 7: Finish reclaimed wood without losing the character
Finishing reclaimed wood is half protection, half art therapy. The goal is to seal the shelf for its environment (kitchen humidity, cleaning, greasy hands) while keeping the grain, knots, cracks, and old nail holes that make reclaimed wood special.
Finish strategy by vibe
- Keep it natural: hardwax oil or matte polyurethane to protect without making it shiny-plastic.
- Warm it up: light stain or tinted oiltest first on scrap, because reclaimed wood can react unpredictably.
- Age it down (less orange): some DIYers use a vinegar + steel wool solution to reduce orange tones, but results vary by wood species and tannins. Always test on the actual board (not just a random scrap) and be ready to adjust.
- Subtle “weathered” look: a thin paint-and-water graywash can soften red/orange tones while letting grain show through.
Whatever finish you choose, do it before you install. It’s cleaner, easier, and you won’t drip stain down your wall and discover a brand-new shade called “Regret Brown.”
Step 8: Install the shelves (aka the moment of truth)
- Mark height and level line. Use a long level/laser so your shelf doesn’t look like it’s sliding off the planet.
- Find studs. Stud finder is easiest; a magnet can help locate drywall screws.
- Pre-drill. Pilot holes reduce splitting and make screws drive straight.
- Mount supports. Brackets/cleat/hardware should be firmly attached to studs whenever possible.
- Shim if needed. Walls are often not perfectly flat. Shims can keep shelves tight and level.
- Set the shelf and lock it. Use set screws, underside screws, or hidden fasteners depending on your system.
Two Realistic Build Examples
Example A: 8-foot rustic kitchen shelf with brackets
You want an 8-foot run above a counter for dishes and glasses. Go with a 1 1/4" thick reclaimed board (or a laminated build if needed), 10–12" deep, and install brackets into as many studs as possible. If your studs land every 16", that could mean 5–7 brackets across the run. More supports = less sag, and it looks intentional.
Add a front lip if the shelf is thinner than you’d like, or if you expect heavy loads. Then seal with a durable finish appropriate for kitchens.
Example B: 10-foot “floating” reclaimed shelf using a cleat frame
You want the clean floating look across a long wall. Build a straight internal cleat/frame secured into multiple studs. Then build a hollow shelf box that slides over that structure. This lets you keep the shelf looking slim while the hidden structure does the heavy lifting. It’s also a great way to handle slightly imperfect reclaimed boards, because the box hides small inconsistencies.
Troubleshooting: Common Problems and Fixes
“My shelf rocks against the wall.”
Walls aren’t always flat. Shim behind brackets or the cleat until everything is snug and level. If using rod hardware, confirm posts are seated fully and the shelf back is mortised correctly.
“It’s sagging in the middle.”
Add support points (more brackets), reduce span (support at more studs), or stiffen the shelf: front lip, hidden steel, or a thicker/laminated shelf build. Also check if you’ve overloaded itcookbooks are heavy and unapologetic.
“The reclaimed wood keeps cracking.”
Some reclaimed boards have checks (old cracks) that are stable and decorative. If a crack is expanding, the board may be moving with humidity changes. Seal all sides if possible, avoid trapping moisture, and consider adding a hidden support strip underneath to reduce flexing stress.
Conclusion
Making long reclaimed wood shelves is part woodworking, part structural common sense, and part “please don’t let my shelf become a smile.” If you focus on straight boards, thorough prep, smart reinforcement, and secure mounting into studs, you’ll get shelves that look like a custom installand behave like one too. Choose brackets for maximum strength, a cleat-based box for a clean floating look, or rod hardware if you love precision and aren’t afraid of measuring twice (and then measuring again because you got nervous).
Real-World Lessons From Long Reclaimed Wood Shelves (The Stuff People Learn the Fun Way)
People often start reclaimed shelf projects thinking the hard part is finding “cool old wood.” Spoiler: the hard part is discovering that cool old wood has opinions. It may look straight at the salvage yard and then reveal a gentle twist once it’s in your living room, like it waited for better lighting to show off its personality. The lesson: acclimate the wood. Let boards sit in the room (or at least in a similar environment) before final trimming and installation. Reclaimed lumber has lived many lives; it deserves a minute to adjust.
Another common experience is the “finish plot twist.” A stain that looks perfect on a small test piece can look wildly different on the full board. This happens because reclaimed boards can vary in density, tannin content, and old exposure patterns across the same plank. The practical takeaway is to test finishes on the actual shelf boardideally on the underside or back edgebefore committing. Many DIYers also find that blending techniques (a light wash, then a clear coat) creates a more controlled look than one heavy stain. And if you’re trying vinegar-and-steel-wool aging methods, expect variability and keep backup options ready (like a gentle graywash).
Installation is where long shelves teach the loudest lessons. The first is that walls are not perfect. Even in newer homes, drywall can wave slightly, corners can be out of square, and studs can be just “close enough” to 16" on center to make you question your measuring tape’s loyalty. That’s why shims are not cheatingthey’re professional-grade problem solvers. A thin shim behind one bracket can be the difference between a shelf that sits tight and one that always looks like it’s trying to escape.
Then there’s the “weight honesty” moment. People love the idea of open kitchen shelves until they start stacking stoneware, glass pitchers, and a heroic row of cookbooks. Long shelves can absolutely handle those loadsif they’re designed for it. Many successful builds share the same pattern: more support points than you think you need, fasteners into studs wherever possible, and a shelf that’s either thick enough or reinforced enough to stay stiff over time. If you’re unsure, brackets are the confidence boost. They might be visible, but so is a sagging shelf, and only one of those looks intentional.
One more real-world truth: reclaimed wood shelves are often “perfectly imperfect,” and that’s the point. Nail holes, knots, and old saw marks can make a room feel warmer and more lived-in. But structure still matters. The best projects balance both sides: keep the character on the faces you see, and quietly engineer the parts you don’t hidden cleats, underside reinforcement, careful fastening into studs, and a finish that protects without making the wood look plastic. When it all comes together, your shelves won’t just hold your stuff; they’ll hold the room together. (And yes, your mugs will feel supported.)