If your sloped yard feels more like a ski run than a garden path, it might be
time to add a set of timber and brick paver steps. This combo is classic,
sturdy, and surprisingly DIY-friendly. You get the warm, rustic look of
landscape timbers paired with the crisp pattern of brick paversplus a safer
way to walk up and down that hill without skid-stepping in wet grass.
In this guide, we’ll walk through how to plan, build, and maintain timber
and brick paver steps using techniques professional landscapers rely on:
proper drainage, compacted base, solid anchoring, and smart layout. By the
time you’re done, you’ll know exactly how to tackle this project like a pro,
not like someone who just watched half a tutorial and winged it.
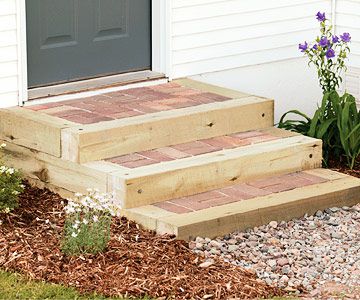
Why Choose Timber and Brick Paver Steps?
Timber and brick paver steps are popular because they hit the sweet spot
between form and function:
- Great curb appeal: The wood frame and brick treads look warm and welcoming in almost any landscape style.
- DIY-friendly structure: The timbers act like a ready-made frame that holds the paver treads in place.
- Customizable layout: You can adapt the number of steps, width, and shape to your exact slope and yard design.
- Durable with proper prep: With a compacted gravel base and good drainage, these steps can last many years with minimal issues.
The key is following a thoughtful process instead of just dropping timbers on
the ground and hoping gravity will be kind.
Planning Your Timber and Brick Paver Steps
1. Assess the slope and path
Start by deciding where your steps will go. You want a natural, comfortable
route people are already taking, not a random staircase that no one uses.
- Look for the “desire path”: Where do you naturally walk now? Follow that general line.
- Avoid obstacles: Try not to cut through large roots, utility lines, or existing irrigation. Always call 811 in the U.S. before digging.
- Connect key spaces: Steps should logically link the driveway, patio, deck, or a main garden area.
2. Measure rise and run
Comfortable outdoor steps generally have:
- Riser (height): About 6 to 7 inches per step, which conveniently matches many 6×6 landscape timbers.
- Tread (depth): About 12 to 16 inches of flat walking surface per step.
Measure the total vertical rise of your slope (bottom to top), then divide by
your chosen riser height to get the approximate number of steps. Then, multiply
the number of steps by your desired tread depth to estimate how far the steps
will project into the yard. Adjust until the layout feels right and fits the
space.
3. Check local codes and safety
In many areas, any set of exterior steps beyond a certain height or number of
risers may require a handrail or meet specific building code dimensions. Even
if your steps are purely in the landscape, it’s smart to:
- Keep risers consistent in height from top to bottom.
- Make treads deep enough to stand comfortably without feeling crowded.
- Consider adding lighting if the steps are used at night.
Tools and Materials You’ll Need
Exact quantities depend on your design, but here’s a typical shopping list for
timber and brick paver steps:
Timbers, pavers, and base materials
- Pressure-treated landscape timbers (commonly 6×6 for risers)
- Brick pavers (standard brick or concrete pavers rated for outdoor use)
- Crushed stone or gravel for base (often 3/4″ minus or similar)
- Paver base or bedding sand (coarse sand, not play sand)
- Landscape fabric to separate soil from the gravel base
- Galvanized spikes or rebar to anchor timbers
- Exterior landscape screws or timber screws
- Optional edging (paver edging or metal edging for the sides of treads)
Tools
- Shovel and digging tools
- Pick or mattock for hard soil
- Hand tamper or plate compactor
- Level (2–4 feet)
- Measuring tape and stakes with mason’s line
- Circular saw or handsaw for cutting timbers
- Drill/driver and appropriate bits
- Hammer or sledgehammer (for driving spikes or rebar)
- Rubber mallet (for tapping pavers into place)
- Safety gear (gloves, eye protection, dust mask)
Using pressure-treated timbers rated for ground contact and pavers designed
for exterior use will dramatically extend the life of your steps.
Step-by-Step: Installing Timber and Brick Paver Steps
1. Lay out and mark the stair path
Use stakes and mason’s line to outline the centerline and width of your steps.
Mark the front of each riser with spray paint or additional stakes. This gives
you a visual while digging and helps keep everything square and consistent.
Double-check your measurements before you start digging. Adjust the spacing
nowbefore your shovel hits the dirtto avoid awkward half steps later.
2. Carve the risers into the slope
Starting at the bottom, dig into the slope to create a “shelf” for the first
timber riser and tread:
- Excavate an area slightly deeper than one timber height for the riser plus 3–4 inches for gravel base.
- Make the first recess about 6 inches deeper (front to back) than your intended tread depth to account for the timber thickness and base preparation.
- Dig straight back into the slope so the riser will sit against undisturbed soil.
Repeat this process up the slope, roughly shaping each riser area. You’ll fine-tune
the exact levels later as you set each timber.
3. Prepare the base and drainage
Good drainage is what keeps your steps from sinking, heaving, or turning into a
muddy mess after heavy rain.
- Line the excavated step areas with landscape fabric to help keep soil from invading your gravel base.
- Add 3–4 inches of crushed stone or gravel and compact it with a hand tamper or plate compactor.
- Make sure each base area slopes slightly forward (away from the hill) so water sheds rather than puddles.
A well-compacted, free-draining base is one of the biggest differences between
professional-quality steps and ones that fail after a few seasons.
4. Set the first timber riser
The first timber is your “reference step.” Take your time hereif this one is
off, every step above it will show the mistake.
- Cut the timber to match the full width of your steps.
- Set it on the compacted gravel base and use a level to check both front-to-back and side-to-side.
- Add or remove gravel as needed to make it perfectly level while keeping that slight forward slope for water runoff.
- Once level, drill pilot holes and drive rebar or landscape spikes down through the timber into the ground to anchor it firmly.
When you press down on the timber or hit it with your boot, it should feel
solid, not squishy or wobbly.
5. Build additional risers up the slope
With the first riser set, repeat the process for the remaining steps:
- Carve out the next shelf into the slope, matching your planned riser height.
- Install landscape fabric and a gravel base, compacting thoroughly.
- Set the next timber, level it, and anchor it with spikes or rebar.
- Check that each new riser is the same height as the previous one to avoid awkward step changes.
If your steps are wide, you can add short side timbers or “cheeks” running up
the slope to frame the sides and hold back soil. These can be screwed into the
main riser timbers for extra strength.
6. Build the paver base for each tread
Once all the risers are installed, you can focus on the treadsthe flat surfaces
where your brick pavers will sit.
- Fill the area between each pair of risers with compacted gravel to about 3 inches below your finished tread height.
- Add 1–2 inches of bedding sand over the gravel and screed it level using a straight board.
- Maintain a slight forward slope so water drains off each tread rather than back toward the hill.
Think of each tread as a mini paver patio. The same rules apply: stable,
compacted base below, smooth bedding layer on top.
7. Lay the brick pavers
Now for the fun partthe visible finish:
- Dry-lay the bricks first to experiment with patterns (running bond, herringbone, basket-weave).
- Leave small, consistent joints between pavers for sand to fill.
- Cut pavers with a masonry saw or chisel if needed to fit the frame cleanly.
- Use a rubber mallet to gently tap each paver into the bedding sand so they sit firmly and evenly.
After laying a tread, sweep sand into the joints and lightly mist with water
to help it settle. You can use polymeric sand for extra joint stability if you
want fewer weeds and less wash-out over time.
8. Backfill, finish edges, and add safety features
Once the steps are structurally complete:
- Backfill around the sides of the timbers with soil and tamp it in to minimize gaps.
- Blend with landscaping: Add mulch, plants, or ground covers along the sides to soften the look.
- Add lighting: Low-voltage step lights or solar path lights improve safety at night.
- Consider a handrail if the steps are tall, steep, or heavily used.
Walk the steps several times, paying attention to any spots where you feel
off-balance. Adjust pavers, add more sand, or fine-tune the grade until
everything feels comfortable and secure.
Design Ideas and Variations
Once you understand the basic structure, you can customize your timber and
paver steps in several ways:
- Change the tread material: Use stone pavers, concrete pavers, or even decorative concrete in place of brick.
- Vary the width: Wider steps (4–6 feet) feel generous and can double as seating in a garden.
- Add landings: On long slopes, break the staircase into sections with flat landings for comfort and style.
- Introduce curves: Shorter timber segments can be angled slightly to create gentle curves instead of straight runs.
Just remember: the more intricate the layout, the more careful you have to be
with base prep and drainage so things stay stable.
Maintenance and Longevity Tips
Even well-built steps need occasional upkeep. Plan to:
- Inspect yearly for loose pavers, eroded sand, or shifting timbers.
- Top off joints with sand if you see gaps or movement.
- Clear debris like leaves and soil that can trap moisture or encourage moss and algae.
- Treat exposed timber ends with wood preservative, and consider sealing or staining for appearance and protection.
If you notice chronic puddling at the bottom of the steps, you may need to add
a small drain, French drain, or improve the slope in front of the staircase.
Catching drainage problems early can prevent frost heave, rot, and structural
issues later on.
Common Mistakes to Avoid
A few missteps can turn a great idea into a high-maintenance headache. Try to
avoid:
- Skipping compaction: Loose soil and gravel are an invitation for settling and uneven steps.
- Inconsistent riser heights: Even half an inch difference between steps can be a tripping hazard.
- Ignoring drainage: Water that can’t escape will eventually move your pavers or rot your timbers.
- Using untreated or non-ground-contact lumber: It may look good for a season, then fail quickly.
- Overly steep steps: Short treads and tall risers feel awkward and unsafe, especially on a slope.
If you slow down during the planning and base-building stages, you’ll avoid
most of these issues before they ever appear.
Real-Life Experiences: What It’s Really Like to Install Timber and Brick Paver Steps
On paper, this project looks like a neat checklist: measure, dig, compact,
set timbers, lay pavers, done. In real life, it’s a little sweatier, a little
messier, and a lot more satisfying than the step-by-step diagrams show. Here
are some experience-based insights that don’t always make it into the
instruction manuals.
Expect the slope to fight back
Dirt never cooperates as much as you’d like. On a real project, you’ll hit
patches of hard clay, rocks the size of bowling balls, or mystery roots that
appear exactly where you planned a riser. That’s normal. Plan extra time for
digging, and don’t be shy about reshaping your layout slightly if nature
makes it clear it has other plans.
Many DIYers find that working from the bottom up gives them a psychological
boost. Once that first step is solid and level, you can literally stand on
your progress and see where the next step needs to go. It feels like
climbing your own project as you build it.
The first timber sets the tone
Almost everyone who has installed landscape timber steps will tell you the
same thing: the first riser takes the longest. You’ll fuss with the gravel,
check the level six times, and adjust by fractions of an inch. Then suddenly
it clicks into place. After that, the next timbers go faster because you’ve
developed a feel for what “level but slightly draining forward” actually
looks like in your yard.
If you’re working with a friend or family member, this is also the step where
you figure out your rhythm. One person can be the “dig and compact” crew,
while the other focuses on setting timbers, checking level, and driving
fasteners. It turns into a surprisingly efficient system once you find your
routine.
Brick patterns matter more than you think
It might seem like overkill to fuss over patterns on an outdoor step, but
those details stand out. A simple running bond pattern is easy to lay and
forgiving if you need to trim a few bricks. A herringbone pattern looks
incredibly upscale but demands more cutting and attention to alignment.
People often notice the steps the first time they visit after your project is
done. They may not know exactly why they like them, but tight joints and a
consistent pattern make the whole staircase look intentional and
professionally planned, even if you spent half the build covered in dust and
muttering at a stubborn paver.
Drainage issues show up laterunless you plan now
One of the most common “experience” lessons comes after the first big rain.
If water sits on a tread, pools against a riser, or washes sand out of the
joints, you’ll see the weak spots quickly. Homeowners who do this project
twice almost always say they wish they had added more gravel, more
compaction, or a clearer path for water the first time.
The best time to solve drainage problems is during excavation. If you see
water-holding clay or low spots, over-dig slightly and backfill with gravel
so water has somewhere to go other than under or against your steps. It’s
extra work up front, but it’s far easier than lifting pavers and re-screeding
treads once everything is in place.
Timber and paver steps age gracefullyif you help them a little
Over time, wood will silver, pavers may darken slightly, and a bit of moss or
greenery may creep into joints. For many people, that weathered look is part
of the charm. The structure, though, should remain solid. A quick yearly
checkupsweeping debris, topping up sand, tightening or replacing a fastener
or twokeeps the steps feeling safe and looking intentional.
The most rewarding part of the project usually isn’t the last screw driven or
the final brick placed. It’s the first morning you carry a cup of coffee up
your new steps, or the first evening a friend says, “Wait, you built these?”
Suddenly that sloped, awkward corner of your yard becomes a favorite route
instead of a spot you avoided.
If you go into the project expecting a workout, a learning curve, and a
little improvisation, you’ll come out of it with not just a sturdy set of
timber and brick paver steps, but also the confidence to tackle the next big
outdoor upgrade on your list.
Conclusion
Installing timber and brick paver steps is one of those projects that looks
intimidating at first glance but breaks down into simple, repeatable tasks:
plan your layout, build a solid base, set and anchor the timbers, then lay
pavers like a mini patio on each tread. When you focus on drainage, consistent
step dimensions, and careful compaction, you end up with outdoor stairs that
look good, feel safe, and last for years.
Whether you’re connecting a driveway to a front door, linking a deck to the
yard, or simply making a steep garden more accessible, timber and brick paver
steps can turn an awkward slope into a beautiful, functional feature you’ll
use every day.