Every drawer has a personality. Some are calm and reasonable (the “spatula drawer”). Others are feral
(the “junk drawer” where batteries breed and tape measures go to retire). The fastest way to turn a chaotic
drawer into a calm, functional one is simple: give everything a lane.
DIY drawer dividers let you build those lanes exactly where you need themno more “almost fits” plastic trays,
no more wasted inches, and no more playing Tetris every time you close the drawer. Below you’ll find three
proven build methods (from “no saw required” to “pretty sure I could get hired by a cabinet shop”), plus
sizing rules, layout ideas, and the little tricks that keep dividers from sliding around like they’re late
for a meeting.
Why DIY Drawer Dividers Beat Store-Bought Organizers
- Custom fit: You decide the compartment sizes based on what you actually own (not what a factory guessed you own).
- Max storage: Thin materials and tailored spacing often create more usable room than bulky trays.
- Budget-friendly: Cardboard, foam board, shims, and “project boards” can outfit a drawer for just a few dollars.
- Removable by design: Build the divider as a drop-in insert so you can lift it out to clean… or to change your mind later.
Plan First, Build Once: The 10-Minute Setup That Saves You an Hour
1) Empty the drawer (yes, all of it)
Don’t “work around” the clutter. Pull everything out, wipe the drawer, and only return what deserves to live there.
Your future self will high-five you.
2) Measure the inside dimensionslength, width, and depth
Measure the interior of the drawer (not the front panel). Note three numbers:
inside length (front-to-back), inside width (side-to-side), and inside depth/height (bottom-to-top).
If your drawer has hardware bumps or screw heads inside, account for those too.
3) Decide what the drawer is supposed to do
Sort items into “families” (forks with forks, chargers with chargers, hair ties with their emotional-support bobby pins).
Then arrange them back into the drawer like a puzzle until the layout feels right. This is where you choose
whether you want long lanes, square bins, or a mix.
4) Leave breathing room
A divider that’s too tight becomes a permanent installation (and not the fun kind). A little clearance makes it easy
to insert, remove, and clean without fighting the drawer like it owes you money.
The Three Best Ways to Build DIY Drawer Dividers
Pick the method that matches your tools, timeline, and tolerance for sawdust. All three workyour “best” option
depends on the drawer’s job.
Method 1: Foam Board or Cardboard Grid (Fast, Cheap, Shockingly Good)
If you want results today (and you don’t want to introduce your fingers to a table saw), foam board or sturdy
corrugated cardboard makes an excellent lightweight divider insert. It’s especially great for socks, office supplies,
makeup, craft bits, and low-impact drawers.
Materials
- Foam board or double-thick corrugated cardboard
- Sharp utility knife + metal ruler/straight edge
- Pencil/marker
- Hot glue (optional) or connector clips (optional)
- Peel-and-stick shelf liner/contact paper (optional, but makes it look “store-bought”)
Step-by-step
-
Cut a base (optional but helpful).
Cut a flat base panel to the drawer’s inside length and width. This gives your grid something to attach to and
makes the insert easy to lift out in one piece. -
Set divider height.
Cut strips to a height slightly less than the drawer’s inside heighttypically about 1/2″ to 3/4″ shorter than the drawer wall.
This keeps dividers from rubbing when the drawer opens and closes. -
Design the grid.
Place items on the base (or directly in the drawer) with a little space between them. Draw your divider lines.
Keep the layout practical: one long lane for scissors and pens beats four tiny squares that only fit… hope. -
Cut strips and label them.
Cut your long strips first (frame pieces), then the inner dividers. Label strips as you go so reassembly is painless. -
Make notches for a lock-together grid.
For intersecting dividers, cut notches halfway down each strip where they cross. Slide the pieces together like a cardboard “waffle” grid.
This creates strength without needing a lot of glue. -
Cover for durability (optional).
Wrap the top and sides of strips with shelf liner/contact paper. It adds stiffness, hides rough edges, and makes cleanup easier. -
Assemble and test fit.
Drop the grid in the drawer. If it’s too tight, shave a hair off the outside edges. If it slides, add a thin non-slip liner under it.
Best uses
- Desk drawers, makeup drawers, sock/underwear drawers, craft storage
- Renters who want zero-permanent changes
- Anyone who wants to prototype a layout before building in wood
Method 2: Wood Shim Dividers (Beginner-Friendly, Great for Junk Drawers)
Wood shims are the unsung heroes of DIY organization: cheap, easy to cut, and perfect when you want flexible sectioning
without building a full “insert.” This method shines in catch-all drawers where you’re constantly adjusting what lives there.
Materials
- Wood shims
- Hand saw or jigsaw
- Sandpaper
- Hot glue or wood glue
- Paint or clear finish (optional)
- Peel-and-stick wallpaper/shelf liner (optional for the drawer bottom)
Step-by-step
- Use the thicker ends. Shims tapermark where the thick portion ends and focus on that sturdier section.
- Lay out sections. Arrange shims in the drawer to form compartments. This is “Lego mode” for adults.
- Mark and cut. Mark cut lines where shims need to meet. Cut and sand any rough edges so nothing snags.
-
Glue strategically.
Glue shim-to-shim to create stable walls. Avoid gluing to the drawer itself so you can remove and reconfigure later. - Finish if you want. A quick coat of paint or clear finish makes it easier to wipe clean (and looks less like construction debris).
Best uses
- Junk drawers, utility drawers, garage drawers, craft catch-alls
- “I want sections but I don’t want commitment” organization
Method 3: Wooden Divider Insert (Durable, Custom, Looks Like It Came With the Cabinets)
This is the classic: thin wood boards cut to size, assembled into an insert, and dropped into the drawer as a removable organizer.
It’s ideal for high-traffic kitchen drawers (flatware, utensils, tools) where lightweight materials get beat up.
Pick your wood
Poplar is a favorite because it’s easy to cut, sands nicely, and takes paint well. Pine is budget-friendly, oak is tougher,
and “project boards/craft boards” from big-box stores are convenient because they’re already straight and sized for small builds.
Tools (choose your comfort level)
- Minimum: measuring tape, pencil, miter saw or hand saw, sandpaper, wood glue, painter’s tape/clamps
- Nice-to-have: brad nailer (or small finish nails), clamps, a sander
- Pro-mode joinery: table saw (or router) to cut dados/rabbets for lock-tight joints and a cleaner look
The simple “glue-and-drop-in” build (no fancy joinery)
-
Prototype the layout.
Put items in the drawer where you want them, then mark divider lines using painter’s tape (or any removable marker system). -
Cut boards to height.
Many DIYers use boards around 2.5″ tall for standard kitchen drawers, but choose height based on your drawer depth and what you store.
Aim slightly below the drawer wall so things slide in and out smoothly. -
Cut boards to length in small batches.
Cut a few pieces, dry fit, adjust, repeat. This prevents a whole pile of “almost right” boards. -
Assemble as an insert (not attached to the drawer).
Place boards inside the drawer to hold alignment, then glue the boards to each other along the seams. Use painter’s tape as “clamps”
if you don’t have actual clamps. -
Let glue cure fully.
Wood glue gets strong as it curesgive it real time so joints don’t shift the first time someone slams the drawer shut. -
Optional: add a liner under the insert.
A thin non-slip liner prevents shifting and makes the whole setup feel more solid.
The “cabinet-shop” build: dados and rabbets (strong, clean, satisfying)
If you want dividers that interlock and resist racking, cut grooves (dados) and notches (rabbets) so boards nest together.
This makes assembly easier and the finished insert tougherespecially for utensil drawers that take daily punishment.
- Cut pieces to length and sand. Smooth edges prevent splinters and make the insert feel finished.
- Mark joinery from a centerline. Working from the center outward helps keep compartments symmetrical.
- Cut dados and rabbets. Use a dado stack or multiple passes with a standard blade to create snug grooves.
- Glue and clamp. Apply glue inside joints, assemble, and clamp until set. Wipe squeeze-out with a damp rag.
- Reinforce (optional). A brad nail at each joint adds durability without making the project bulky.
- Ease edges. Lightly sand or chamfer edges so nothing catches on fingersor on that one spatula that always fights back.
Sizing Rules That Make Dividers Fit Like They Were Meant to Be There
Rule #1: Build for removal, not permanence
A removable insert is easier to clean, adjust, and replace. Glue your divider parts to each othernot to the drawer walls.
Rule #2: Use a tiny clearance on the outside
A common pro trick is to make the outside footprint of an insert slightly smaller than the drawer’s interiorthink around
1/8″ less in both length and widthso it drops in smoothly and lifts out without drama.
Rule #3: Divider height should clear the drawer’s top edge
Tall dividers can rub and catch. Cut dividers just a bit shorter than the drawer’s inside height so the drawer opens/closes freely.
Rule #4: Include at least one “spine” piece for stability
Inserts stay put best when one or more pieces run the full width or depth of the drawer. Think of it as a backbone:
it prevents the grid from shifting as a unit.
Three Layout Examples You Can Steal (and Adjust)
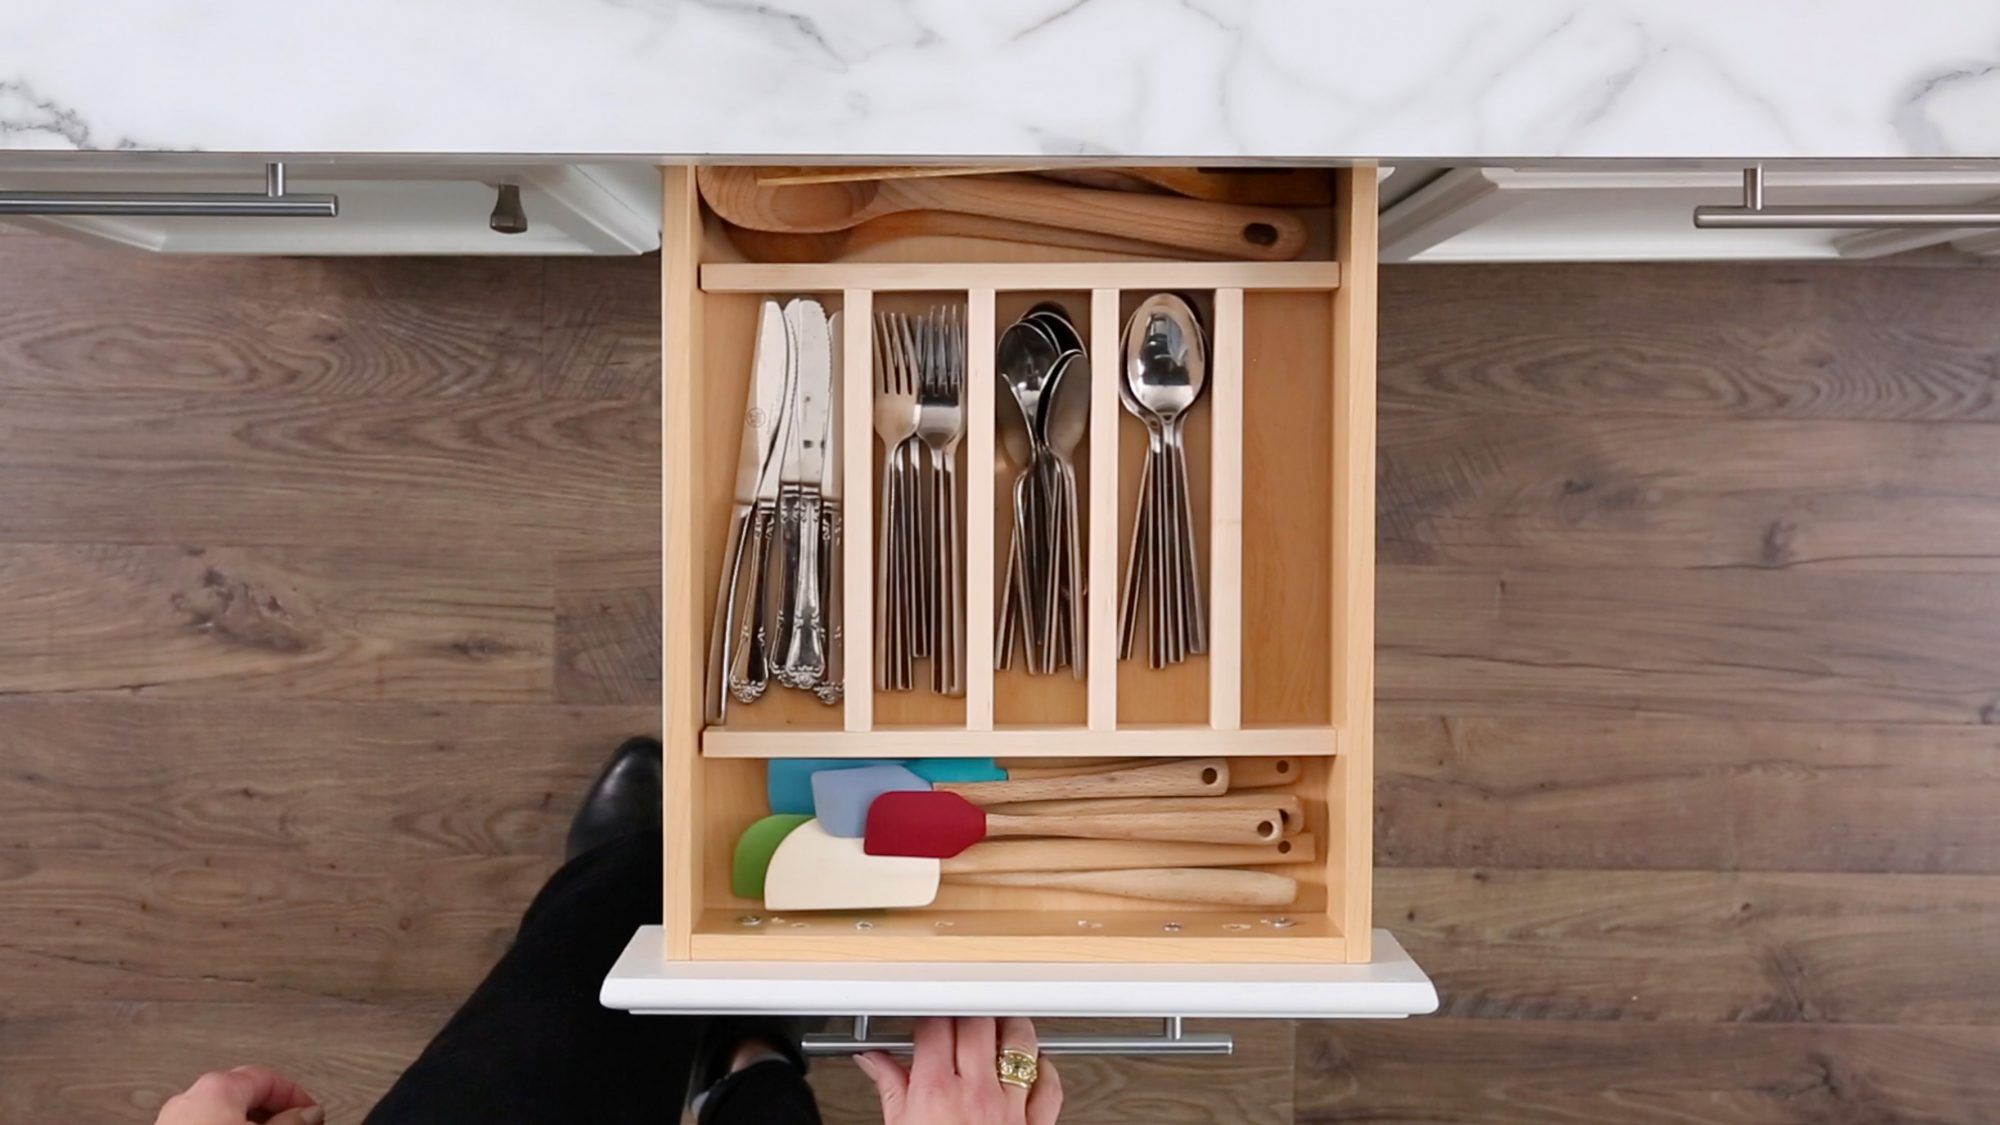
1) The utensil drawer (daily use, high traffic)
- Long lanes for spatulas, tongs, whisks
- Medium compartments for measuring spoons/cups, peelers, small tools
- A “back zone” for long, flat items (wraps, bags, funnels) if the drawer depth allows
2) The junk drawer (everything, everywhere, all at once)
- One medium compartment for scissors and a tape measure
- One small compartment for batteries (with a label so they don’t migrate)
- One “tiny items” compartment for paper clips, keys, and the mystery Allen wrench collection
- A flexible lane for rotating seasonal stuff (candles in winter, sunglasses in summer)
3) The dresser drawer (soft goods need softer organization)
- Grid compartments for socks/underwear (foam board works great here)
- Wider compartments for rolled tees or workout gear
- Shorter dividers so fabric slides in and out without snagging
Finishing Touches That Make It Look “Done”
- Sand edges: even a quick pass removes sharp corners and gives a clean, pro feel.
- Line the drawer: shelf liner adds grip, hides old scuffs, and makes the insert feel custom.
- Seal for kitchens/baths: a wipe-on finish or paint helps resist moisture and makes cleanup easier.
- Label compartments (optional): especially useful in shared spaces, kid drawers, or office supply drawers.
Troubleshooting: Quick Fixes for Common DIY Divider Problems
The insert slides around
Add non-slip liner under the insert, or add a full-length “spine” piece to stabilize the layout.
It’s too tight to remove
Sand or trim the outside edges slightly. Next time, build the outer footprint with a small clearance so it drops in easily.
The compartments are the “wrong” sizes
This is why cardboard prototypes are magical. If you already built in wood, consider rebuilding only the pieces that define the problem area.
Modular layouts make this painless.
Cardboard/foam board is collapsing
Use thicker material, reinforce intersections with notches, and consider wrapping strips with shelf liner for extra stiffness.
Safety Notes (Because Drawers Are Not Worth a Trip to Urgent Care)
- Use a sharp blade for foam board/cardboarddull blades slip more.
- Keep hands clear of cut paths; use a straight edge and cut slowly.
- When using saws, follow tool safety basics: eye protection, stable work surface, and clamps when possible.
- Ventilate if painting, staining, or using strong adhesives.
Conclusion: Build the Drawer You Want to Open
DIY drawer dividers are one of those rare projects that deliver instant quality-of-life upgrades. You spend an hour measuring and cutting,
and then you get to stop rummaging forever. Whether you choose foam board for speed, shims for flexibility, or a wooden insert for a
cabinet-worthy finish, the secret is the same: design around your real stuff, leave a little clearance, and make it removable so future-you
can adjust without regrets.
Your drawers don’t need to be perfect. They just need to stop eating your time. Build the lanes, assign the homes, and enjoy the small,
glorious thrill of a drawer that finally makes sense.
Real-World Experiences and Lessons DIYers Learn the Hard Way (So You Don’t Have To)
People who build drawer dividers tend to share the same “I wish someone told me this earlier” momentsusually right after they’ve cut
their third board 1/4″ too long. The first big lesson: drawers lie. Not maliciously, but casually. A drawer that measures 15″ wide at the
front might be a smidge narrower at the back, or it may have a slightly bowed side, or a screw head that sticks out just enough to make
a tight insert feel like it’s welded in place. DIYers who end up happiest usually measure in a couple of spots (front and back), then build
with a small clearance so the insert drops in and lifts out without a wrestling match.
The second lesson is that “perfect layout” is a moving target. A junk drawer today is a gift-wrap drawer next month, and a battery drawer
during the holidays becomes a “random tiny ornaments” drawer whether you approve or not. That’s why removable inserts win. DIYers often
report they’re grateful they didn’t glue anything to the drawer wallsbecause once you’ve lived with a layout, you’ll inevitably want to
nudge a compartment wider, add a long lane, or create a dedicated spot for one oddly-shaped tool that refuses to cooperate.
A surprisingly common experience is the “container trap.” Many people try store-bought bins first, only to realize the bins fit the drawer
like mismatched socks: technically wearable, emotionally upsetting. The DIY approach flips the equation. Instead of forcing your stuff into
compartments you didn’t choose, you build compartments around the stuff you actually use. That mindset shift tends to stickDIYers start
grouping by function (prep tools together, baking tools together) rather than by “whatever fits in this random bin.”
Another shared lesson: prototypes aren’t for quittersthey’re for people who don’t want a pile of scrap wood. A quick cardboard mockup is
the “rough draft” that saves your final build. DIYers who prototype can test small-but-important details: Do tongs snag on a divider corner?
Does the pizza cutter handle need more clearance? Is the divider too tall for your hand to grab items easily? That 5–10 minutes of testing
often prevents the annoying realization that your beautiful wooden insert is functionally… fine, but mildly irritating.
Finally, experienced DIY organizers tend to leave one “breathing” compartment on purpose. Not a junk zonemore like a flexible buffer.
It catches the odd items that don’t deserve a full redesign, and it prevents the system from collapsing the moment one new tool enters the
drawer. Organization that survives real life isn’t rigid; it’s resilient. Build your dividers with that in mind, and you’ll end up with
drawers that stay tidy even when the week doesn’t.