If you grew up with Nutter Butters, you probably have a very specific memory: the peanut shape, the snap when you bite, and that sweet peanut-buttery filling that somehow tastes like “after-school happiness.” The store-bought classic is greatbut homemade nutter butters are where things get dangerously fun. You get a richer peanut flavor, a fresher crunch, and the power to make the filling as thick (or as “I’ll just eat this with a spoon”) as you want.
This guide breaks down how to make copycat-style homemade nutter butters with a crisp-yet-tender peanut cookie and a creamy peanut butter filling. You’ll also get troubleshooting tips, flavor variations, and real kitchen lessons so your cookies look cute, taste legit, and don’t turn into a peanut-butter pancake situation.
What are homemade nutter butters, exactly?
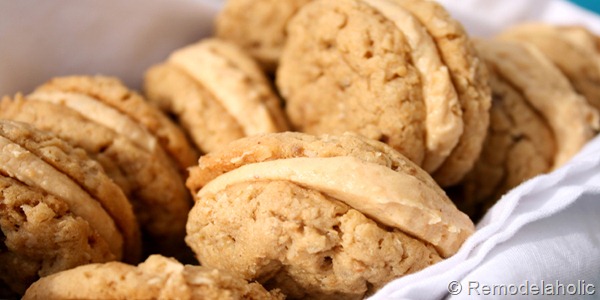
Homemade nutter butters are peanut-shaped peanut butter sandwich cookies: two lightly sweet, peanut-forward cookies pressed with a classic crisscross pattern, then sandwiched with a thick peanut butter cream filling.
They’re not identical to the packaged version (unless you own a snack factoryplease invite me), but you can get incredibly close in vibe: crunchy edges, soft-ish center if you want it, and a filling that holds its shape without oozing out like it’s escaping the cookie witness-protection program.
Why make them at home?
- Flavor control: more peanut flavor, less “mystery sweetness.”
- Texture choice: extra-crisp, tender-crisp, or slightly chewyyour kitchen, your rules.
- Filling freedom: classic peanut butter cream, honey-peanut filling, chocolate-peanut, or even a salty pretzel twist.
- They’re fun to shape: these cookies are basically edible arts and craftswith better results than glue.
Key ingredients
These cookies work best with standard creamy peanut butter (the shelf-stable kind). Natural peanut butter can be used, but it may make the dough and filling looser because the oils separate more easily.
For the peanut-shaped cookies
- Creamy peanut butter: the main flavor and part of the fat.
- Butter: adds richness and helps browning.
- Brown sugar + granulated sugar: brown sugar gives chew and depth; white sugar helps crispness.
- Egg: structure and binding.
- Vanilla: background flavor that makes peanut butter taste more “cookie-like.”
- All-purpose flour: structure.
- Cornstarch: helps keep cookies tender while still crisping at the edges.
- Baking soda: lift and spread control.
- Salt: non-negotiable. Peanut butter loves salt.
For the filling
- Creamy peanut butter
- Powdered sugar: thickens and sweetens.
- Honey (or a splash of cream/milk): smooths the filling and improves spreadability.
- Vanilla + salt: keeps it from tasting flat.
Equipment you’ll want
- Mixing bowls + hand mixer or stand mixer
- Measuring cups/spoons (or a kitchen scale, if you’re feeling fancy)
- Baking sheets + parchment paper
- A fork (yes, your cookie-styling tool is… a fork)
- Optional: small cookie scoop for even sizing
- Optional: piping bag or zip-top bag for neat filling
Homemade nutter butters recipe
Yield: about 18–22 sandwich cookies (depending on size)
Total time: ~1 hour (including chilling)
Difficulty: Easy with a tiny bit of “cookie sculpting”
Ingredients
Cookies
- 3/4 cup creamy peanut butter
- 1/2 cup unsalted butter, softened
- 3/4 cup packed light brown sugar
- 1/4 cup granulated sugar
- 1 large egg
- 2 teaspoons vanilla extract
- 1 1/2 cups all-purpose flour
- 2 tablespoons cornstarch
- 1/2 teaspoon baking soda
- 1/2 teaspoon fine salt
Filling
- 3/4 cup creamy peanut butter
- 1 to 1 1/4 cups powdered sugar (to taste and thickness)
- 1–2 tablespoons honey or 1–2 tablespoons cream/milk
- 1 teaspoon vanilla extract
- Pinch of salt
Step-by-step instructions
1) Make the dough
In a large bowl, beat the peanut butter and softened butter until smooth. Add brown sugar and granulated sugar, then beat until fluffyabout 1–2 minutes. Beat in the egg and vanilla until fully combined.
In a separate bowl, whisk flour, cornstarch, baking soda, and salt. Add the dry ingredients to the wet ingredients and mix just until no flour pockets remain. Don’t overmixthese are cookies, not a stress test.
2) Chill (yes, it matters)
Cover and chill the dough for 30–45 minutes. Chilling helps the fat firm up, which reduces excessive spreading and makes shaping easier. If your kitchen is warm, don’t skip thisyour cookies will thank you by staying peanut-shaped instead of becoming “abstract peanut art.”
3) Shape the peanut cookies
Preheat oven to 350°F. Line baking sheets with parchment.
Scoop dough into small portions (about 1 tablespoon each). To get that peanut look, roll each portion into a short log, then pinch gently in the middle to create the “waist.” Another easy method: roll two smaller balls, press them together end-to-end, then pinch the center lightly.
Place cookies 2 inches apart. Use a fork to press a crisscross pattern on topone press, rotate fork 90 degrees, press again. You want them flattened but not pancaked.
4) Bake
Bake for 9–11 minutes, until edges look set and lightly golden. The centers may look slightly underdone; they’ll firm up as they cool. Let cookies cool on the baking sheet for 5 minutes, then transfer to a rack to cool completely.
Important: If you fill warm cookies, the filling will melt and slide around. That’s not a sandwich cookieit’s a peanut butter slip-n-slide.
5) Make the filling
In a bowl, mix peanut butter with powdered sugar, vanilla, and salt. Add honey (or cream/milk) a little at a time until the filling is thick, smooth, and spreadable. You’re aiming for a consistency that holds peaks but doesn’t crumble.
Thickness test: Swipe a knife through the filling. If it closes in slowly, you’re good. If it flows like frosting, add more powdered sugar. If it looks like peanut sand, add a tiny splash of liquid.
6) Assemble like a pro
Match cookies into pairs of similar size. Pipe or spread about 1–2 teaspoons filling onto the flat side of one cookie, then press the second cookie on top gently. The filling should reach near the edges without squeezing out like it’s trying to flee the scene.
How to nail the “store-bought style” texture
Want them crisp?
- Bake 1 minute longer (but don’t scorch them).
- Use a touch more granulated sugar than brown sugar.
- Cool completely uncovered so steam doesn’t soften them.
Want them slightly softer?
- Pull them at the earlier end of the bake time.
- Lean a bit more on brown sugar.
- Store in an airtight container once fully cooled.
Common problems (and how to fix them)
My cookies spread too much
- Dough too warm: chill longer.
- Butter too soft: use softened, not melty.
- Pan issue: use parchment and a cool baking sheet (don’t reuse a hot pan).
- Measuring drift: too little flour can cause extra spreadspoon and level, or weigh.
My cookies are dry or crumbly
- Overbaking is the usual culpritpull them earlier.
- Too much flour can do itmeasure carefully.
- Use creamy peanut butter for a smoother dough; very stiff peanut butter can dry things out.
My filling is too sweet
- Use less powdered sugar and add a little honey for smoothness.
- Add a pinch more salt and a touch more peanut butter to rebalance.
My filling won’t hold its shape
- Add powdered sugar gradually until it thickens.
- Chill the filling 10–15 minutes before assembling.
- Avoid oily, separated peanut butterstir well first.
Flavor variations that still taste like “nutter butter energy”
Chocolate-dipped homemade nutter butters
After assembling, dip half of each sandwich cookie in melted chocolate. Let set on parchment. This turns your cookies into “party cookies” with very little extra effort (and maximum applause).
Salty-sweet pretzel crunch
Mix 2–3 tablespoons finely crushed pretzels into the filling. It adds a little crunch and a salty kick that makes the peanut butter pop.
PB&J throwback
Spread a very thin layer of jam on one cookie half, then add the peanut butter filling, then top with the second cookie. Keep it thin so the sandwich doesn’t slide around.
Spiced “grown-up” nutter butters
Add 1/2 teaspoon cinnamon to the cookie dough and a tiny pinch of cayenne to the filling. Not spicy-hotmore like “wait, what is that amazing flavor?”
Storage and make-ahead tips
- Room temp: store in an airtight container for 3–5 days.
- Fridge: helps the filling stay firm, especially in warm climates. Let cookies sit 10 minutes before serving for best texture.
- Freeze: freeze assembled cookies in a single layer, then bag them. Thaw at room temp. You can also freeze the baked cookie halves and fill later.
Allergy and safety note
These cookies contain peanuts and are not safe for anyone with a peanut allergy. If baking for a group, keep surfaces clean and avoid cross-contact with other foods. Peanut butter is delicious, but it is not subtle.
Kitchen stories and real-life experiences with homemade nutter butters (the extra )
Here’s what tends to happen when people make homemade nutter butters for the first time (and why it’s part of the charm). The first batch usually starts with pure confidence: “I bake all the time. I’ve got this.” Then you begin shaping peanuts and realize you’re basically doing tiny cookie sculpture. Your first few might look like actual peanuts. The next few might look like a bowtie. Somewhere around cookie number ten, you’ll accept that the “homemade” look is a feature, not a bugand suddenly everything gets easier.
Then comes the fork-press moment. It feels old-school in the best way, like you’re channeling a grandparent who could eyeball a tablespoon without measuring. You’ll press one cookie too hard and think, “Well, that one’s going to be extra crunchy,” and you’ll press another too lightly and end up with a puffier peanut that looks like it’s wearing a winter coat. The funny part is that once they’re sandwiched, nobody cares. In fact, the slightly irregular shapes make the platter look more invitinglike a bakery display instead of a factory lineup.
The filling stage is where the emotional stakes rise. You’ll taste it “just to check,” then taste again to confirm the first taste was accurate (it was), and then you’ll wonder if you should make a double batch. A common experience is making the filling a little too stiff at first because powdered sugar thickens fast. The fix is simple: add honey (or a teaspoon of cream) and watch it transform from crumbly to spreadable. It’s oddly satisfyinglike cookie chemistry working in your favor.
Assembly is when you learn your personal cookie philosophy. Some people go for neat, piped filling with perfect edges. Others embrace the rustic swoosh of a butter knife. If you’re piping, you’ll feel extremely professional for about 90 seconds… until the bag warms up in your hand and the filling starts to soften. That’s when you discover a pro move: fill a few cookies at a time, then pause and chill the filling (or the assembled cookies) briefly. Suddenly you’re back in control, like a peanut butter architect.
And finally, there’s the “first bite reality check.” Homemade nutter butters usually taste more peanut-forward than the packaged versionricher, toastier, and less one-note sweet. People often describe it as “the grown-up version of the cookie I loved,” which is honestly the best compliment. The other predictable experience: you’ll swear you’ll eat just one, then you’ll do the classic “I’ll just break one in half,” then you’ll realize halves don’t count because you didn’t commit to a full cookie. Cookie math is wild like that.
If you’re making these for a holiday tray, expect them to disappear first. They have that rare combination of nostalgic and impressive. Even people who “aren’t big dessert people” somehow become peanut butter sandwich cookie people when these show up. That’s not magic. That’s homemade nutter butters doing what they do best: turning an ordinary day into an excuse for a second glass of milk.
Conclusion
Homemade nutter butters are the kind of baking project that feels playful but pays you back with serious flavor. Chill the dough, shape with confidence (or at least enthusiasm), press the crisscross like you mean it, and build a filling that’s thick enough to behave. Once you’ve made them once, you’ll start riffingdipping in chocolate, adding crunch, or tweaking sweetnessbecause the only thing better than a copycat cookie is a cookie that becomes your signature.