Tire pressure is one of those “boring until it’s expensive” topics. When your tires are low, the car can feel
a little mushy, your fuel economy quietly takes a hit, and tire wear starts acting like it’s paid by the mile.
That’s why modern vehicles use TPMSTire Pressure Monitoring Systemsto warn drivers when a tire drops
significantly below its recommended pressure.
But what if you want your own tire-pressure dashboardone that works on a trailer, an older vehicle, a project
car, an RV, a track setup, or even a weird off-label experiment (because makers are gonna make)? That’s where a
homebrew tire pressure monitoring system comes in. Done right, it’s a practical DIY project that teaches
you RF basics, embedded hardware, and real-world reliabilitywhile helping you avoid the special misery of realizing
your tire is low only after the steering wheel starts negotiating with you.
What TPMS Really Does (and Why It Matters)
TPMS in plain English
A typical TPMS setup measures tire pressure (often temperature too) and alerts the driver if pressure drops to a
defined threshold. In the U.S., the regulatory target for warning is commonly framed around a significant underinflation
level (often referenced as around 25% below the placard pressure for compliance contexts), plus the system must also
detect malfunctions and warn the driver appropriately.
Low pressure isn’t just “less air,” it’s more problems
Underinflation increases rolling resistance, which can reduce fuel economy. It can also increase heat buildup and uneven
weartwo ingredients that don’t belong in any recipe involving highway speeds. Keeping tires properly inflated can help
improve mileage; several U.S. energy and transportation resources highlight that even small PSI drops across all four tires
can measurably reduce MPG over time.
Homebrew TPMS: Two Big Paths
DIY TPMS projects usually fall into one of two categories:
(1) External sensors that screw onto valve stems and send data via Bluetooth Low Energy (BLE) or simple RF,
and (2) Internal “direct TPMS” sensors like OEM-style units inside the wheel that transmit on common TPMS RF bands.
Your best choice depends on your patience level, your budget, and whether you enjoy removing tires for fun
(some people dono judgment, just confusion).
Option A: External valve-stem sensors (often BLE)
These are easy: install in seconds, no tire dismount, and the data is generally straightforwardpressure and sometimes temperature.
The tradeoffs: they can be stolen, they can be exposed to weather, and some are picky about when they transmit (many conserve battery by
staying quiet unless they detect pressure/rotation).
Option B: Internal direct TPMS sensors (315/433 MHz RF)
Internal sensors are the “real deal”: protected inside the tire and designed for long battery life. Many systems transmit on
315 MHz (common in North America) or 433.92 MHz (common in other regions and also seen on some platforms),
using short low-power bursts. The challenge is decoding the protocol and mapping sensor IDs to wheel positions.
Direct vs. Indirect TPMS (Why DIY Folks Prefer “Direct” for Data)
Indirect TPMS: clever, but not pressure data
Indirect TPMS estimates underinflation by watching wheel-speed differences via ABS sensors. It’s cost-effective, but it can’t tell you
“Front-left is 31 PSI.” It can only infer something’s off after driving conditions make the difference obvious.
Direct TPMS: actual pressure readings you can display
Direct systems measure pressure in each tire and transmit it wirelessly. For a homebrew display, direct TPMS is usually what you want
because it gives you real numbers (pressure, temperature, battery flags) instead of a vague “something’s weird” lamp.
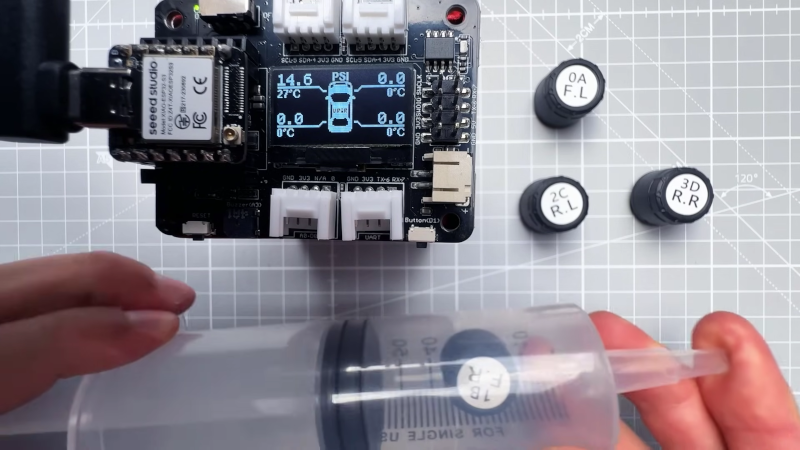
Core Building Blocks of a Homebrew TPMS
1) Sensors
- External BLE sensors (simplest install; decoding depends on app/protocol availability).
- Internal OEM-style sensors (315/433 MHz; require RF reception + decoding).
- Aftermarket RF sensors (sometimes easier to decode than OEM, sometimes not).
2) Receiver hardware
You have three common DIY receiver choices:
-
Software-defined radio (SDR) like an RTL-SDR dongle + a small computer (Raspberry Pi/mini PC).
Very flexible for sniffing and decoding TPMS packets. -
Dedicated RF transceiver module (commonly CC1101 boards paired with Arduino/ESP32-class microcontrollers).
Lower power and more “embedded,” often great for a permanent in-vehicle display. -
Vehicle data path (OBD-II/CAN, if your vehicle exposes TPMS data and you have legitimate access).
This can be clean, but it’s not universal and can be vehicle-specific.
3) Decoder software
TPMS sensors broadcast short messages that include a sensor ID and measurements. A decoder’s job is to:
(a) detect packets, (b) extract the ID, (c) convert raw values into PSI/kPa and °F/°C, and (d) filter out noise.
Many maker builds rely on existing decoders when available, then customize the last miledata formatting, alarms,
and display.
4) Display and alerts
Once you have data, you decide how you want to be warned:
- Simple LED + buzzer (the “I only need to know when it’s bad” approach).
- OLED/e-ink dashboard showing each tire’s PSI and temperature.
- Phone dashboard via BLE/Wi-Fi.
- Cloud/logging for trend graphs and slow leaks (useful for fleets, trailers, RVs, or obsessives).
How the RF Side Works (Without Turning This Into a Graduate Thesis)
Why sensors don’t talk nonstop
Battery life is everything for internal TPMS sensors. To last for years, many sensors transmit infrequently and often only when rotating.
That’s why a parked car might look “silent” on your receiver until you drive or simulate motion. Some sensors can be “woken” by
low-frequency (LF) activation tools used in service shops, but a homebrew system usually assumes you’ll capture transmissions during driving.
Frequencies you’ll encounter
In practice, many setups involve 315 MHz or 433.92 MHz transmissions. Your receiver choice must match the band your sensors use,
and your antenna placement matters a lotcars are metal boxes that love blocking radio signals like it’s their hobby.
A Practical Build Blueprint (Choose Your Adventure)
Build 1: SDR-based “Listen and Decode” TPMS (fast to prototype)
- Identify your sensor band: 315 MHz or 433.92 MHz is most common.
- Set up the SDR on a small computer. Use a known TPMS decoder workflow when possible.
- Capture packets while driving: start with logging mode so you can review sensor IDs and values.
- Map IDs to wheel positions: move the vehicle, then correlate signal strength changes by placing the antenna near each tire
(or temporarily isolate which wheel transmits by rotating one wheel at a time if you can do so safely off-road or on a lift). - Create alerts: define thresholds (e.g., 10% drop from target, and a “serious” threshold well below target).
- Build a dashboard: local web page, on-device screen, or send values to your home automation/logging stack.
Why this works: SDR is forgiving. You can see the spectrum, confirm activity, and iterate quickly. It’s the “oscilloscope” approach to TPMS.
Build 2: Embedded CC1101 + Microcontroller TPMS Receiver (great for permanent installs)
- Pick your microcontroller: ESP32 is popular for Wi-Fi/BLE, low power modes, and plenty of processing headroom.
- Add a CC1101 (or similar) RF module: configure it for 315 or 433.92 MHz, then tune modulation settings as needed.
- Implement packet parsing: start from known examples for your sensor type when available; otherwise log raw packets and reverse-engineer.
- Store sensor IDs: save known IDs in flash, then assign them to tire positions using a pairing routine.
- Display values: small OLED is the classic choice; e-ink is nice for sunlight readability.
- Power safely: use a proper automotive buck converter, fuse the line, and handle ignition-on vs always-on behavior thoughtfully.
Build 3: External BLE sensors + your own dashboard (simple hardware, software-heavy)
- Choose BLE sensors with consistent data behavior.
- Scan BLE advertisements (or connect, depending on the sensor design).
- Decode payloads into PSI and temperature.
- Design the UX: phone app, small in-car display, or a tiny web dashboard served by an ESP32.
This is often the easiest path if you want something that’s “installed by lunchtime,” but compatibility varies between brands and models.
Accuracy, Calibration, and the “Don’t Lie to Yourself” Checklist
Use a known-good reference gauge
A homebrew system is only useful if it’s trustworthy. Compare readings with a reliable handheld gauge and note:
(a) cold vs warm tire pressure differences, and (b) sensor tolerance. You’re looking for consistency more than perfection.
Set alerts that make sense
If your alerts are too sensitive, you’ll ignore them. If they’re too relaxed, they’ll show up after the tire has already filed
a formal complaint. A solid approach is:
- Warning: modest drop from your normal cold pressure baseline.
- Urgent: a bigger drop that suggests a leak or a real safety issue.
- Sensor fault: missing transmissions for an extended period (with logic that accounts for parked/idle behavior).
Reliability in the Real World (Where Projects Go to Become “Version 2”)
Antenna placement is not optional
RF projects don’t fail because the code is bad (okay, sometimes). They fail because the antenna is in the wrong spot and the car is basically
a rolling Faraday cage. Test mounting locations and watch packet reception while driving. If you can’t receive consistently, move the receiver,
change the antenna, or both.
Understand transmission timing
Many sensors transmit intermittentlysometimes on the order of tens of seconds to minutesespecially to preserve battery. Your UI should be honest:
show a “last update” timestamp per tire so users don’t assume silence means “all good.”
Power design: don’t let the car’s electrical system bully your electronics
Automotive power is noisy. Use a quality buck converter, add filtering, and fuse properly. If you want always-on monitoring, build for low standby
current. If you want ignition-only, handle clean boot and quick reacquisition of sensor data.
Legal and Safety Notes (The Responsible Part)
A homebrew TPMS display should be treated as supplemental information, not a replacement for safe tire maintenance.
Use it to catch slow leaks early, validate tire behavior under load, and improve situational awarenessthen still check pressures regularly,
especially before long trips or towing.
Also: receiving RF is generally a “listen only” activity. Avoid transmitting on TPMS-related bands unless you are properly authorized and know
exactly what you’re doing. Your goal is awareness, not interference.
Common Use Cases Where Homebrew TPMS Shines
Trailers and towing
Trailer tires can run hot and fail dramatically. A DIY TPMS dashboard can be a lifesaverespecially if your towing setup doesn’t integrate well
with factory vehicle systems.
Fleet, farm, and work vehicles
When multiple vehicles are involved, logging pressure trends can identify slow leaks and maintenance patterns before they turn into downtime.
Track days and off-road setups
Tire pressure tuning matters. Being able to see pressure and temperature in real time (or near real time) helps you learn what your tires are doing
instead of guessing based on vibes and tire squeal alone.
Builder Experiences: What DIY TPMS Projects Feel Like in the Real World (About )
If you hang around maker forums long enough, you’ll notice a pattern: the first day of a homebrew TPMS build feels like magic, and the second day feels
like physics. Day one is when you see your first packet come throughan ID, a pressure value, maybe a temperature byteand you think, “That’s it. I’ve
built a tire whisperer.” Then you move the receiver inside the car, go for a drive, and suddenly your “tire whisperer” becomes a “tire mime,” because the
antenna is now trapped behind metal, tinted glass, and the world’s most stubborn cup holder.
The most common learning moment is realizing that RF reliability beats RF cleverness. People often start by tweaking decoder settings for hours,
when the real fix is embarrassingly simple: move the antenna. Put it higher. Put it closer to the wheel wells. Use a better antenna. Route a small coax
cable to a location with fewer metal obstructions. The “aha” moment usually happens when you temporarily place the antenna near a tire and watch packets
become clean and frequent. That’s when you stop treating reception like software and start treating it like a placement problem.
Another very normal experience is learning that “no data” doesn’t always mean “no pressure.” Internal sensors frequently conserve power. Many won’t
transmit at all when the vehicle is parked, and some transmit far less often than you expect while driving. Builders who design dashboards without timestamps
tend to panic the first time a tire “goes silent.” The smarter dashboards show “last updated,” and they treat silence as a soft warning until it crosses a
realistic time threshold. That tiny UI decisionadding timestampsoften turns a stressful gadget into a genuinely useful tool.
There’s also the reality check of calibration and expectations. DIY builds rarely match a laboratory instrument, and that’s fine. What people learn to
value is consistency: if the sensor is always 1–2 PSI off but stable, it still tells you when pressure is trending down. That’s especially helpful for slow
leaks, where you might not notice anything for days. Many builders end up adding a feature that logs pressure over time and flags a “leak suspicion” when the
pressure drop rate crosses a threshold. It’s a nerdy feature, surebut it’s also the kind that saves tires and prevents roadside drama.
Finally, the “human factors” experience: once your DIY TPMS works, you’ll become the person who notices tire behavior everywhere. You’ll watch temperature
climb on long highway runs. You’ll see pressure jump after a few miles. You’ll spot that one tire that always loses a bit more between checks. And yesyou may
annoy your passengers by announcing, “We are at optimal PSI,” like your car is a spaceship. Consider that your reward for successfully building a
homebrew tire pressure monitoring system: equal parts safety, insight, and the tiniest bit of smug satisfaction.
Conclusion
A homebrew tire pressure monitoring system is one of those DIY projects that sits at the sweet spot between “fun gadget” and “actually useful.”
Start by choosing your sensor path (BLE external sensors vs. internal 315/433 MHz direct sensors), then pick your receiver approach (SDR for fast iteration,
or a microcontroller + RF module for a permanent install). Focus on good reception, honest UX (timestamps!), sensible alert thresholds, and safe power design.
If you do that, you’ll end up with a system that helps you catch slow leaks early, tune performance setups, and keep your tires happier than they deserve.