Spring is the perfect time to refresh your front door with a DIY wreath that celebrates the season. If you’re looking for an easy and fun project, creating a hula hoop spring wreath is a great way to add color and charm to your doorstep. This simple, budget-friendly craft is perfect for crafters of all skill levels, and with just a few materials, you can make a wreath that’s as unique as your home. Let’s dive into how to make this delightful spring wreath with a hula hoop!
Why a Hula Hoop Spring Wreath?
The idea of using a hula hoop for a wreath might sound unconventional, but it’s the perfect base for a seasonal decoration. Hula hoops are lightweight, durable, and come in various sizes, which makes them a great option for creating wreaths. Plus, they are easy to work with, and you can get creative with how you decorate them.
Another great reason to choose a hula hoop wreath is that it’s customizable. Whether you prefer a minimalist style with just a few flowers or you want to create a more extravagant design bursting with spring colors, a hula hoop gives you the flexibility to craft the wreath of your dreams.
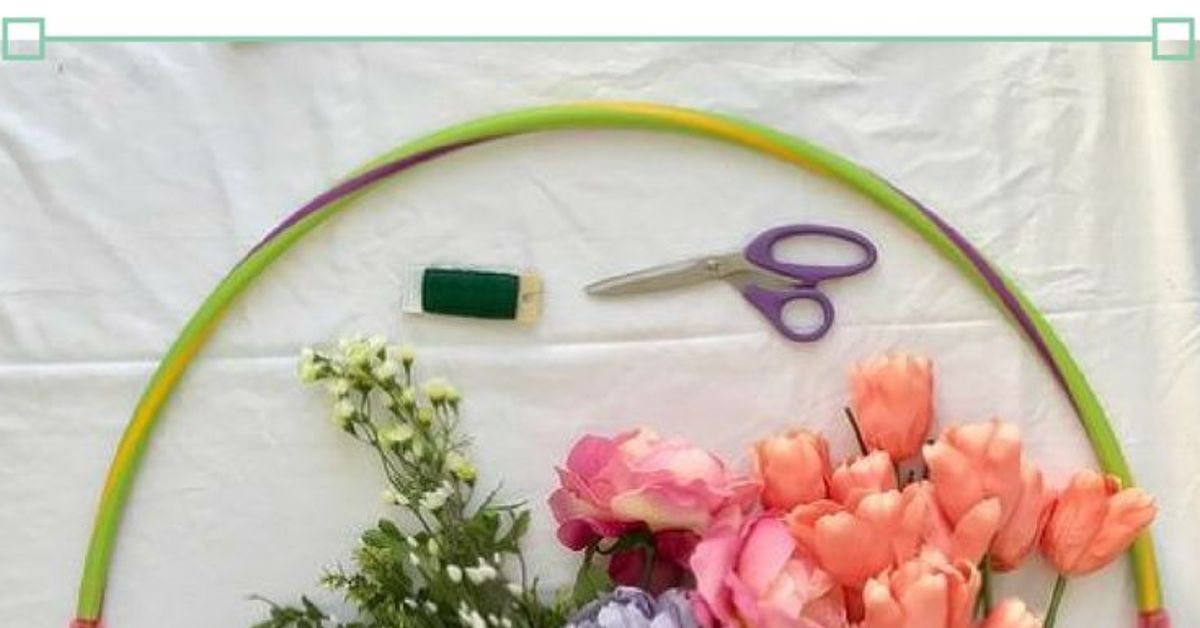
Materials Needed for Your Hula Hoop Spring Wreath
Before you get started, gather the materials you’ll need. Here’s what you’ll need for this DIY wreath:
- Hula Hoop – You can find these at most craft stores or online. A standard hula hoop size (around 36 inches) works well, but feel free to choose a smaller or larger one depending on your style.
- Floral Wire – This will help you attach the flowers and any other embellishments to the hula hoop.
- Spring Flowers – Fresh or faux flowers in pastel shades like lavender, pink, yellow, and white are perfect for spring. You can also choose other elements like greenery or even small artificial birds for added charm.
- Hot Glue Gun – For securely attaching flowers and decorations to the hula hoop.
- Ribbons – These will add a lovely finishing touch, especially if you’re creating a bow or hanging ribbon.
- Decorative Elements – Think about adding butterflies, birds, or even a springtime message like “Welcome!” or “Happy Spring!” These will give your wreath personality and flair.
Step-by-Step Instructions for Making Your Hula Hoop Wreath
Now that you have your materials, it’s time to get crafting! Follow these simple steps to create your own beautiful hula hoop spring wreath.
1. Prepare the Hula Hoop
Start by preparing your hula hoop. If you like, you can paint it to match the theme of your wreath. Light pastel colors such as mint green, soft pink, or sky blue work beautifully for spring, but feel free to get creative! Once your paint has dried, you’re ready to move on to the next step.
2. Attach the Ribbon
Next, attach a ribbon to the top of your hula hoop to create a way to hang your wreath. You can make a simple loop of ribbon or tie a larger bow depending on the look you want. Secure it with a bit of hot glue, ensuring it’s tight enough to hold the wreath up on your door.
3. Arrange the Flowers
Now comes the fun partarranging your flowers! Start by laying out your flowers around the hula hoop to see where you want each bloom to go. You can go for an even pattern or a more organic, asymmetrical design. Once you have everything in place, use floral wire or a hot glue gun to attach the flowers securely to the hula hoop. Don’t be afraid to layer the flowers, greenery, and other elements to create depth and texture.
4. Add Decorative Accents
If you’re using any additional decorations like butterflies, small birds, or a springtime sign, now’s the time to attach them. These small touches will make your wreath stand out and feel festive. Use hot glue to secure them onto the wreath.
5. Final Touches
Once you’ve attached all your flowers and decorative accents, step back and take a look at your wreath. Does it need more color? Add a few more flowers! If the ribbon isn’t sitting right, adjust it. You want the wreath to look full, but not overcrowded.
Why This DIY Wreath Is Perfect for Spring
The beauty of a hula hoop spring wreath is that it’s versatile and can be customized to reflect the season’s vibrant colors and textures. Spring is all about fresh starts, renewal, and celebrating nature’s beauty, and this wreath can capture all of that in a single design.
Moreover, creating a wreath is a great way to get into the spring spirit. It’s a simple project that can be completed in just a few hours, making it an ideal craft for a weekend afternoon or a fun group project. Whether you make it alone or with family and friends, this DIY wreath is a wonderful way to add a personal touch to your home’s decor.
Variations to Try for Your Hula Hoop Wreath
If you want to switch things up, here are a few variations on the classic hula hoop wreath that might inspire you:
- Monochromatic Design: Instead of using a mix of colors, try creating a wreath using only one color palette. You could make an all-white wreath with white flowers and a white-painted hula hoop for a fresh and calming look.
- Farmhouse Chic: Add burlap ribbon or a rustic sign like “Welcome” for a farmhouse-inspired wreath. This will give your door a cozy, country feel.
- Floral Garland: Instead of placing individual flowers, create a long floral garland to wrap around the hula hoop. This adds a sophisticated, flowing effect to your wreath.
- Incorporate Fresh Flowers: For a more natural look, use real flowers instead of artificial ones. You can swap them out as the seasons change for a fresh look each time.
Easy Hula Hoop Wreath DIY: A Fun, Creative Project
Making a hula hoop wreath is an easy, affordable way to add a personalized touch to your front door this spring. It’s a wonderful way to celebrate the season, whether you go for a classic floral design or mix in some unique decorative elements. Whatever your style, this DIY project is a fun, creative way to brighten up your home and showcase your crafting skills!
Conclusion: Crafting a Personalized Spring Wreath
Creating a hula hoop spring wreath is a delightful way to usher in the season and personalize your front door. Whether you’re crafting it for your own home or as a thoughtful gift, this DIY project is an enjoyable and rewarding experience. And with so many customization options, you can tailor the wreath to suit your own tastes, making it a one-of-a-kind piece that will brighten your home for weeks to come.
Additional Experience and Tips for Your Hula Hoop Wreath
In my experience, creating a hula hoop spring wreath is one of the most satisfying and enjoyable craft projects you can do. The best part is how you can easily tailor it to your own personal style. I’ve made several wreaths over the years, and each one was unique. Whether I was adding faux flowers, burlap, or even small, decorative birds, there was always something new to try. If you’re someone who enjoys getting creative and experimenting with different materials, this project will keep you entertained for hours!
One thing I recommend is to take your time when picking out your materials. Sometimes, finding the right flowers or embellishments can take a bit of time, but the result will be worth it. For instance, I once found a bundle of lavender that was perfect for one of my wreaths. I combined it with soft pink roses and a hint of greenery, creating a soft, romantic look that made the front door feel welcoming and fresh.
Another tip: Make sure to secure everything well, especially the flowers. Sometimes the flowers can shift if they’re not properly glued or wired, and you don’t want your wreath falling apart the first time the wind blows! A few extra dabs of glue will ensure your design stays intact for the long haul.
Lastly, don’t forget to step back and admire your work. There’s something so fulfilling about seeing your creation come to life, especially when you hang it on your front door and see how it adds charm to your home. It’s a great way to greet guests and show off your crafting skills! So grab your materials, get creative, and make a hula hoop wreath that will put a smile on your face every time you see it.