Some centerpieces whisper politely from the middle of the table. A DIY tulle topiary centerpiece, on the other hand, floats in like it owns the roomand honestly, it kind of does. Soft, airy, affordable, and surprisingly easy to customize, tulle topiaries are the kind of party decor that makes guests say, “Wait, you made that?” which is craft-person code for “please accept this invisible trophy.”
Whether you are planning a baby shower, bridal shower, birthday party, wedding reception, princess-themed celebration, ballet party, garden luncheon, or a dessert table that needs a little drama, tulle topiary centerpieces are a beautiful DIY option. They bring height, texture, color, and whimsy without the price tag of fresh floral arrangements. Even better, they do not wilt, droop, or judge you for eating frosting directly from the mixing bowl while crafting.
This guide walks you through how to make tulle topiary centerpieces step by step, including materials, design ideas, budget tips, safety notes, troubleshooting, and real-world experience from making these fluffy little showstoppers. The goal is simple: create a centerpiece that looks polished, photographs beautifully, and survives the journey from your craft table to the party table without behaving like a rebellious cloud.
What Is a Tulle Topiary Centerpiece?
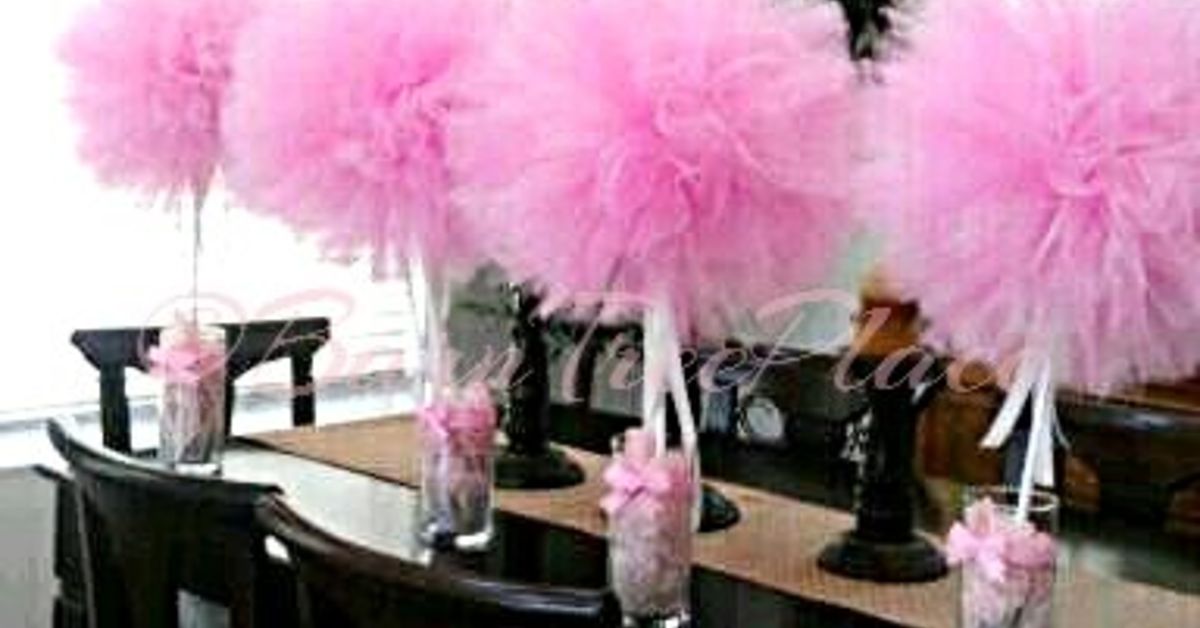
A tulle topiary centerpiece is a decorative arrangement that usually features a round, fluffy tulle “pom-pom” or tulle-covered ball mounted on a dowel, stick, or stem and placed inside a pot, vase, bucket, or decorative container. It mimics the classic shape of a topiary tree, but instead of greenery, it uses tullethe lightweight netting often seen in veils, tutus, bows, gift wrapping, and party decorations.
The result is playful but elegant. A white tulle topiary can feel bridal and romantic. Pink or blue versions are perfect for baby showers. Black, gold, and deep jewel tones can look surprisingly chic for milestone birthdays, masquerade parties, or New Year’s celebrations. Pastels give a sweet garden-party effect, while layered colors create a full, dimensional look.
Why DIY Tulle Topiary Centerpieces Are Worth Making
There are plenty of centerpiece ideas out there, from flowers to candles to bowls full of candy that mysteriously disappear before guests arrive. But DIY tulle topiary centerpieces offer a few big advantages.
They Are Budget-Friendly
Tulle is generally inexpensive, especially when purchased in rolls. A single roll can often make one or more smaller pom-poms depending on fullness, size, and technique. Containers can come from craft stores, dollar stores, thrift shops, or your own cabinet of “I might use this someday” items. Congratulations, that someday has arrived.
They Are Lightweight
Because tulle is airy, these centerpieces are much lighter than floral or greenery-heavy arrangements. That makes them easy to transport, rearrange, and set up. If you are decorating a venue yourself, lightweight centerpieces are a gift to your future tired arms.
They Are Customizable
You can match tulle to almost any theme. Add ribbon, pearls, mini flowers, butterflies, rhinestones, LED fairy lights, paper cutouts, lace, glitter picks, or themed toppers. A basic tulle topiary can go from “sweet baby shower” to “glam wedding reception” with a simple color change and a few accents.
They Can Be Made Ahead
Unlike fresh flowers, tulle topiaries can be made days or even weeks before the event. Store them in a clean, dry place, cover loosely with a large bag or box, and fluff them before the party. Future you will be deeply grateful.
Materials You Will Need
Before you begin, gather everything in one spot. This prevents the classic DIY workout known as “walking back and forth across the house looking for scissors.”
- Tulle rolls or yardage in your chosen colors
- Foam ball, cardboard template, or pom-pom maker
- Wooden dowel, painted stick, bamboo skewer bundle, or decorative stem
- Small flower pot, metal pail, vase, mason jar, or decorative container
- Floral foam or craft foam for the base
- Hot glue gun and glue sticks
- Floral pins, wire, or zip ties
- Ribbon, moss, shredded paper, beads, faux flowers, or other accents
- Scissors or rotary cutter
- Ruler or measuring tape
- Paint, washi tape, or ribbon for covering the dowel
- Optional: battery-operated fairy lights
For most table centerpieces, a 4-inch to 6-inch foam ball works well. If you want a dramatic dessert-table topiary, go larger. Just remember: the larger the tulle ball, the more tulle you will need. Tulle is fluffy, but it is not magic. It cannot cover a beach ball on three inches of fabric and positive thinking.
Choosing the Right Tulle
Tulle comes in different widths, textures, colors, and levels of stiffness. For topiary centerpieces, 6-inch tulle rolls are especially convenient because they are easy to wrap, cut, tie, and layer. Yardage can also work well, especially if you want to cut custom strips.
Soft Tulle vs. Stiff Tulle
Soft tulle creates a romantic, cloud-like look. It is lovely for weddings, baby showers, and elegant events. Stiffer tulle gives more volume and structure, making it useful when you want a very round, perky pom-pom. If your centerpiece needs to stand tall and survive a busy party room, slightly firmer tulle can be your friend.
Matte, Glitter, or Shimmer Tulle
Matte tulle is classic and easy to style. Glitter tulle adds sparkle, but it can shedsometimes with the enthusiasm of a craft-store snowstorm. Use glitter tulle sparingly or work over a washable surface. Shimmer tulle gives a softer glow and often looks beautiful under event lighting.
Best Color Combinations
For a baby shower, try blush and ivory, blue and white, lavender and silver, or sage green and cream. For bridal showers, white, champagne, dusty rose, and pearl accents look timeless. For birthdays, match the guest of honor’s favorite colors. For seasonal parties, use orange and black for Halloween, red and white for Valentine’s Day, emerald and gold for winter holidays, or pastels for spring.
Step-by-Step: How to Make DIY Tulle Topiary Centerpieces
Step 1: Prepare the Container
Choose a container that is sturdy enough to hold the topiary upright. A small clay pot, metal pail, glass jar, or ceramic vase all work well. Cut floral foam so it fits snugly inside the container. If the container is lightweight, add pebbles, glass gems, dry beans, or sand beneath the foam to give it more stability.
Cover the top of the foam with moss, shredded paper, faux petals, crinkle paper, or fabric. This hides the mechanics and makes the centerpiece look finished. The secret to good DIY decor is not that nothing messy exists; it is that the messy parts are wearing a tiny disguise.
Step 2: Prepare the Stem
Cut your dowel to the desired height. For dining tables, keep sightlines in mind. A shorter topiary should usually sit low enough that guests can see over it. A taller topiary should rise high enough that the fluffy top is above the direct line of conversation, with a narrow stem below.
Paint the dowel, wrap it with ribbon, cover it with washi tape, or leave it natural for a rustic look. Insert one end into the foam base and secure it with hot glue. Hold it straight while the glue sets. If the dowel leans, your topiary may develop the personality of a windblown tree.
Step 3: Make the Tulle Pom-Pom
There are several ways to make the top of a tulle topiary. The easiest approach is to create a large tulle pom-pom and attach it to the dowel.
Cut two cardboard circles or use two paper plates as a wrapping template. The diameter of your template will determine the approximate size of your pom-pom. Wrap tulle around the template many times until it looks full. Slide a piece of floral wire, string, or tulle through the center and tie it tightly. Cut the loops around the outer edge, then fluff the layers outward.
Fluffing is the step where the magic happens. Pull the layers gently in different directions until the pom-pom becomes round and full. Trim uneven pieces with scissors. Do not overthink every strand; tulle is supposed to look airy, not like it has been through military inspection.
Step 4: Attach the Pom-Pom to the Stem
Add hot glue to the top of the dowel and press it into the center of the tulle pom-pom. For extra strength, wrap floral wire or a small zip tie around the center of the pom-pom and dowel, then hide it with additional tulle or ribbon. If you are using a foam ball as the base for the tulle, poke a hole in the foam ball, add glue, and insert the dowel securely.
Step 5: Shape and Balance the Topiary
Place the centerpiece on a flat surface and check it from all sides. Add more tulle where it looks thin. Trim long pieces. Rotate it as you work. The topiary should look full from the front, back, and sides, especially if it will sit in the middle of a table where guests can admire it from every angle.
Step 6: Add Decorative Details
Now comes the fun part: accessories. Tie a bow around the dowel. Add tiny silk flowers, pearl sprays, mini butterflies, paper stars, baby blocks, rhinestones, themed cupcake toppers, or small signage. For evening events, weave battery-operated fairy lights through the tulle. Just keep lights cool, lightweight, and battery-powered for safety.
Alternative Method: Tulle Strips on a Foam Ball
If you want a denser, more sculpted topiary, use a foam ball and individual tulle strips. Cut tulle into strips about 6 to 8 inches long. Fold each strip, gather it at the center, and secure it to the foam ball with floral pins or hot glue. Continue adding pieces until the ball is completely covered.
This method takes longer, but it gives you more control over color placement. You can create an ombre effect, stripes, polka dots, or a two-tone design. It also works well if you want the topiary to look more like a tulle flower ball than a pom-pom.
Design Ideas for Different Events
Baby Shower Tulle Topiary
Use soft pink, powder blue, lavender, mint, ivory, or yellow tulle. Add baby-themed accents such as mini rattles, alphabet blocks, tiny bows, pacifier charms, or a small “Oh Baby” sign. A pair of matching topiaries on a dessert table looks adorable without overwhelming the cake.
Bridal Shower or Wedding Topiary
Choose white, ivory, champagne, blush, or dusty rose tulle. Add pearl strands, satin ribbon, faux roses, lace, or small crystal picks. For a wedding reception, keep the design consistent across tables and use table numbers attached to the container or stem.
Birthday Party Topiary
Go bold with bright colors. For a princess party, use pink, lavender, and glitter accents. For a sports-themed party, use team colors. For a milestone birthday, try black and gold or navy and silver. Add a small number topper for the birthday age if desired.
Holiday Tulle Topiary
For Christmas, use white tulle with silver ribbon for a snowball effect, or red and green for classic cheer. For Halloween, black and orange tulle with tiny bats can be charmingly spooky. For Easter, pastel tulle with faux eggs or tiny flowers feels fresh and cheerful.
Budget Tips for DIY Tulle Topiary Centerpieces
To keep costs low, buy tulle in bulk or multipacks. Reuse containers you already own. Paint inexpensive clay pots instead of buying decorative vessels. Use leftover ribbon from gift wrapping. Check clearance aisles after holidays for seasonal picks, florals, and fillers. If you need many centerpieces, make one prototype first, calculate how much tulle it uses, then purchase the rest.
Another smart trick is to vary the table decor. Not every table needs a large tulle topiary. You can place topiaries on main tablesdessert table, gift table, welcome table, or head tableand use smaller coordinating accents on guest tables. This saves money while keeping the overall theme cohesive.
Common Mistakes and How to Avoid Them
Using Too Little Tulle
A sparse tulle pom-pom can look sad, like a party decoration that just heard bad news. Wrap or layer more tulle than you think you need. Fullness is what gives the topiary its charm.
Choosing a Container That Is Too Light
If the topiary is top-heavy, it may tip over. Add weight to the bottom of the container before inserting the foam. Pebbles, glass gems, or sand work well.
Skipping the Test Centerpiece
Always make one sample before producing ten, twenty, or fifty centerpieces. A test piece helps you adjust height, fullness, color balance, and cost before committing to the full batch.
Forgetting About Table Space
Centerpieces share the table with plates, glasses, napkins, favors, table numbers, candles, and possibly Aunt Linda’s purse. Keep the base compact and make sure guests still have room to eat comfortably.
Safety Notes for Crafting
Hot glue guns are useful, but they deserve respect. Work on a heat-resistant surface, use a stand, keep fingers away from the nozzle and melted glue, and unplug the glue gun when not in use. If children are helping, let them fluff tulle, sort colors, or decorate containers while an adult handles hot glue and cutting tools.
If your centerpiece includes small beads, pins, gems, or detachable decorations, keep them away from babies and young children. For kids’ parties, attach all accents securely and avoid small loose pieces on tables where little hands can reach them.
How to Store and Transport Tulle Topiaries
Tulle topiaries are lightweight, but they can crush if packed too tightly. Place them upright in boxes with tissue paper or bubble wrap around the containers. Avoid stacking them. If the tulle flattens during transport, gently shake and fluff it at the venue.
For long-term storage, cover each centerpiece loosely with a large plastic bag or fabric cover to protect it from dust. Do not compress the tulle. Store in a dry area away from heat, moisture, and curious pets who believe all fluffy objects are personal enemies.
Experience Notes: What I Learned Making DIY Tulle Topiary Centerpieces
The first thing you learn when making DIY tulle topiary centerpieces is that tulle has a mind of its own. It clings to sleeves, floats under chairs, sticks to carpet, and somehow appears in rooms where no crafting occurred. This is normal. Accept it. You are not just making centerpieces; you are entering a temporary relationship with a very dramatic fabric.
In practice, the most important part of the project is not the bow, the pot, or even the color. It is proportion. A small container with a huge tulle ball can look adorable in photos but unstable in real life. A tall dowel with a tiny pom-pom can look like a lollipop that lost confidence. The best design usually has balance: a container wide enough to support the height, a stem that feels intentional, and a tulle top that is full without swallowing the entire table.
Another experience-based tip: make your prototype in the same lighting as the event if possible. Tulle colors can change dramatically under warm bulbs, daylight, or venue lighting. Blush may look peach. Ivory may look yellow. Glitter tulle may sparkle beautifullyor shed like a disco ball with commitment issues. Testing one finished centerpiece under similar lighting helps avoid surprises.
When making multiple centerpieces, create an assembly line. Cut all dowels first. Paint or wrap them together. Prepare all containers. Cut foam in batches. Make all pom-poms before attaching them. This is much faster than completing one full centerpiece at a time. It also keeps the finished pieces more consistent. Consistency matters, especially for weddings and showers where the decor will be photographed from every angle by guests, relatives, and at least one person who takes pictures of the table before sitting down.
Do not underestimate fluffing time. The tulle pom-pom may look underwhelming when first tied, but careful fluffing changes everything. Pull layers apart gently, rotate the pom-pom, trim uneven edges, and then let it rest for a few minutes. Sometimes the shape improves after the tulle relaxes. If a section looks thin, tuck in extra strips rather than starting over.
Transport is another lesson learned the hard way. Finished topiaries should ride upright, not sideways. If you place them in a car trunk under bags of napkins, favors, and emergency cupcakes, they will arrive looking emotionally crushed. Use tall boxes, laundry baskets, or divided storage bins. Bring a small repair kit with extra tulle, glue sticks, scissors, ribbon, and floral pins. Even if nothing breaks, having the kit nearby gives you the calm confidence of a person who has watched enough party disasters to prepare for the sequel.
Finally, remember that handmade decor does not need to be perfect to be beautiful. A tiny uneven spot will not ruin the centerpiece. Guests notice the color, texture, height, and overall charm. They notice that the room feels festive. They notice the personal touch. They do not measure your pom-pom diameter unless they are deeply unusual dinner companions. Make the centerpiece sturdy, full, and coordinated with the event, then let it do its job: making the table look joyful.
Conclusion
DIY tulle topiary centerpieces are one of those rare craft projects that deliver big visual impact without requiring professional floral skills or a luxury event budget. With tulle, a container, a dowel, foam, and a little patience, you can create centerpieces that feel playful, elegant, and completely customized to your celebration.
The key is to plan your size, choose colors that support your theme, use enough tulle for fullness, secure the structure well, and test one centerpiece before making the full set. Add personal details, keep table sightlines in mind, and give yourself time to fluff, trim, and adjust. Whether you are decorating for a baby shower, wedding, birthday, holiday party, or dessert table, tulle topiaries can bring that soft “wow” factor without making your wallet hide under the couch.
In the end, these centerpieces prove that beautiful decor does not have to be complicated. Sometimes all it takes is a little netting, a glue gun, a steady base, and the courage to believe that a fluffy ball on a stick can, in fact, be the star of the table.