Coffee filter twinkle lights are what happens when humble kitchen supplies decide they are tired of filtering Tuesday morning caffeine and would rather become dreamy home décor. With a strand of LED fairy lights, a stack of paper coffee filters, and a little creative folding, you can make soft glowing flowers, mini lanterns, party garlands, nursery accents, wedding backdrops, holiday decorations, or cozy bedroom lights that look far more expensive than they are.
This project is popular for a good reason: coffee filters are lightweight, easy to shape, inexpensive, and surprisingly elegant once they are fluffed around tiny bulbs. They diffuse light beautifully, creating a warm, cloud-like glow instead of a harsh sparkle. Think “enchanted cottage window,” not “airport runway.” The result feels handmade, romantic, and slightly magicalwithout requiring a craft room, power tools, or the emotional courage needed to assemble flat-pack furniture.
Below is a complete guide to making coffee filter twinkle lights safely and beautifully, including materials, step-by-step instructions, design ideas, styling tips, mistakes to avoid, and real-world experience from making and using them.
What Are Coffee Filter Twinkle Lights?
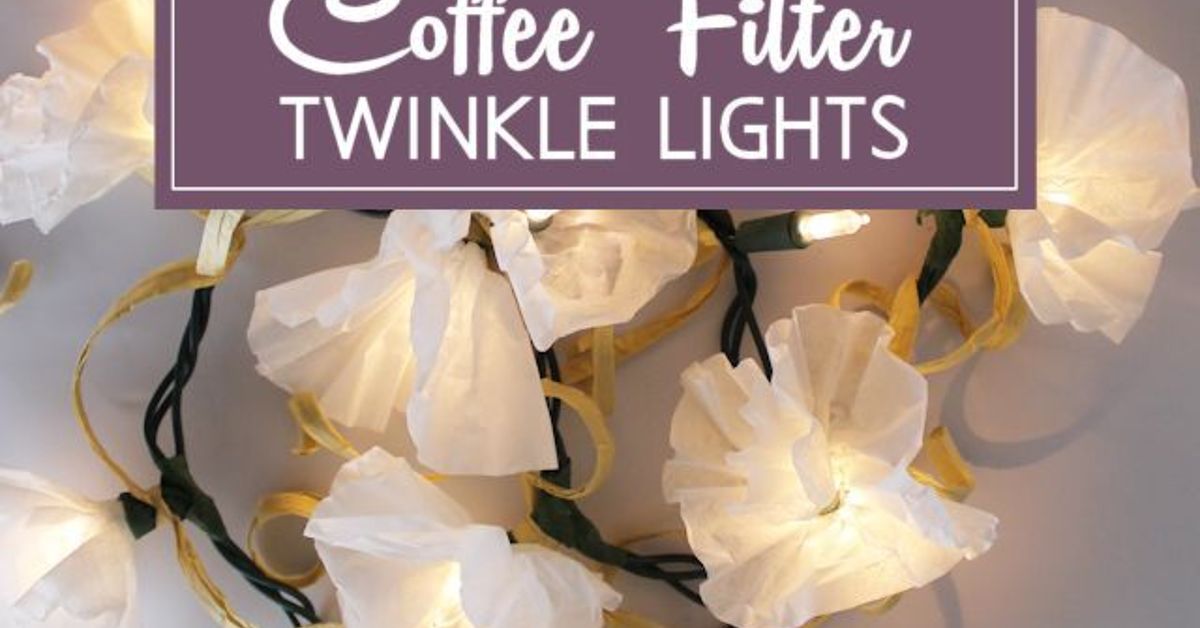
Coffee filter twinkle lights are decorative string lights dressed with shaped coffee filters. The filters can be folded into flowers, ruffled into soft blossoms, dyed with watercolor or food coloring, cut into petals, or gathered into little lantern-like shades. Once attached to LED twinkle lights, they soften the glow and turn a plain light strand into a handmade decoration.
The most common version uses white basket-style coffee filters shaped around individual bulbs to create a flower garland. Cone filters can also work, especially for rose-like petals or pointed floral shapes. Some crafters leave the filters white for a clean, romantic look; others dye them blush pink, lavender, blue, peach, gold, or seasonal colors.
Why Coffee Filters Work So Well for DIY Lighting
Coffee filters are oddly perfect for this craft. They are thin enough to let light through, strong enough to hold a ruffled shape, and soft enough to look like petals when layered. Unlike regular printer paper, they have a delicate texture that catches light in a beautiful way.
They are also budget-friendly. A large pack of filters can decorate an entire string of lights, and if you make a mistake, you do not have to stare dramatically out the window like a disappointed Victorian poet. You just grab another filter and try again.
Main Benefits
- Affordable: Coffee filters are inexpensive and easy to find.
- Customizable: You can dye, cut, layer, and shape them in many styles.
- Lightweight: They do not weigh down delicate fairy light strands.
- Soft glow: The paper diffuses LED light for a warm, cozy effect.
- Beginner-friendly: No advanced crafting skills are required.
Important Safety Note Before You Start
Because coffee filters are paper, safety matters. Use only LED string lights, not incandescent mini lights. LED lights use far less energy and produce much less heat than older incandescent bulbs, making them the better choice for paper-based décor. Even with LEDs, never leave handmade paper light decorations on unattended, overnight, near curtains, close to candles, above heaters, or outdoors unless every material in the setup is rated for outdoor use.
Inspect your light strand before decorating. Do not use lights with frayed wires, loose sockets, cracked bulbs, exposed wiring, or mystery sparks. Mystery sparks are not a “vibe.” They are a warning.
Materials You Need
You do not need a luxury craft haul for this project. Most supplies are simple, easy to find, and possibly already sitting in a drawer next to three expired coupons and a lonely birthday candle.
Basic Supplies
- One strand of LED twinkle lights or fairy lights
- White basket-style coffee filters
- Scissors
- Floral tape, clear tape, twist ties, or thin craft wire
- Optional: watercolor paint, food coloring, markers, or diluted acrylic paint
- Optional: spray bottle with water
- Optional: wax paper or parchment paper for drying dyed filters
- Optional: ribbon, raffia, faux greenery, or small clips for styling
How to Make Coffee Filter Twinkle Lights
This tutorial creates soft flower-style coffee filter twinkle lights. The method is flexible, so you can keep the flowers simple or make them dramatic enough to deserve their own tiny reality show.
Step 1: Test the Lights
Plug in or switch on the LED light strand before adding anything. Make sure every bulb works. If your lights are battery-operated, check the battery pack and replace weak batteries. If your strand plugs into an outlet, confirm that the cord is in good condition.
Step 2: Prepare the Coffee Filters
Flatten each coffee filter gently. For fuller flowers, use two to four filters per bulb. For a softer, simpler look, use one filter per bulb. If you want a delicate petal effect, fold the filter in half, then in half again, and cut a rounded or scalloped edge along the open side.
You can also cut small V-shaped notches around the edge to create a carnation look. For a rose-like style, cut the filter into a loose spiral and wrap it around the bulb area carefully, leaving room for airflow.
Step 3: Add Color If Desired
To dye the filters, mix water with a few drops of food coloring or watercolor paint. Dip the edges for an ombré effect, lightly spray the surface for a watercolor bloom, or use markers and mist with water to let the colors bleed together. Let filters dry completely before attaching them to lights.
This part is where the project gets dangerously fun. One minute you are making pale pink flowers; the next minute your table looks like a craft unicorn sneezed. Protect the work surface.
Step 4: Make a Small Center Opening
Cut a tiny slit or X in the center of each filter. The opening should be just large enough for the LED bulb to pass through or sit inside the flower. Do not force the paper tightly around wiring or sockets. The goal is a loose decorative cover, not a paper chokehold.
Step 5: Attach Filters Around Each Light
Slide the filter over or around each bulb, then pinch the base gently beneath the bulb. Secure the filter with floral tape, a small twist tie, or a tiny piece of clear tape. Keep the paper away from electrical connections as much as possible. Repeat until the strand is covered.
If you are creating flowers, fluff each filter outward after attaching it. Layered filters can be pulled apart slightly to create volume. The messier ruffles often look the most natural, which is wonderful news for anyone whose crafting style is “enthusiastic but not surgically precise.”
Step 6: Hang and Adjust
Hang the finished coffee filter twinkle lights along a mantel, headboard, bookshelf, party table, window frame, or photo backdrop. Use removable hooks, clips, or ribbon ties. Avoid staples, nails, or anything sharp that could damage wires.
Creative Design Ideas
Once you understand the basic method, coffee filter twinkle lights can be customized for many occasions. The same project can look romantic, rustic, whimsical, modern, spooky, or festive depending on color and placement.
1. White Flower Garland
Use plain white filters and warm white LED lights for a soft, elegant garland. This version works beautifully for bedrooms, weddings, baby showers, reading corners, and minimalist holiday décor.
2. Pastel Fairy Lights
Dye filters in pale pink, lavender, mint, and sky blue. The result is sweet and dreamy, perfect for nurseries, kids’ rooms, spring parties, or anyone who secretly wants their home to look like a cupcake learned interior design.
3. Fall Coffee Filter Lights
Use diluted orange, rust, gold, and burgundy tones. Cut the filters into leaf shapes instead of flowers and attach them loosely along the strand. Hang them over a mantel with mini pumpkins for an autumn display.
4. Halloween Ghost Lights
Leave the filters white, drape one over each LED bulb, tie loosely below the bulb, and draw tiny ghost faces with a black marker. These are cute, fast, and just spooky enough to entertain children without making the dog suspicious.
5. Wedding or Bridal Shower Backdrop
Create a fuller look by using three or four filters per bulb. Mix white, cream, and blush tones. Hang several strands vertically behind a dessert table or photo booth area for a soft glowing flower wall effect.
6. Christmas Snowflake Lights
Fold the filters like paper snowflakes and cut small patterns around the edges. Attach one snowflake around each bulb or between bulbs for a snowy garland. Pair with warm white lights for a cozy winter look.
Where to Use Coffee Filter Twinkle Lights
Coffee filter twinkle lights work best indoors in dry spaces. They are especially pretty in areas where you want atmosphere rather than task lighting. In other words, they are better for “cozy movie night” than “finding the contact lens you dropped.”
Best Places to Display Them
- Across a bedroom headboard
- Along a mantel
- Inside a clear vase or decorative basket, loosely arranged
- On a bookshelf
- Around a mirror
- Behind a party table
- As a photo booth backdrop
- Across a covered indoor window
- On a dorm room wall, using removable hooks
Common Mistakes to Avoid
This project is simple, but a few mistakes can make the finished lights look messy or unsafe. Avoid these issues for better results.
Using Incandescent Lights
Do not use old-style incandescent string lights with paper filters. They can become warmer than LED lights and are not ideal for paper crafts. Choose LED fairy lights or LED twinkle lights instead.
Attaching Paper Too Tightly
Do not wrap the filter tightly around the bulb or socket. Keep the shape loose and airy. This looks better and helps prevent heat from being trapped.
Skipping the Drying Time
If you dye the filters, let them dry completely before attaching them. Damp paper can tear easily, stain surfaces, and behave like a tiny wet blanket with artistic ambitions.
Overloading the Design
More is not always better. If every bulb has five dyed filters, two ribbons, fake leaves, glitter, and a motivational quote, the strand may look crowded. Start simple. Add details slowly.
Leaving Lights On Unattended
Even with LEDs, handmade paper decorations should be turned off when you leave the room, leave home, or go to sleep. A timer can help, but common sense is still the main accessory.
How to Make Them Look More Expensive
The secret to making coffee filter twinkle lights look polished is consistency. Use a controlled color palette, repeat the same flower shape, and hide attachment points with floral tape or ribbon.
Use Warm White Lights
Warm white LEDs usually look softer and more flattering than cool white lights. Cool white can feel icy or clinical, while warm white creates the cozy glow most people want from handmade décor.
Layer Filters for Depth
Use two filters per bulb for everyday décor and three or four for special events. Layering gives the flowers dimension and helps diffuse the light more evenly.
Choose One Color Story
Try cream and blush for romance, white and silver for winter, orange and gold for fall, or lavender and pale blue for a dreamy fairy-light effect. Random colors can be fun, but a planned palette looks more intentional.
Hide the Cord
If the cord color clashes with your décor, wrap it loosely with ribbon, faux vine garland, or neutral fabric strips. Do not wrap so tightly that you trap heat or stress the wire.
Can Kids Help Make Coffee Filter Twinkle Lights?
Yes, with adult supervision. Kids can flatten filters, color them with washable markers, mist them with water, help fluff the flowers, and choose color combinations. Adults should handle scissors, electrical lights, and final attachment around bulbs.
This craft is especially good for classrooms, family craft nights, rainy afternoons, and holiday decorating. It teaches color blending, paper shaping, pattern repetition, and patience. It also teaches that coffee filters are not just for coffee, which may be shocking news to certain breakfast purists.
How Long Do Coffee Filter Twinkle Lights Last?
With careful handling, coffee filter twinkle lights can last for several seasons. Store them loosely in a box rather than crushing them into a bag. Keep them dry, away from dust, and out of direct sunlight to reduce yellowing or fading.
If a flower gets crushed, replace only that filter instead of remaking the whole strand. That is one of the best things about this project: it is repairable, forgiving, and not emotionally dramatic.
Cleaning and Storage Tips
Paper decorations do not love moisture, so avoid wet cleaning. To remove dust, use a hair dryer on a cool, low setting or gently shake the strand outdoors. Store the lights in a shallow box with tissue paper between layers. Do not wrap the cord tightly, because tight wrapping can stress wires over time.
Label the box so you do not accidentally place heavy decorations on top of it. Coffee filter flowers are charming, but they do not bench-press ornaments well.
Budget Breakdown
One of the biggest reasons coffee filter twinkle lights are popular is the low cost. A pack of filters, a strand of LED fairy lights, and a roll of floral tape can often create a full decorative garland for far less than store-bought flower lights.
Estimated Cost
- Coffee filters: low-cost and often already available at home
- LED fairy lights: budget-friendly options are widely available
- Floral tape or clear tape: inexpensive
- Optional dye or paint: small amount needed
For parties or weddings, making several strands can still be affordable compared with buying specialty floral lighting. The trade-off is time, but if you enjoy crafting, the process is part of the fun.
Best Occasions for Coffee Filter Twinkle Lights
These lights are versatile enough to work across seasons and celebrations. They can be casual or fancy depending on how you style them.
Great Uses Include:
- Birthday parties
- Baby showers
- Bridal showers
- Wedding receptions
- Holiday mantels
- Dorm room décor
- Cozy bedroom lighting
- DIY photo backdrops
- Spring and Easter decorations
- Halloween ghost garlands
Personal Experience: What It Is Actually Like to Make Coffee Filter Twinkle Lights
The first thing you notice when making coffee filter twinkle lights is how quickly the project transforms from “random kitchen supply experiment” into “wait, this is actually gorgeous.” At the beginning, the filters look plain and floppy. You may question your life choices. You may wonder whether the internet has lied to you again. But once the filters are folded, cut, layered, and placed around warm LED bulbs, they suddenly become soft glowing flowers.
The easiest version I have tried uses two white basket filters per bulb. I cut a tiny X in the middle of each filter, slid them over the bulb, pinched the paper beneath the light, and wrapped the base with floral tape. The first few flowers looked a little suspicious, like they had been assembled during a mild earthquake. By the fifth bulb, the rhythm became clear: slide, pinch, wrap, fluff. After that, the project was relaxing.
Dyeing the filters makes the process more exciting, but it also adds drying time. Lightly misting marker-colored filters with water creates beautiful watercolor effects, especially with pink, purple, and blue. The colors spread unpredictably, which is part of the charm. No two flowers look exactly alike. The only downside is that wet filters are fragile, so patience matters. Trying to attach them too soon leads to tearing, wrinkling, and muttering things you do not want children to repeat.
Warm white LED lights gave the best result. Cool white LEDs worked, but they made the flowers look sharper and less cozy. Warm white created a candlelike glow without using actual candles, which is exactly what you want when paper is involved. Battery-operated fairy lights were convenient for small displays, especially inside a vase or on a shelf. Plug-in strands worked better for longer garlands across a mantel or wall.
One practical lesson: do not make the flowers too bulky if you plan to hang the lights vertically. Heavy layers can pull downward and make the garland look uneven. For wall backdrops, lighter flowers spaced evenly look better than oversized blooms fighting for attention. For a centerpiece, though, fuller flowers are beautiful because they can sit loosely in a bowl, basket, or clear glass container.
Another lesson is that placement changes everything. On a table in daylight, the strand may look handmade in a very obvious way. At night, when the lights are on, the same strand looks magical. The filters soften every bulb, hide the plain wiring, and create a gentle glow that feels expensive. It is the kind of decoration guests notice and then immediately ask, “Where did you buy that?” That is your cue to casually say, “Oh, I made it,” while pretending you are not deeply pleased with yourself.
The project is also surprisingly social. Kids can color filters, adults can attach them, and everyone can help fluff the final flowers. It works well for craft nights because there is room for different skill levels. Perfection is not required. In fact, slightly irregular flowers look more natural than identical ones.
For storage, the best method is to place the finished lights in a shallow box rather than winding them tightly. The paper flowers crush easily, but they can usually be revived with gentle fluffing. If one filter becomes torn or dusty, replacing it takes only a minute. That makes coffee filter twinkle lights a rare DIY decoration: pretty, cheap, customizable, and not a nightmare to repair.
Overall, coffee filter twinkle lights are worth making if you enjoy simple crafts with a big visual payoff. They are not meant to replace permanent lighting, and they should be used responsibly, but as decorative indoor accent lights, they are charming. They bring softness to shelves, warmth to parties, and a little handmade personality to spaces that need something more interesting than another beige throw pillow.
Conclusion
Coffee filter twinkle lights prove that beautiful décor does not have to be expensive, complicated, or purchased from a boutique with a candle that costs more than lunch. With LED string lights, coffee filters, scissors, and a little patience, you can create glowing flower garlands, seasonal decorations, party backdrops, or cozy bedroom accents that feel personal and creative.
The key is to keep the design lightweight, use LED lights, let dyed filters dry fully, and display the finished strand safely indoors. Whether you choose classic white blossoms, pastel fairy lights, fall leaves, Halloween ghosts, or winter snowflakes, this DIY project offers a flexible way to turn everyday materials into something warm, whimsical, and genuinely lovely.
Note: This article was created from research-backed DIY crafting methods and recognized electrical safety guidance, rewritten in original standard American English for web publication.