Note: This article is for informational purposes only. If your project touches a transformer, chime box, or any house wiring, shut off power first and verify it is off before touching anything.
There are two kinds of people in this world: the ones who hear the doorbell, and the ones who somehow miss it while standing ten feet away, headphones on, vacuum running, living their best distracted life. An optocoupler doorbell notifier is for the second group. It is a clever little project that listens for a button press on a traditional wired doorbell and turns that event into something smarter: a phone alert, a flashing light, a logged timestamp, a Home Assistant trigger, or even an all-hands-on-deck notification that your pizza has finally arrived.
The beauty of this build is not just that it works. It is that it works politely. Instead of tearing out an existing chime system and replacing it with an expensive smart doorbell, you let the old hardware keep doing its reliable ding-dong thing while a separate low-voltage logic circuit quietly watches from the sidelines. The optocoupler is the hero of that arrangement. It creates an electrical “air gap” between the doorbell circuit and your microcontroller, making the project safer, cleaner, and far less likely to end in a puff of regrettable electronics smoke.
What Is an Optocoupler Doorbell Notifier?
An optocoupler doorbell notifier is a circuit that detects when a wired doorbell button is pressed and then sends that signal to another device without a direct electrical connection. In practice, that means the doorbell circuit and the notification circuit stay isolated from each other. The doorbell still powers the chime. Your microcontroller, single-board computer, or home automation hub simply gets a clean on/off event it can use for automations.
The most common outcome is a notification. That might be a push alert on your phone, a blinking lamp in the back office, an event in a spreadsheet, or a message on a smart speaker. Some makers use it to trigger IFTTT. Others send MQTT messages into Home Assistant. The end goal is the same: never miss a visitor again, even if your house is noisy, your hearing is limited, or your attention span has wandered off to make toast.
Why Use an Optocoupler Instead of Wiring the Doorbell Straight to a Microcontroller?
Because the doorbell circuit and your logic board live in very different worlds.
A standard wired doorbell usually runs on low-voltage AC from a transformer, often in the 8V, 16V, or 24V range depending on the setup. Your microcontroller, meanwhile, wants something tame and predictable like 3.3V or 5V DC. That mismatch matters. AC doorbell circuits can be noisy, voltage can fluctuate, and older systems may behave in ways that make direct connection frustrating or risky.
An optocoupler solves that elegantly. On one side is a tiny LED. On the other side is a light-sensitive transistor. When current flows through the LED, the transistor changes state. The magic trick is that light crosses the gap, but electricity does not. So your notifier can detect the doorbell without sharing the same electrical path.
That isolation helps with safety, ground-loop headaches, and noise. It also makes debugging more civilized. Without isolation, your microcontroller input can float, chatter, or misread pulses. With isolation and a proper pull-up resistor, the firmware sees a much cleaner signal and your sanity gets to remain employed.
How the Circuit Usually Works
The doorbell side
When someone presses the doorbell button, current flows through the wired bell circuit and the chime activates. In a notifier design, that same event is also used to drive the input side of an optocoupler. Depending on the circuit, you might use an AC-input optocoupler designed to monitor AC signals directly, or you might use a more general optocoupler with additional components to tame the waveform.
The logic side
On the isolated output side, the optocoupler behaves like a simple transistor switch. That output is usually connected to a microcontroller GPIO with a pull-up resistor, either external or internal. When the doorbell rings, the GPIO sees a state change. Your firmware then decides what counts as a real ring and what counts as noise, bounce, or a brief electrical hiccup.
The notification side
Once the event is confirmed, the fun begins. You can flash an LED strip, send a push notification, write a timestamp to a log, ping your phone over a local network, or trigger a smart home routine. This is where the project goes from “small circuit” to “surprisingly useful household upgrade.”
Choosing the Right Optocoupler
Not every optocoupler fits every doorbell. That is where many first builds become educational in the “I learned something after it did not work” sense.
If you are monitoring an AC doorbell line directly, an AC-input optocoupler can make life easier because it is built for AC detection. These parts typically use anti-parallel LEDs internally, so they respond to both halves of the waveform. That means fewer helper parts and less fuss.
If you use a common phototransistor optocoupler such as a 4N35-style device, you will often need extra circuitry to deal with the AC signal. Some builders use rectification. Others use two devices or additional protection components. None of this is impossible, but it does raise the project’s “weekend hobby” difficulty from relaxing to mildly opinionated.
The practical rule is simple: choose a device that matches the signal you are sensing. If the doorbell is AC, start with parts and circuit examples intended for AC monitoring. That saves time, board space, and the universal maker emotion known as “Why is this pin doing that?”
Key Design Considerations That Make the Project Better
1. Respect the transformer
Even though most wired doorbells are low-voltage systems, the transformer that feeds them connects back to household mains. That means you should treat the installation with respect. The notifier should interact with the low-voltage side only unless you truly know what you are doing.
2. Expect voltage variations
Many people assume every wired doorbell is 16VAC. Real homes have other ideas. Some systems are 8VAC, some are 16VAC, some are 24VAC, and older or upgraded hardware can behave a little off-spec. Measure first. Designing around assumptions is how hobby projects turn into mystery novels.
3. Filter the signal in software
Doorbell signals are brief, and switches bounce. Mechanical contacts do not transition like movie robots; they jiggle, chatter, and change state a few times before settling. Add AC ripple and a noisy household environment, and a raw interrupt may produce multiple false triggers. A short debounce window or event validation routine can make your notifier feel much more professional.
4. Use a defined input state
A floating GPIO pin is chaos wearing a tiny silicon hat. Give the logic side of the optocoupler a pull-up or pull-down arrangement so your controller always knows what “idle” looks like. Otherwise, your notifier may announce phantom visitors, which is only funny the first three times.
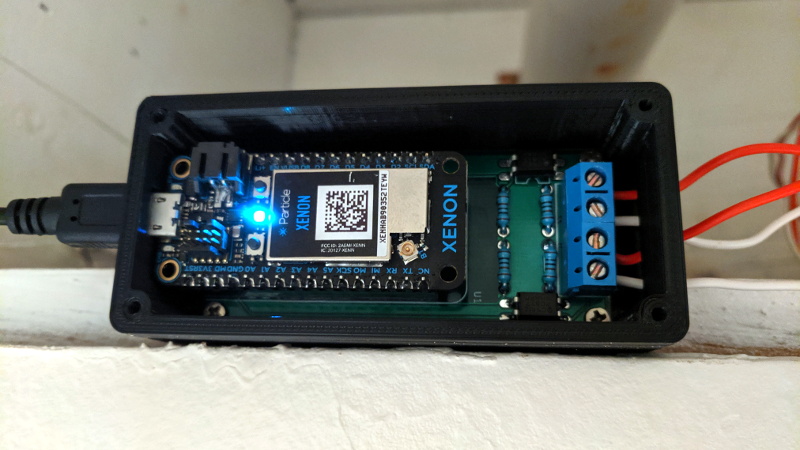
5. Protect and package it well
If the project is going to live near the chime box or in a utility area, use a proper enclosure. Add strain relief. Label the low-voltage wires. Do not leave a proud little science fair masterpiece dangling beside household wiring like it lost a bet.
A Practical Feature Set for a Modern Doorbell Notifier
The simplest version of this project just detects a press and lights an LED. That is already useful. But the real charm of an optocoupler doorbell notifier is that it scales nicely. Here are the features that give it real-world value:
Phone notifications
A notifier that sends a message to your phone solves the classic “I was upstairs” problem. This is especially handy for deliveries, apartment entrances, workshops, garages, and shared homes where the chime is not easy to hear.
Accessibility alerts
For people who are hard of hearing, pairing the notifier with bright lights, room-level lamps, or a vibration device can make a standard doorbell much more accessible without replacing the entire system.
Event logging
Logging doorbell presses can be surprisingly useful. You can track delivery attempts, check visitor frequency, or see whether someone rang while you were out. It is not exactly thrilling data science, but it is wonderfully practical.
Smart home integration
Once the signal is in your automation stack, the possibilities multiply. Pause the music. Flash the kitchen light. Announce the ring on a speaker. Save a timestamp. Trigger a nearby camera. A basic wired doorbell suddenly graduates into a much smarter household citizen.
Common Mistakes and How to Avoid Them
Mistake one: treating AC like friendly DC. Doorbell circuits are often AC, which means the waveform and input behavior matter. Pick the sensing approach accordingly.
Mistake two: skipping measurement. Before choosing resistor values, components, or input assumptions, measure the bell circuit with a meter on the low-voltage side.
Mistake three: trusting every pulse. Use timing logic so a single press becomes one clean event, not a machine-gun burst of phantom rings.
Mistake four: forgetting the enclosure. Prototype on a breadboard if you like, but finish in something durable and insulated.
Mistake five: building a notifier that is smarter than it is useful. Start with one job: detect the ring reliably. Add cloud services and elaborate automations later. Reliability first, gadget theatrics second.
Why This Project Still Matters in the Smart Doorbell Era
Because not every home needs a camera on the porch, a subscription plan, two-factor authentication, and a firmware update schedule worthy of a small enterprise. Sometimes you already have a perfectly good wired doorbell and simply want a modern alert layer on top of it.
An optocoupler doorbell notifier is a refreshingly practical middle path. It preserves existing hardware, costs less than a full replacement, and gives you exactly the parts of “smart” that you actually want. No more, no less.
It is also a genuinely educational build. You learn about galvanic isolation, AC sensing, input conditioning, and real-world signal reliability. In other words, it is one of those projects that is useful on Monday and teaches you something on Tuesday.
Experiences From Building and Living With an Optocoupler Doorbell Notifier
The most memorable part of this kind of project is that the first success feels tiny and enormous at the same time. Tiny, because the whole thing is just detecting a button press. Enormous, because when your phone lights up and says “Someone is at the door” while the old chime rings exactly as before, you realize you have quietly upgraded your house without breaking its personality.
One common experience is discovering that the doorbell signal is messier than expected. On paper, it sounds simple: button pressed, current flows, optocoupler turns on, message sent. In reality, the signal can wobble, pulse, or fluctuate depending on the transformer, chime style, wire length, and how fast someone jabs the button like they are trying to win a game show. Builders often find that the hardware works quickly, but the software polish is what makes the project feel finished. A tiny delay, a cooldown timer, or a requirement that the signal stay active for a few milliseconds can turn a twitchy gadget into a dependable notifier.
Another common experience is that the notifier becomes more valuable over time than expected. At first it seems like a convenience project. Then it saves a missed package. Then it helps when music is loud. Then it proves useful when someone in the house is sick, napping, or working with noise-canceling headphones. Eventually the little notifier stops feeling like a novelty and starts feeling like infrastructure.
Builders also tend to appreciate how well this project respects an older home. Many people do not want to rip out a perfectly good chime or depend entirely on cloud-connected consumer hardware. An optocoupler doorbell notifier feels different. It adds intelligence without demanding total replacement. The original bell remains the main character. The new electronics just become a very competent assistant.
There is also a subtle satisfaction in the physical build itself. Moving from a breadboard prototype to a compact PCB or perfboard version inside a neat enclosure feels like crossing a line from experiment to product. You stop explaining it as “something I’m trying” and start pointing to it as “the doorbell notifier.” That shift is surprisingly motivating, especially for hobbyists who want projects that survive past the first weekend.
And perhaps the best experience of all is that this project often sparks the next one. Once you have safely isolated a messy real-world signal and turned it into a clean digital event, all kinds of ideas show up. Mailbox notifier. Garage signal monitor. Washer-finished alert. Legacy alarm integration. The doorbell notifier becomes a gateway project in the best possible sense. It teaches a useful pattern: keep the old system, isolate the signal, clean it up, and let automation do the rest.
Conclusion
An optocoupler doorbell notifier is one of those wonderfully grounded maker projects that combines practicality with real electronics know-how. It lets a traditional wired doorbell stay exactly what it is while adding the modern conveniences people actually use: phone alerts, smart-home triggers, accessibility cues, and clean event logging.
The biggest lesson is not that the project is flashy. It is that good design starts with respect for the signal. Doorbells run on low-voltage AC, microcontrollers expect tidy DC logic, and the optocoupler is the diplomat that keeps both sides talking without starting an international incident. Add careful input conditioning, a little software filtering, and a proper enclosure, and you end up with a notifier that feels reliable rather than improvised.
If you want to modernize an existing doorbell without replacing the whole system, this is one of the smartest and most satisfying ways to do it. It is affordable, educational, and genuinely useful. Also, it might save your tacos from getting cold on the porch, which is a level of engineering success history tends to underappreciate.