Creating a slideshow should not feel like launching a rocket, negotiating with a printer, or explaining to your relatives why the “any key” is not labeled on the keyboard. If you have a folder full of photos and want to turn them into a simple, fast, lightweight slideshow, IrfanView is one of the handiest tools for Windows users.
IrfanView has been around for years because it does several boring-but-important image tasks extremely well: opening photos quickly, resizing images, batch converting files, rotating pictures, previewing folders, and yes, making slideshows without forcing you to build a dramatic PowerPoint masterpiece with spinning text and a theme song. Whether you are preparing vacation photos, family memories, classroom images, product shots, event pictures, or a quick visual presentation for work, IrfanView can help you get it done in minutes.
This guide walks you through how to create a slideshow using IrfanView in 7 steps. You will learn how to choose your images, arrange the slide order, set timing, add optional music, save the slideshow as a file, and avoid common mistakes that make a slideshow look like it was assembled during a coffee spill.
What Is IrfanView and Why Use It for Slideshows?
IrfanView is a compact image viewer and editor for Windows. It is popular because it is fast, simple, and surprisingly powerful for such a small program. Unlike heavy photo-editing software, IrfanView opens quickly and does not require you to learn a giant interface before completing a basic job. That makes it especially useful when your goal is straightforward: display a group of images in order.
The slideshow feature in IrfanView is ideal for people who want a practical presentation rather than a design-heavy slide deck. You can show pictures automatically, control the delay between images, loop the presentation, randomize the order, play it full screen, or save it as a standalone file. Depending on your installed plugins and version, IrfanView can also save slideshows in formats such as EXE, SCR, or MP4 video.
In plain English: IrfanView is for the person who says, “I just want these photos to play nicely on screen,” not the person who wants every slide to enter with a glitter cannon.
Before You Start: Prepare Your Images
Before opening the slideshow tool, spend a few minutes organizing your image files. This small step saves a surprising amount of time later. Place all slideshow images in one folder, remove duplicates, rotate sideways photos, and rename files if you want a specific order. For example, names like 01-intro.jpg, 02-family-photo.jpg, and 03-final-shot.jpg make ordering much easier than leaving files named IMG_8472, IMG_8473, and who-even-knows.jpg.
Also consider image size. Very large photos can look great, but they may slow down older computers or make exported slideshows heavier than needed. If the slideshow is only for a laptop, classroom screen, or office monitor, you usually do not need enormous original camera files. IrfanView’s batch resize feature can help you create smaller copies while keeping the originals safe.
How to Create a Slideshow Using IrfanView: 7 Steps
Step 1: Download and Install IrfanView
Start by installing IrfanView from the official IrfanView website or a trusted software source. Choose the version that matches your Windows system. Most modern users will be fine with the 64-bit version, but the 32-bit version is still useful in some older setups.
For best results, install the IrfanView plugins as well. The plugins expand what IrfanView can open, play, and export. They are especially helpful if you plan to add audio, use uncommon image formats, or save a slideshow in additional formats. Think of the plugin pack as the tool belt: you may not use every tool today, but when you need one, you will be glad it is there.
Step 2: Open the Slideshow Tool
Launch IrfanView, then go to the top menu and select File > Slideshow. This opens the slideshow dialog box, which is the command center for your presentation.
At first glance, the window may look a little old-school. That is part of IrfanView’s personality. It is not trying to win a beauty contest; it is trying to get your photos moving. Inside the dialog, you will see options for adding files, choosing playback settings, adjusting timing, sorting images, saving the slideshow, and starting the presentation.
Step 3: Add Images to the Slideshow List
On the right side of the slideshow dialog, browse to the folder that contains your images. Select the pictures you want, then use the Add button to place them into the slideshow list. If you want every image in the folder, use Add All. If your images are inside multiple folders, you may also see options that help include subfolders, depending on your version and settings.
This list is important because it controls what appears in the slideshow. If an image is missing from the list, it will not magically appear out of pity. Add every file you need, then scan the list once to make sure nothing strange slipped in, such as a screenshot of your desktop or a blurry photo of your thumb from 2019.
Step 4: Arrange the Slide Order
Once your files are added, arrange them in the order you want. You can sort files by name, date, or other available options. If your filenames are numbered properly, sorting by name is often the easiest method. You can also move individual files up or down in the list when you need a custom sequence.
A good slideshow has a natural flow. Start with an opening image, group similar photos together, and finish with a strong final picture. For a family event, that might mean starting with arrival photos, moving through key moments, and ending with a group shot. For a business presentation, you might begin with a title graphic, continue with product images, and close with contact information.
Do not overlook pacing. Twenty nearly identical images in a row can make even a beautiful slideshow feel like a hostage situation. Pick the best shots, remove weak duplicates, and let the story move.
Step 5: Choose Timing and Playback Settings
Now choose how the slideshow should play. IrfanView allows you to set automatic playback after a certain number of seconds, or you can advance slides manually using the keyboard or mouse. For casual photo viewing, three to five seconds per image usually feels comfortable. For fast review sessions, one or two seconds may be enough. For detailed images, charts, or instructional slides, use a longer delay.
You can also choose options such as full-screen playback, windowed playback, looping, random order, and whether the slideshow closes after the final image. Full screen is best for presentations because it hides distractions. Windowed mode is useful when testing the slideshow or presenting while using other software.
Looping is great for kiosks, trade shows, waiting rooms, memorial displays, school events, and digital photo frames. Random order is fun for casual photo collections, but avoid it when the images tell a story. Nobody wants a wedding slideshow that starts with cake, jumps to the parking lot, then ends with someone getting ready.
Step 6: Add Optional Music or Text
If you want background music, IrfanView can use audio files in the slideshow list when the right plugins are installed. A common method is to add an MP3 file near the beginning of the slideshow list so it plays while the images advance. Keep the music appropriate for the setting. A soft instrumental track may work beautifully for a family photo show, while dramatic movie-trailer music may make your vacation to the lake feel like an alien invasion.
You can also display text information during the slideshow, such as filenames, image numbers, or metadata. This is useful for photographers reviewing shoots, teachers showing image collections, or teams checking product photos. For public presentations, however, keep on-screen text clean. Too much technical information can distract from the images.
If you need titles or captions, another approach is to create title-card images before adding them to IrfanView. For example, you can make simple JPG slides that say “Day 1: Arrival,” “Behind the Scenes,” or “Final Results.” Add those title cards between photo groups to make the slideshow feel more organized.
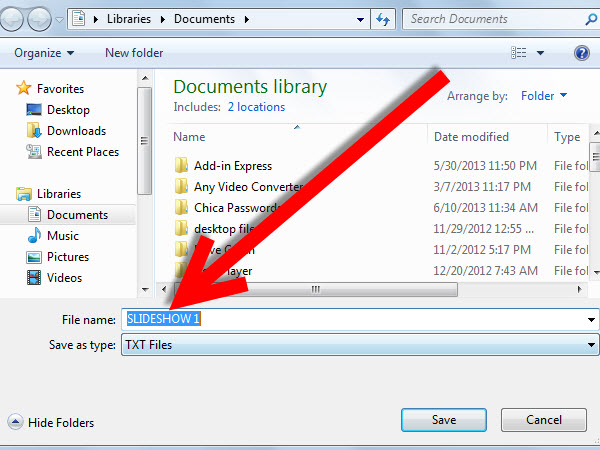
Step 7: Start, Save, or Export the Slideshow
When everything looks ready, click the button to start the slideshow. Watch at least part of it before sharing. This preview helps you catch problems with timing, order, image rotation, missing files, or music that starts too loudly and frightens everyone within 20 feet.
If you only need to present from your own computer, you can simply run the slideshow inside IrfanView. If you want to share it with others, look for the save or export options. IrfanView can save slideshows as standalone executable files or screen saver files when the slideshow plugin is available. In newer setups with the proper plugin support, saving as MP4 video may also be possible. MP4 is often the most convenient format for sharing online, uploading to websites, or playing on devices that do not have IrfanView installed.
Before sending an EXE file to someone, remember that many email systems and security tools block executable attachments. That is not IrfanView’s fault; the internet has trust issues, and honestly, fair enough. If easy sharing matters, MP4 video is usually friendlier.
Best Settings for an IrfanView Slideshow
The best settings depend on your purpose. For a family photo night, use full screen, automatic playback, and a relaxed delay of around four seconds. For a business display running in the background, use full screen, loop mode, and consistent image dimensions. For reviewing hundreds of images quickly, use a shorter delay and skip music so you can focus.
If your slideshow includes both horizontal and vertical images, test how they appear on screen. Some photos may show black bars, while others may stretch depending on display settings. Avoid stretching images unnaturally unless you enjoy turning people into funhouse mirrors. Fit-to-screen options usually produce cleaner results.
For a polished look, keep your images consistent. Use similar aspect ratios when possible, crop distracting edges, fix rotation, and remove blurry shots. A slideshow does not need to be fancy to feel professional; it just needs to look intentional.
Common Problems and Easy Fixes
Images Appear in the Wrong Order
If your images are out of order, rename them with numbers at the beginning of each filename, then sort by name. Use two-digit or three-digit numbering, such as 001, 002, and 003, so Windows and IrfanView sort them correctly.
Music Does Not Play
If audio does not play, make sure the necessary IrfanView plugins are installed. Also confirm that your audio file format is supported and that your system volume is not muted. Yes, that sounds obvious. Yes, everyone has checked software settings for 10 minutes before noticing the speakers were off.
The Slideshow File Is Too Large
Large images create large slideshows. Resize copies of the images before exporting. For most screen presentations, images around standard HD or slightly larger are enough. Keep original high-resolution files in a separate folder so you do not accidentally shrink your only copies.
EXE Slideshow Gets Blocked
Executable slideshow files are useful, but they may be blocked by email clients, browsers, or company security policies. If the slideshow needs to travel easily, export as MP4 when available or present directly from IrfanView on the target computer.
Photos Look Sideways
Open the photos in IrfanView first and rotate them correctly. Save copies if needed. Some images contain orientation data that displays differently across programs, so preview the slideshow before presenting.
IrfanView Slideshow vs. PowerPoint: Which Should You Use?
Use IrfanView when your slideshow is mainly a sequence of images. It is fast, lightweight, and simple. You do not need to design individual slides, choose templates, or align text boxes. You add photos, set timing, and press play.
Use PowerPoint, Google Slides, or similar software when you need charts, bullet points, speaker notes, animations, branded layouts, or collaboration. IrfanView can behave like a quick presentation tool, but it is not a full slide-design platform.
A simple rule: if the pictures are the presentation, use IrfanView. If the pictures support a larger speech, lesson, or sales pitch, use presentation software.
Practical Examples of IrfanView Slideshows
A teacher can use IrfanView to display historical images, art references, science diagrams, or student project photos. A photographer can review a shoot with clients without importing everything into a complex editing suite. A small business owner can create a looping in-store product display. A family can build a birthday or memorial slideshow from scanned photos. A real estate agent can show property photos during an open house. A blogger can organize screenshots before writing a tutorial.
The strength of IrfanView is speed. It lets you move from “Here is a messy folder of images” to “Here is a working slideshow” without turning the task into a software training course.
Extra Experience: What I Learned From Creating Slideshows With IrfanView
The biggest lesson from using IrfanView for slideshows is that preparation matters more than the software. IrfanView will faithfully play whatever you give it. If the folder is clean, the images are named well, and the order makes sense, the slideshow feels smooth. If the folder is chaos, IrfanView will also play that chaos with impressive confidence.
One useful habit is to create a separate project folder for each slideshow. Inside that folder, keep only the images you plan to show. Do not build the slideshow directly from your giant camera dump folder. That folder is where good intentions go to disappear. Instead, copy selected photos into a new folder named something clear, such as Birthday-Slideshow-Final or Product-Demo-Images. This makes it easier to add all files, sort them, and avoid accidental extras.
Another experience-based tip is to test the slideshow on the same type of screen you will use for the final presentation. A slideshow that looks perfect on a laptop may feel too fast on a projector or too small on a large TV. Timing is emotional, not just technical. Three seconds can feel quick when people are reading text, but slow when they are looking at simple scenery. Previewing helps you find the rhythm.
For family slideshows, less is usually more. People love memories, but they do not necessarily love 280 nearly identical photos from the same picnic table. Choose the strongest images. Mix wide shots, close-ups, funny moments, and emotional highlights. A 60-photo slideshow with variety often beats a 300-photo slideshow that becomes a test of endurance.
For business or educational slideshows, consistency makes a big difference. Use images with similar dimensions when possible. Add title-card images between sections. Keep file names organized. If you are showing product images, use a clean background and similar framing. IrfanView is simple, but simple tools can still produce professional results when the inputs are tidy.
Music deserves special caution. A good track can make a slideshow feel warm and polished. A bad track can make it feel awkward in record time. Keep volume moderate, avoid distracting songs, and think about the audience. Also consider copyright if the slideshow will be published online. Personal viewing and public web publishing are not the same thing.
Finally, always keep an export backup. If you save a slideshow as a standalone file or video, also save the original image folder and any file list you used. That way, you can update the slideshow later without rebuilding it from scratch. Future you will appreciate this. Future you may even forgive present you for naming the first draft “final-final-real-final.”
Conclusion
Learning how to create a slideshow using IrfanView is refreshingly simple. Open the slideshow tool, add your images, arrange the order, choose timing, add optional music or text, preview the result, and save or export when needed. The process is quick enough for beginners but flexible enough for teachers, photographers, office users, bloggers, and anyone who needs a clean image presentation without heavy software.
IrfanView may not look modern in the flashy sense, but that is part of its charm. It is fast, practical, and focused. It does not ask you to create an account, pick a cloud workspace, or watch a tutorial series before showing a few photos. Sometimes the best tool is the one that simply does the job.
Note: This article is written as an original, fully rewritten guide based on real IrfanView features, common slideshow workflows, and practical user experience. Always use the latest official IrfanView version and plugins for the best format support.