
Taking apart a Rubik’s Cube sounds like something a bored genius does five minutes before accidentally inventing chaos. In reality, disassembling a 3×3 cube is simple, useful, and surprisingly satisfying when done correctly. Whether your cube feels gritty, a piece popped out during an enthusiastic solve, or you simply want to understand the tiny plastic wizardry inside, this guide will walk you through the safest way to take apart a Rubik’s Cube without turning your desk into a crime scene for colorful cubies.
A standard 3×3 cube has center pieces, edge pieces, and corner pieces. The centers stay attached to the internal core and define the cube’s color layout. The edges have two colors, the corners have three, and the whole puzzle works because these pieces interlock while sliding around a central mechanism. Once you understand that, taking apart a Rubik’s Cube becomes less mysterious and more like opening a lunchbox with a very dramatic hinge.
This tutorial focuses on the most common 3×3 Rubik’s Cube and modern speed cube designs. Some older or official store-bought cubes may be tighter and less adjustable than speed cubes. If your cube fights back like it has rent due, stop forcing it. A careful hand is the difference between “maintenance” and “I need to buy another cube.”
Why Take Apart a 3×3 Rubik’s Cube?
There are several good reasons to disassemble a Rubik’s Cube. The most common is cleaning. Dust, hair, pocket lint, snack crumbs, and mysterious desk particles can creep into the mechanism and make turning rough or sticky. If your cube sounds like a tiny plastic gravel driveway, it probably needs a clean.
You may also take apart a cube to lubricate it, adjust the tension, replace broken pieces, fix a pop, or reassemble it after a curious sibling performed “scientific research.” Speedcubers often disassemble their cubes to remove old lubricant, apply fresh cube lube, and tune the puzzle for better control. Beginners may take one apart simply to learn how the mechanism works. That curiosity is healthy, as long as the springs, screws, and center caps do not vanish into another dimension.
Before You Begin: Tools and Safety Tips
What You Need
You do not need a toolbox worthy of a superhero garage. For most 3×3 cubes, your hands are enough. Still, a few items make the job easier:
- A clean table or tray to catch small pieces
- A small flathead screwdriver or plastic pry tool
- A soft cloth or paper towel
- Cotton swabs for cleaning corners and tracks
- Cube-safe silicone lubricant, if you plan to lube it
- A small container for screws, springs, washers, or center caps
Important Safety Note
Do not use excessive force. A 3×3 cube is designed to flex, but it is not designed to survive a wrestling match. If the first edge piece refuses to come out, loosen the cube slightly if your model allows tension adjustment, or try another edge. Avoid petroleum jelly, cooking oil, or random household sprays. These can damage plastic, attract grime, or turn your cube into a sad slippery brick.
How to Take Apart a Rubik’s Cube (3×3): 9 Steps
Step 1: Start With a Clean, Open Workspace
Place your cube on a flat surface with good lighting. A tray, towel, or large mouse pad is helpful because small parts love to roll away at the exact moment you blink. If you are working with a speed cube, there may be tiny springs, washers, magnets, or tensioning parts inside the center mechanism. Losing one of those is like losing one sock in the laundry, except now your cube turns weird forever.
Before removing anything, take a quick look at the cube. Notice the color scheme and how the pieces fit together. On a standard cube, the center pieces determine the final face colors. That means when you reassemble the cube, corners and edges must match the center layout. If you build it randomly, you may create an impossible cube that cannot be solved through normal turns.
Step 2: Turn the Top Layer 45 Degrees
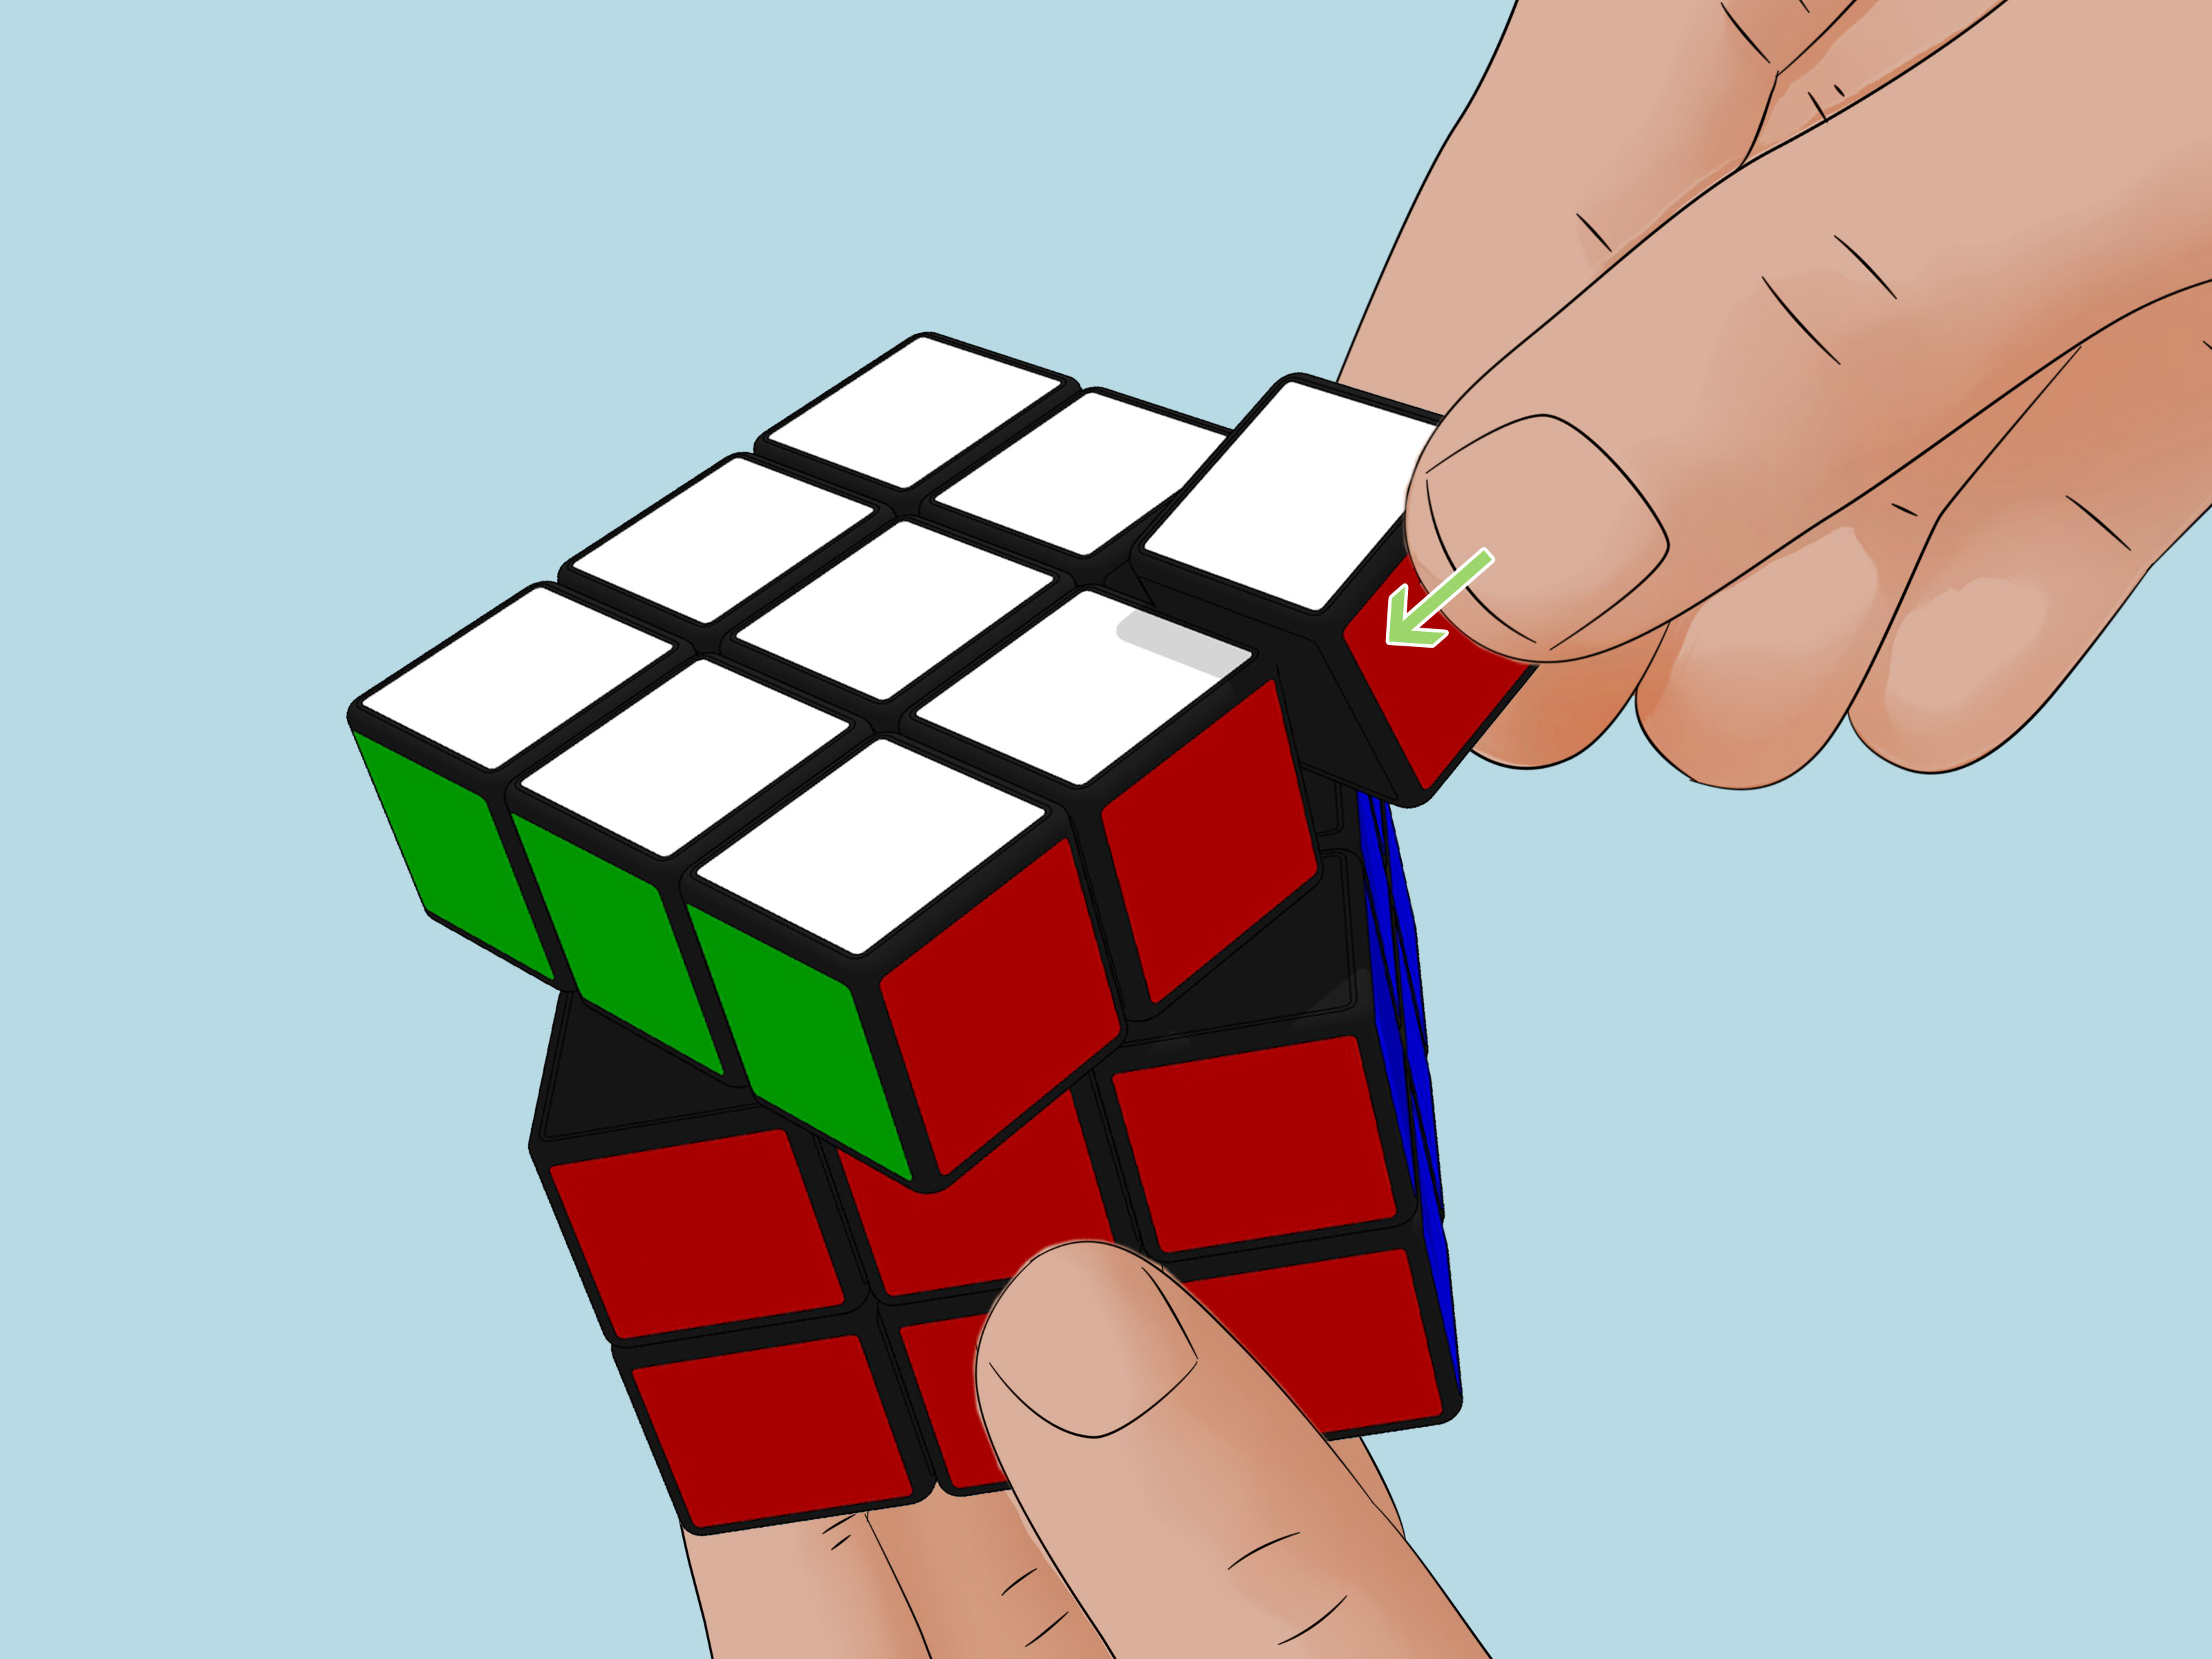
Hold the cube firmly in one hand and rotate the top layer about 45 degrees. Instead of lining up perfectly with the bottom layers, the top layer should sit diagonally. This exposes space around the top edge piece and gives you room to remove it.
This is the classic entry point for disassembling a 3×3 Rubik’s Cube. Turning the top layer 45 degrees reduces the pressure holding the edge in place. It also gives your fingers a better grip. Think of it as opening the cube’s front door rather than trying to enter through the chimney.
Step 3: Remove One Top Edge Piece
Choose an edge piece on the rotated top layer. An edge piece has two colored stickers or plastic color panels. Use your thumb and index finger to gently lift or pry the edge upward. If it does not come out easily, wiggle it slightly while maintaining the 45-degree angle.
If your cube is very tight, use a small flathead screwdriver or plastic pry tool under the edge piece. Be careful not to scratch stickers, tiles, or colored plastic. Apply slow, even pressure. The goal is to pop the piece out, not launch it across the room like a tiny square cannonball.
Once the first edge comes out, the cube becomes much easier to disassemble because the surrounding pieces have more room to move.
Step 4: Take Out the Neighboring Corner Pieces
After removing the first edge, remove the two corner pieces beside it. Corner pieces have three colors and sit at the corners of the cube. They should slide out with gentle pressure because the missing edge has created space.
Do not yank the corners straight out if they feel stuck. Instead, tilt them slightly and pull them away from the core. The internal tabs are shaped to hold the cube together while still allowing movement, so the right angle matters. Once the first few pieces are removed, the cube will start loosening quickly.
Step 5: Continue Removing Edges and Corners From the Top Layer
Work around the top layer and remove the remaining edge and corner pieces. Keep similar pieces together if you want an easier reassembly. You can make one pile for edges and one pile for corners. If your cube has unusual colors, printed designs, or custom stickers, arrange the pieces face-up so you can identify them later.
At this stage, resist the urge to dump everything out like a cereal box. Controlled removal helps prevent broken stems, missing magnets, and confusion during reassembly. A Rubik’s Cube is friendly, but it does enjoy punishing overconfidence.
Step 6: Remove the Middle and Bottom Layer Pieces
Once the top layer is open, the rest of the cube comes apart easily. Remove the exposed edges and corners from the middle and bottom layers one at a time. You may need to rotate layers slightly to free certain pieces.
Most 3×3 cubes contain 12 edge pieces and 8 corner pieces. The six center pieces usually remain attached to the core. On many speed cubes, the centers connect to screws, springs, or tensioning systems under removable center caps. On some official Rubik’s brand cubes, the centers may not be designed for easy adjustment. If the center caps do not come off naturally, do not pry aggressively unless you are willing to risk damage.
Step 7: Organize the Pieces and Inspect the Mechanism
Now that the cube is apart, look at what you have. You should see corner pieces, edge pieces, and the core with six centers attached. Inspect each piece for cracks, worn tabs, dirt buildup, sticker peeling, or trapped debris.
If a piece looks damaged, that may explain poor turning or frequent popping. If everything looks fine but dusty, cleaning is likely all you need. Wipe the tracks and contact surfaces with a dry cloth or cotton swab. For stubborn grime, use a slightly damp cloth on plastic pieces only, then let everything dry completely before reassembly. Do not soak the core, especially if your cube has screws, springs, magnets, or electronic parts.
Step 8: Clean, Lubricate, or Adjust the Cube
If your goal is maintenance, this is the perfect time to clean and lubricate. Remove old lube and dust from the inside surfaces. A dry cotton swab works well for grooves, feet, and tracks. After cleaning, apply a small amount of cube-safe silicone lubricant to the contact points. Less is usually better. Too much lube can make a cube sluggish, gummy, or weirdly dramatic.
For adjustable speed cubes, you can also check the tension. Remove the center caps carefully if the design allows it. Under the caps, you may find screws, springs, compression settings, or numbered tension systems. Tightening usually improves stability but may make turning slower. Loosening can make the cube faster but may increase corner cutting issues or popping. Aim for balance, not chaos.
If you are new to cube tuning, adjust each side evenly. Uneven tension can make one face feel buttery and another face feel like it was designed by a committee of angry doors.
Step 9: Reassemble the Cube in a Solved State
To put the cube back together, build it around the core in a solved color layout. Start with one face and insert the correct corners and edges around the matching center. Continue layer by layer, making sure each piece belongs where you place it.
The easiest method is to assemble most of the cube while leaving one edge out until the end. Insert the final edge last by turning the top layer 45 degrees again and gently snapping the piece into place. If it feels too tight, loosen the cube slightly if possible, then try again. Do not force the final piece with heroic strength. Plastic remembers trauma.
After reassembly, turn every face slowly. Check for catching, uneven tension, or pieces that sit incorrectly. If the cube turns smoothly and shows a normal solved pattern, congratulations. You have successfully taken apart and rebuilt a 3×3 Rubik’s Cube without summoning mathematical demons.
Common Mistakes to Avoid
Forcing the First Edge
The first edge is always the hardest piece to remove. If it does not come out, check the angle of the top layer and try again. Too much force can crack an internal tab or bend a piece.
Mixing Up the Pieces During Reassembly
A cube reassembled with the wrong piece placement may look close to normal but become impossible to solve. Always rebuild around the center colors. Remember: centers define the cube’s solved color scheme.
Using the Wrong Lubricant
Use lubricant made for speed cubes or plastic-safe silicone lubricant. Avoid oily household products. They may feel smooth for five minutes, then attract dirt and make the cube worse.
Over-Loosening the Cube
A loose cube may turn fast, but it can also pop during solves. If pieces fly out when you turn aggressively, tighten the cube slightly or adjust the compression system.
How to Know If Your Cube Should Be Taken Apart
You do not need to disassemble your cube every week. For casual solvers, occasional cleaning is enough. Consider taking it apart when the cube feels sandy, sticky, uneven, noisy, or unusually slow. If pieces pop out often, internal tension may need adjustment. If the cube has been dropped, stepped on, or introduced to orange juice by a small child, disassembly is probably not optional anymore.
For speedcubers, maintenance depends on use. A frequently used cube may need cleaning and fresh lube every few weeks or months. A display cube sitting on a shelf may need nothing except admiration and maybe a dusting.
Can You Take Apart Every 3×3 Rubik’s Cube?
Most 3×3 cubes can be taken apart, but not all cubes are equally friendly about it. Modern speed cubes are designed for maintenance and customization. Many have removable center caps and adjustable mechanisms. Some official Rubik’s brand cubes and older models may be tighter, riveted, or not intended for tension adjustment. You can often remove pieces from them, but you should be more cautious.
If the cube is a special edition, electronic cube, magnetic smart cube, picture cube, or collector’s item, check the design before opening it. Smart cubes may contain sensors, batteries, or delicate internal parts. In that case, casual prying is a terrible idea wearing a tiny colorful hat.
Personal Experience: What Taking Apart a Rubik’s Cube Teaches You
The first time you take apart a Rubik’s Cube, it feels slightly illegal. You spend years thinking the cube is a sealed object, a perfect little box of frustration, and suddenly one edge pops out and the whole thing becomes a pile of plastic geometry. It is oddly empowering. It is also the moment you realize that the cube is not magic. It is engineering, patience, and a lot of cleverly shaped pieces pretending to be simple.
One useful lesson is that small adjustments matter. A cube that feels awful may not be broken at all. It may simply be dirty, dry, over-tightened, or unevenly tensioned. Cleaning the tracks and adding a tiny amount of proper lubricant can make an old cube feel dramatically better. The keyword is tiny. Many beginners over-lubricate their cubes because they think more slippery juice equals more speed. Then the cube feels slow, heavy, and confused. A few drops are usually enough. The cube should glide, not swim.
Another experience worth mentioning is the importance of organizing pieces. When you are new, it is tempting to remove everything quickly and trust your future self to figure it out. Future self will not thank you. Future self will stare at twenty loose pieces and wonder why past self had so much confidence. Sorting edges and corners before reassembly saves time and reduces mistakes. Rebuilding in a solved state is much easier than trying to create a random scramble and hoping the laws of cubing approve.
Taking apart a cube also makes you a better solver. Once you see how centers, edges, and corners differ, the puzzle becomes more logical. You understand why an edge cannot move into a corner spot, why centers define face colors, and why a single twisted corner can make a cube impossible to solve normally. That mechanical understanding supports beginner solving methods, advanced speedcubing, and troubleshooting.
There is also a confidence boost. The next time a piece pops out during a solve, you will not panic. You will know how to place it back correctly. If the cube becomes scratchy, you will know how to clean it. If the turning feels unstable, you will know where to inspect. Instead of treating the cube like a mysterious object with an attitude problem, you will treat it like a maintainable puzzle.
The best advice from experience is simple: go slowly the first time. Use a clean workspace, avoid forcing pieces, keep track of small parts, and reassemble carefully. A Rubik’s Cube is durable, but it rewards patience. Plus, once you finish, you get the tiny satisfaction of knowing you have seen the inside of one of the world’s most famous puzzles and lived to tell the tale.
Conclusion
Learning how to take apart a Rubik’s Cube 3×3 is useful for cleaning, lubrication, repair, and understanding the puzzle’s design. The process begins by turning the top layer 45 degrees, removing one edge, taking out nearby corners, and carefully working through the remaining pieces. Once apart, you can clean the cube, inspect the mechanism, adjust tension if your model allows it, and reassemble the puzzle in a solved state.
The most important rule is to be gentle. A cube should come apart with controlled pressure, not brute force. With patience and a little organization, you can maintain your 3×3 cube, improve its feel, and avoid common problems like popping, stiffness, and gritty turning. And yes, you may feel like a puzzle surgeon afterward. That is completely normal.
Note: This guide is for standard 3×3 cubes and common speed cubes. For smart cubes, rare collector cubes, or models with unusual mechanisms, check the manufacturer’s instructions before disassembly.