If your “workshop” is currently a sad plastic table wedged between the lawn mower and last year’s holiday decorations, a DIY fold-up workbench might be the weekend upgrade you’ve been waiting for. Inspired by the Family Handyman “Saturday Morning Workshop” video, this smart folding workbench gives you a rock-solid surface when you need it, and folds flat when you don’t. It’s the workshop equivalent of a Murphy bedonly with more sawdust and fewer pillows.
In this guide, we’ll walk through what makes a fold-up workbench so useful, how the Saturday Morning Workshop design works, what to consider before you build, and practical tips to get the most from every square inch of your garage or basement shop.
What Is a DIY Fold-Up Workbench?
A DIY fold-up workbench is a sturdy work surface that hinges or pivots out from a wall or frame when in use, then folds up flat to reclaim floor space. The Family Handyman version from their Saturday Morning Workshop series is built around a simple idea:
- A strong frame built with common lumber (usually 2x4s).
- A thick plywood top that can handle clamping, pounding, and cutting.
- A hinge or pivot system that lets the bench swing up against the wall.
- Smart storage inside the frame for tools, clamps, or small parts.
When folded, the bench sits just a few inches out from the wall, leaving plenty of room to park a car, wheel in a lawn mower, or let kids cut through the garage without dodging sawhorses. When lowered, it becomes a full-size work surface that feels as solid as a permanent benchwithout permanently stealing your precious square footage.
Why a Fold-Up Workbench Is Perfect for Weekend DIYers
1. It Saves Serious Floor Space
Most homeowners don’t have a dedicated workshop. You’re carving out space in a shared garage, basement, or even a spare bedroom. A traditional fixed workbench can hog several feet of floor space 24/7. A fold-up bench changes the game:
- Parking + projects: Keep your parking spot during the week; fold the bench down on Saturday morning for your projects.
- Shared spaces: In multipurpose rooms, you can stow the bench away and keep the room looking clean.
- Small-footprint shops: In tiny workshops, a fold-up bench becomes the “main stage” that appears only when needed.
2. It Doubles as Storage
The Saturday Morning Workshop–style design doesn’t just give you a flat surface; the underside and frame are prime real estate for storage. Many DIYers add:
- Built-in cubbies for hand tools, screws, and glue.
- French cleats or pegboard panels on the wall behind the bench.
- Shallow trays or bins inside the frame for sandpaper and small accessories.
That means less time hunting for your tape measure and more time actually building something.
3. It’s a Beginner-Friendly Build
Some workbenches involve complex joinery and specialty hardware. The fold-up workbench featured by Family Handyman is intentionally approachable. You’re mostly working with:
- 2x4s for the frame and support structure.
- 3/4-inch plywood for a sturdy top.
- Standard hinges or a continuous piano hinge for the fold-up action.
- Basic fasteners like wood screws, lag screws, and wall anchors appropriate for your wall type.
If you can measure accurately, cut square, and drive screws, you’re already qualified.
Planning Your DIY Fold-Up Workbench
Step 1: Choose the Right Location
Before you buy lumber, walk around your garage or workspace and decide where the bench should live. Ask yourself:
- Wall strength: Is this a solid stud wall or masonry wall that can safely support the bench?
- Clearance: When the bench is folded down, will you still have room to walk around it and maneuver materials?
- Lighting and power: Are there outlets nearby for tools? Can you see what you’re doing without working in your own shadow?
A common strategy is to place the bench along a long wall opposite the garage door. That way, you can rip long boards or handle larger sheet goods by opening the door for extra clearance when needed.
Step 2: Dial in the Size and Height
Most DIY workbenches land somewhere around 34 to 38 inches high, depending on your comfort and height. Your fold-up bench should feel natural to work atnot too low for your back, not so high that you’re shrugging your shoulders.
For the top size, think about your typical projects:
- Small hobby work: 24 x 48 inches may be plenty.
- General home repair and woodworking: 30 x 60 or 36 x 72 inches offers more flexibility.
- Very small spaces: You might go narrower or shorter but rely on outfeed supports or sawhorses for long boards.
Remember, the deeper the bench, the farther it sticks out when folded down. Strike a balance between generous workspace and comfortable clearance in front.
Step 3: Choose Materials That Can Take a Beating
A good workbench top should feel solid. A common recipe is:
- Frame: Construction-grade 2x4s, glued and screwed.
- Top: 3/4-inch plywood, MDF, or a sandwich of two layers for extra rigidity.
- Edge banding (optional): 1×3 or 1×4 boards around the edge to protect the plywood and prevent chipping.
If you plan to mount a vise, bench dogs, or heavy tools temporarily, build with strength and stiffness in mind. Don’t undersize the hinges or the fasteners anchoring the bench to the wall.
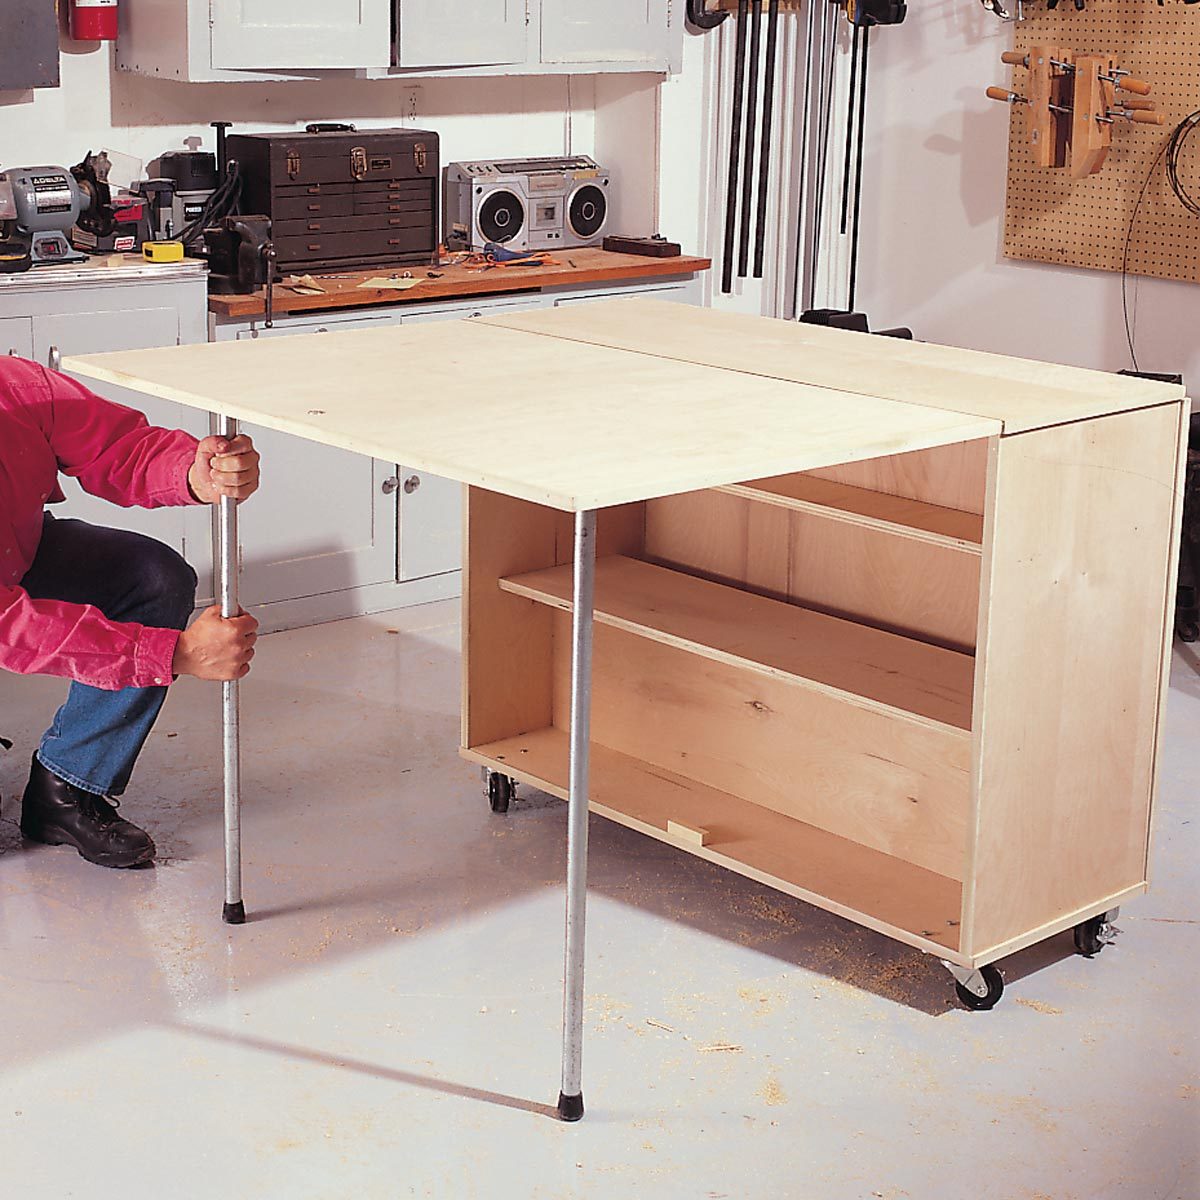
How the Saturday Morning Workshop Fold-Up Bench Works
The Basic Mechanism
The fold-up workbench design used in the Family Handyman video is built around a simple but clever mechanism:
- A wall-mounted ledger or frame is anchored securely into studs.
- The bench top and front frame are hinged along the bottom or lower edge.
- The legs either fold up under the bench or are fixed and pivot with the frame.
- When you pull the bench down, the legs swing into position and lock, supporting the weight of the bench and your work.
- When you’re done, you fold the legs and swing the bench back up against the wall, where it latches securely.
This design keeps most of the structure and weight close to the wall, so the bench feels stable and doesn’t rack or wobble during use.
Storage Built Right In
One of the fun touches you’ll often see on this style of bench is storage integrated into the underside. Think of the underside of the bench as a shallow cabinet that flips into the room:
- Drill bit racks and driver bit holders.
- Small bins for screws and fasteners.
- Hooks for safety glasses, tape measures, and frequently used tools.
When the bench folds up, your tools tuck neatly away. When it folds down, your most-used gear is right in front of youno rummaging through random boxes.
Key Design Considerations for a Safe, Stable Fold-Up Workbench
Weight Capacity and Stability
Even a weekend DIY bench should be built with safety in mind. Think about:
- Load rating: Build your frame and choose hinges that can comfortably support the weight of the bench plus your heaviest tool or project.
- Leg design: Use diagonal bracing or sturdy hinged legs so the bench doesn’t wobble or fold accidentally.
- Wall anchors: Fasten into studs or masonry with appropriate anchors. Don’t rely on drywall alone to hold anything load-bearing.
- Non-slip feet: If your bench has folding legs that contact the floor, consider rubber or non-slip pads so it doesn’t creep during heavy work.
Hardware That Makes Life Easier
A few small hardware upgrades can really improve the user experience:
- Continuous hinge: Also known as a piano hinge, this runs the full width of the bench and spreads out the load.
- Locking latches: Surface-mount latches, barrel bolts, or even homemade wooden catches can hold the bench securely in the upright position.
- Gas struts or supports (optional): On larger benches, some DIYers add gas struts or folding supports to ease the lifting and lower the bench more gently.
Finishing Touches
Once the structure is built, a few finishing touches can make your fold-up bench more enjoyable to use:
- Rounded edges: Lightly round over corners and edges to keep them from chippingand to save your hips from bruises.
- Durable finish: A couple of coats of polyurethane, spar varnish, or even a layer of hardwax oil can help the surface resist glue and stains.
- Layout lines: Adding a simple grid with a marker or pencil can help with measuring, squaring, and positioning workpieces.
Step-by-Step Overview: Building Your Own Fold-Up Workbench
1. Layout and Mark the Wall
Use a stud finder to locate studs and snap a level line where the top of your ledger board or wall frame will go. Double-check the bench height against your bodypretend to plane, sand, or cut at that height. Adjust before you start drilling holes.
2. Build the Bench Frame
Cut your 2x4s to form a rectangular frame matching your chosen bench dimensions. Add cross braces every 16 to 24 inches for stiffness. Dry-fit your frame, then glue and screw everything together so it stays square.
3. Attach the Top
Cut the plywood top slightly oversized, then fasten it to the frame with wood screws from underneath so you don’t pepper the surface with fastener heads. You can trim the top flush with a router and flush-trim bit, or simply sand the edges smooth.
4. Mount the Hinges
Secure your continuous hinge or pairs of heavy-duty hinges to the bottom edge of the bench frame first. Then hold or prop the bench in position and fasten the other leaf of the hinge to the wall ledger or bracket. Take your time here: a level and a helper are worth their weight in gold.
5. Add Legs and Bracing
Cut legs to the correct length so the bench sits level when lowered. Hinged legs can fold up under the bench when stored. Cross-braces or diagonal supports between the legs add rigidity and make the bench feel rock-solid.
6. Install Latches and Storage
With the bench working smoothly, add latches to lock it in the upright position. Then get creative with storage: small trays, racks, and hooks can all be fastened to the underside and nearby wall space.
Tips for Using a Fold-Up Workbench Safely and Efficiently
- Develop a pre-work checklist: Confirm the legs are locked, latches are disengaged, and the bench is resting firmly on the floor before you start working.
- Distribute weight wisely: Keep the heaviest tools and workpieces centered over the supports, not hanging off one edge.
- Protect the surface: Use a sacrificial board when cutting with circular saws or jigsaws so you don’t gouge the bench itself.
- Clean before folding: Brush off dust and debris before folding the bench up so grit doesn’t scratch the wall or finish.
Smart Small-Workshop Ideas to Pair With Your Fold-Up Bench
Your fold-up workbench becomes even more powerful when you pair it with other space-saving strategies:
- Vertical storage: Use wall-mounted racks for clamps, lumber, and commonly used tools.
- Rolling cabinets: Store tools in rolling carts that slide under the bench when it’s down or tuck elsewhere when it’s up.
- Modular fixtures: Build removable jigslike miter saw stands or sanding stationsthat clamp onto the bench when needed and live on shelves the rest of the time.
- Clear traffic zones: Plan a path through your space and make sure the folded-down bench doesn’t block doors, vehicles, or other critical access points.
Real-World Experiences With a DIY Fold-Up Workbench
On paper, a fold-up workbench is just dimensions, hardware, and plywood. In real life, it changes how you workand how often you’re willing to tackle projects. Here are some lived-in lessons and experiences that pop up again and again from DIYers who’ve built something similar to the Family Handyman Saturday Morning Workshop bench.
The “Barrier to Entry” Drops to Almost Zero
Before having a dedicated work surface, many homeowners admit they avoided small projects simply because setting up was a hassle. You had to drag out sawhorses, clear a table, or work on the floor. Once a fold-up bench is installed, projects suddenly feel easier:
- You walk into the garage, drop the bench down, plug in a tool, and you’re working in minutes.
- You’re more likely to fix the wobbly chair, hang that shelf, or test a new tool because your workspace is ready when you are.
This “instant start” feeling is one of the biggest hidden benefits of the design.
It Teaches You to Be Organized
A fold-up bench forces a certain level of disciplinebecause if you leave everything piled on top, you can’t fold it away. Over time, many DIYers find themselves naturally more organized:
- Tools get consistent homes on the underside of the bench or nearby wall racks.
- Scrap wood gets sorted or tossed instead of living forever on the floor.
- End-of-day cleanup becomes a simple routine: put tools back, sweep off the bench, fold it up, and you’re done.
The result is a workspace that feels less chaotic and more inviting, even if it’s still just one side of the garage.
Small Design Tweaks Make a Big Difference
Almost everyone who builds a fold-up workbench discovers details they’d tweak next timeand those tweaks are worth considering up front:
- Rounded corners: Many people end up rounding off the front corners after catching a hip one too many times.
- Better lighting: A dedicated LED light fixture right above the bench turns night projects from “dimly lit improvisation” into “real workshop.”
- Power strips and cord management: Adding a mounted power strip and a couple of cord hooks keeps cords off the floor and out of your way.
Think of your first version as “Version 1.0”you can always come back and upgrade once you’ve used it for a few months.
It’s Surprisingly Family-Friendly
Because the bench folds away, it fits into real family life more easily than a permanent workshop island. People often mention:
- Using the bench for kid projects like Pinewood Derby cars or school models, then folding it up before soccer practice.
- Keeping potentially dangerous tools locked in cabinets or drawers while still having a clean, sturdy surface for supervised projects.
- Being able to switch the garage from “project mode” to “family mode” in minutescar back in, bikes accessible, no clutter in the way.
That flexibility is a big deal if your workshop has to coexist with daily life.
The Bench Becomes the Heart of Your Workshop
Even in small, carefully planned shops with rolling carts and clever storage, the fold-up bench tends to become the focal point. It’s where you:
- Lay out parts and hardware before a project.
- Clamp boards for sanding, gluing, or routing.
- Stage tools and materials for home repairs.
As that happens, you’ll naturally rearrange your space so the tools you use most often end up near the benchchisels, sandpaper, tape measures, bits, and blades all migrate to within arm’s reach. Over time, your fold-up bench becomes more than just a space-saving gimmick; it’s your go-to workstation.
The Satisfaction Factor Is Huge
There’s something especially satisfying about projects that immediately improve your day-to-day life. A fold-up workbench is one of those rare builds:
- You see the payoff every time you walk into the garage and fold it down.
- You feel the difference every time you tackle a project with a solid, comfortable work height.
- You experience the convenience every time you fold it up, park your car, and realize you didn’t have to sacrifice your workspace to do it.
For many DIYers, that combination of practicality, clever design, and everyday usefulness is exactly what keeps them coming back to weekend projectsand why the Family Handyman “Saturday Morning Workshop” fold-up bench is such a standout idea.
Whether you’re just starting your DIY journey or upgrading a long-neglected garage, building your own fold-up workbench is a weekend project that delivers long-term rewards: a cleaner space, a better workflow, and a workshop that appears magically whenever inspiration strikes.