Resistance bands are the “tiny but mighty” tools of leg day: lightweight, travel-friendly, and annoyingly effective
(in the best way). Whether you’re working out in a living room, a hotel, or the corner of a gym where nobody can
judge your band color choices, a solid set of resistance band leg exercises can build strength,
improve stability, and light up muscles you didn’t even know had an opinion.
This guide breaks down the 7 best resistance band exercises for the legswith clear setup, form
cues, common mistakes, and ways to progress. You’ll hit quads, glutes, hamstrings, hip abductors, and calves, and
you’ll walk away with a plan that feels more “athletic” than “random band flailing.”
Why Bands Work So Well for Leg Training
Bands create tension that increases as they stretch, which can make bodyweight moves feel surprisingly challenging.
They’re also easy to scale: shorten the band or switch resistance levels to adjust intensity without changing the
entire workout. If you like simple equipment with lots of options, bands are basically the Swiss Army knife of
lower-body training (minus the tiny scissors nobody uses).
Before You Start: Band Types, Setup, and Safety
Pick the right band for the job
- Mini loop bands (small circles): great for squats, bridges, lateral walks, clamshells, and glute activation.
- Long loop bands or tube bands (with or without handles): best for deadlifts, hamstring curls, and calf work.
Quick safety checklist
- Check bands for tears, thin spots, or cracked rubber before each session.
- Anchor bands securely (door anchors, heavy furniture, or sturdy posts) and keep your face out of the “snap line.”
- Start lighter than your ego wants, then build up once your form looks clean.
Warm-Up: 5 Minutes That Make the Workout Feel 10x Better
A quick warm-up improves movement quality and helps the right muscles show up to work. Try this simple sequence:
- Bodyweight hip hinges (10 reps) to groove the hinge pattern
- Air squats (10 reps) to warm knees/hips
- Mini-band lateral steps (8–10 each direction) to wake up the hip abductors
- Glute bridges (10 reps) to cue glutes/hamstrings
If your hips feel sleepy from sitting, consider adding a couple of low-intensity “activation” moves (like lateral
walks or clamshells) before the harder sets. It’s not magicit’s just getting your nervous system on the same page
as your workout.
1) Banded Squat (Mini Band Above Knees)
Best for: quads, glutes, and improving knee tracking (especially if your knees cave inward).
Setup
- Place a mini band just above your knees.
- Stand with feet about hip- to shoulder-width apart.
- Keep your torso tall, ribs stacked over hips.
How to do it
- Sit your hips back and down like you’re aiming for a chair that moved away slightly.
- As you lower, gently press your knees outward to keep tension on the band.
- Drive through midfoot/heel to stand, squeezing glutes at the top.
Common mistakes
- Letting knees collapse inward (band goes slack).
- Heels lifting or torso folding like a lawn chair.
Progressions
- Harder: pause 2 seconds at the bottom; add a banded pulse for 5–10 mini reps.
- Easier: reduce band tension or squat to a box/bench for a consistent depth.
2) Banded Romanian Deadlift (Stand on Long Band)
Best for: hamstrings and glutes (your posterior chainaka the “stand tall” muscles).
Setup
- Stand on the middle of a long band with feet hip-width apart.
- Hold the ends of the band with arms straight at your sides.
- Soft bend in knees; chest proud; shoulder blades gently back and down.
How to do it
- Push hips back as if closing a car door with your butt (hands slide along thighs).
- Keep spine neutral and band close to your body.
- Lower until you feel a strong hamstring stretch (usually mid-shin).
- Drive hips forward to stand tall, squeezing glutes at the top.
Common mistakes
- Rounding the back to “reach lower.”
- Turning it into a squat by bending knees too much.
Progressions
- Harder: slow tempo (3 seconds down), or do single-leg band RDLs for balance + intensity.
- Easier: shorten range of motion and practice the hinge with hands on hips first.
3) Banded Glute Bridge (Mini Band Above Knees)
Best for: glutes, hamstrings, and hip stabilitygreat for people who “feel squats in their knees” more than their hips.
Setup
- Loop a mini band above your knees.
- Lie on your back, knees bent, feet flat and slightly wider than hip-width.
- Arms by sides, palms up or downdealer’s choice.
How to do it
- Brace your core so your ribs don’t flare upward.
- Press knees gently outward to keep band tension.
- Drive through heels to lift hips until your body forms a straight line from shoulders to knees.
- Pause 1 second at the top; lower under control.
Common mistakes
- Overarching the lower back instead of lifting with glutes.
- Letting knees cave inward and band slacken.
Progressions
- Harder: switch to a hip thrust (shoulders elevated on a bench), or do single-leg bridges.
- Easier: reduce band resistance and shorten the top pause.
4) Banded Reverse Lunge (Band Under Front Foot)
Best for: quads, glutes, balance, and building strength evenly between legs.
Setup
- Stand on a long band with your front foot (the working leg).
- Hold band ends at shoulder height (elbows tucked) or at your sides for lighter resistance.
- Feet hip-width, posture tall.
How to do it
- Step the opposite leg back into a reverse lunge.
- Lower until both knees are near 90 degrees (or your comfortable depth).
- Drive through the front foot to stand, keeping band tension controlled.
Common mistakes
- Front knee collapsing inward.
- Leaning forward excessively or wobbling from rushing the rep.
Progressions
- Harder: add a 2-second pause at the bottom, or increase band resistance.
- Easier: hold onto a wall/chair lightly for balance support.
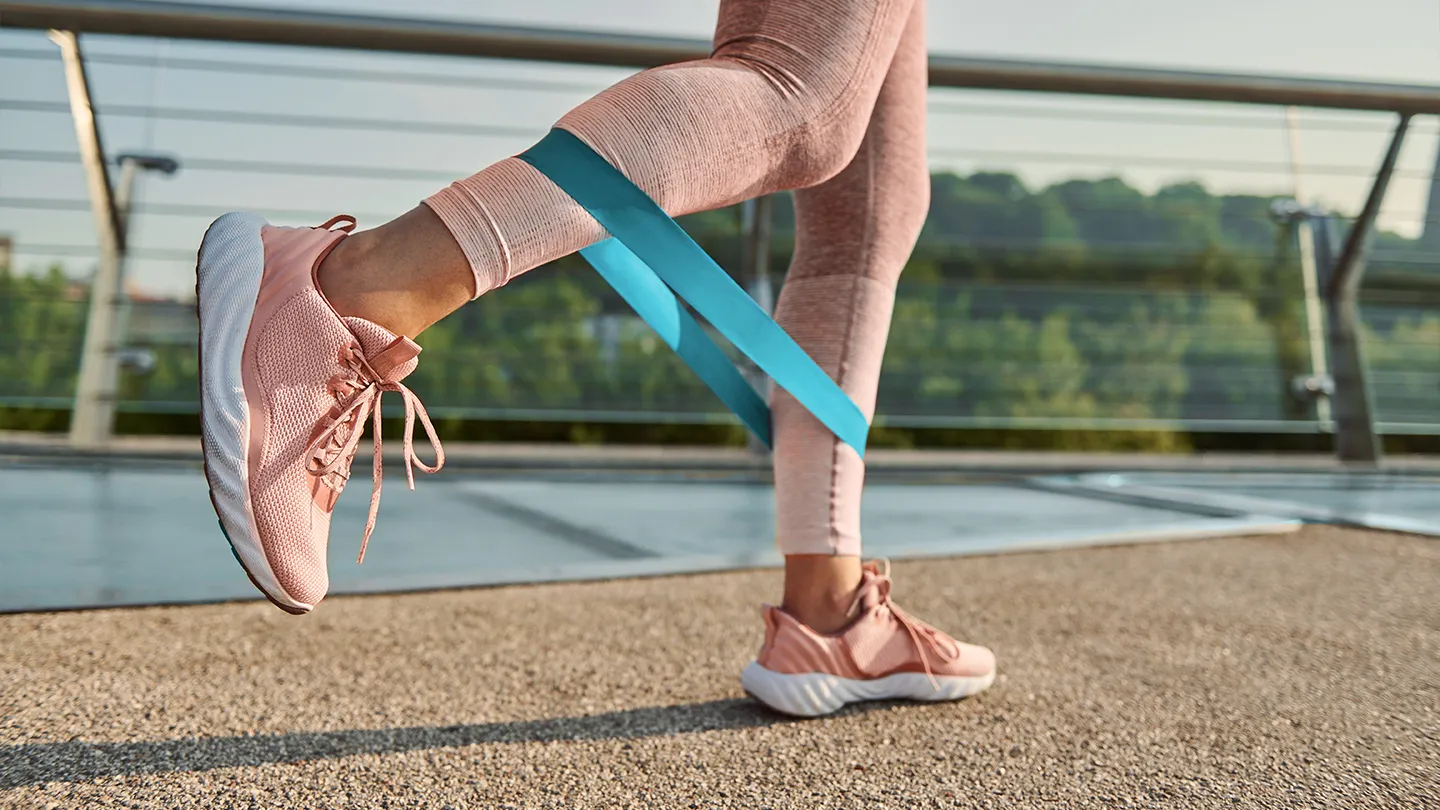
5) Lateral Band Walk (a.k.a. Hip Abduction Walk)
Best for: hip abductors (especially glute medius), knee stability, and athletic “side-to-side” control.
Setup
- Place a mini band around ankles, shins, or above the knees.
- Sink into a quarter squat (soft knees, hips back).
- Keep toes mostly forward and torso steady.
How to do it
- Step to the side under control (don’t let feet snap together).
- Maintain constant band tensionthink “step, control, step.”
- Take 8–12 steps one direction, then back.
Common mistakes
- Dragging feet instead of stepping (band turns into a carpet burn machine).
- Rocking the torso side-to-side to cheat the movement.
Progressions
- Harder: band lower (ankles) or use a stronger band; add a diagonal “monster walk” pattern.
- Easier: band above knees and take smaller steps.
6) Banded Clamshell
Best for: glute med/min, hip control, and making your pelvis feel more stable during squats, runs, and stairs.
Setup
- Loop a mini band just above the knees.
- Lie on your side, knees bent about 90 degrees, heels stacked.
- Keep hips stacked (don’t roll backward).
How to do it
- Keeping feet together, lift the top knee upward against the band.
- Pause briefly at the top without rotating your torso.
- Lower slowly and repeat.
Common mistakes
- Rolling the hips backward to “get higher.”
- Speeding through reps and letting band tension disappear.
Progressions
- Harder: hold 2 seconds at the top or increase band resistance.
- Easier: lighten resistance and focus on perfect hip stacking.
7) Banded Calf Raise (Band Under Feet)
Best for: calves (gastrocnemius/soleus) and ankle strengthimportant for walking, running, jumping, and general “my knees like me” energy.
Setup
- Stand on a long band with both feet, hip-width apart.
- Hold band ends at your sides with elbows slightly bent.
- Use a wall or chair for balance if needed.
How to do it
- Rise onto the balls of your feet as high as you can without rolling ankles outward.
- Pause at the top for 1 second.
- Lower slowly until heels are back down.
Common mistakes
- Bouncing reps (calves love control, not chaos).
- Letting ankles roll outward (keep pressure through the big toe area).
Progressions
- Harder: single-leg calf raises (hold something for balance).
- Easier: reduce band resistance or shorten range of motion temporarily.
How to Turn These 7 Moves Into a Leg Workout
For general strength and muscle building, many programs use moderate rep ranges and consistent weekly practice.
A simple approach is training legs 2–3 days per week with at least a day between sessions.
Pick a resistance that challenges you while keeping form cleanyour last reps should feel tough but controlled.
Option A: Full Lower-Body Strength (30–40 minutes)
- Banded Squat 3 sets of 8–12 reps
- Banded RDL 3 sets of 8–12 reps
- Banded Reverse Lunge 3 sets of 8–10 reps per side
- Banded Glute Bridge 2–3 sets of 10–15 reps
- Lateral Band Walk 2 sets of 10 steps each way
- Clamshell 2 sets of 12–20 reps per side
- Banded Calf Raise 3 sets of 12–20 reps
Option B: Quick Band Circuit (15–20 minutes)
Do 2–3 rounds, resting 30–60 seconds between exercises:
- Banded Squat 12 reps
- Banded RDL 12 reps
- Reverse Lunge 8 reps per side
- Lateral Band Walk 10 steps each way
- Glute Bridge 15 reps
- Calf Raise 20 reps
Form Fixes That Save Your Knees (and Your Mood)
- Keep tension on the band: if the band goes slack, the target muscles go on vacation.
- Control the return: bands love to “snap you back.” Don’t let them.
- Own your alignment: knees generally track in the same direction as toes (no collapsing inward).
- Progress gradually: increase resistance, reps, or tempoone variable at a time.
Frequently Asked Questions
Are resistance band leg workouts effective for building muscle?
They can be, especially when you choose a challenging band, use full control, and progress over time. If you can
do endless reps with perfect ease, the band is too light (or you’ve secretly become a superhero).
What if I only have a mini band?
You can still crush a lower-body session with squats, bridges, lateral walks, clamshells, and tempo work. For hinges
and curls, a long band adds optionsbut you can still build plenty of strength with mini-band variations.
How do I know I’m using the right resistance?
A good rule: you should finish a set feeling like you could do maybe 1–3 more reps with good form.
If you’re doing 30 reps and texting at the same time, it’s time to level up.
Conclusion: Strong Legs, Simple Tools, Smarter Training
The best resistance band exercises for legs aren’t complicatedthey’re consistent. Master the basics (squat, hinge,
lunge, bridge, and lateral work), keep tension honest, and progress in small steps. Do that for a few weeks and
you’ll notice stronger legs, steadier knees, and a lower body that feels more capable in everyday life.
As always: if you have pain (sharp, persistent, or worsening), a recent injury, or a medical condition, talk to a
qualified healthcare professional before pushing intensity. Strong is good. Smart strong is better.
Real-World Experiences: What Usually Happens When You Train Legs With Bands
People often expect resistance bands to feel “easy” because they’re light and don’t look like traditional weights.
Then the first set of banded squats happensand suddenly the band becomes a tiny personal trainer with a loud
opinion. A common experience is feeling muscles in places you normally ignore, especially the outer hips (glute
medius) and the upper glutes during lateral walks and clamshells. That’s not a sign you’re “weak.” It usually means
you’re finally asking stabilizer muscles to do their job instead of letting bigger muscles (or momentum) take over.
Another real-world pattern: bands instantly reveal form habits. If your knees tend to cave inward on squats or
lunges, the band will call you out by going slack or pulling you off line. The fix is rarely “try harder.” It’s
usually “slow down, keep tension, and own the movement.” When people focus on controlled repsespecially a slow
lowering phaseband workouts start to feel more like strength training and less like cardio disguised as exercise.
The burn you feel is often from time under tension, not just the amount of resistance.
Many beginners also notice their hamstrings cramp during bridges or hinges. That’s common when glutes are sleepy
(thanks, chairs) and hamstrings try to do everything. The practical solution is to shorten your range of motion,
brace your core, and focus on squeezing glutes at the top instead of trying to lift as high as possible. With a
little practice, glutes start to “turn on” earlier, and the movement feels smoother and stronger.
Bands are also great for making workouts more consistent in messy schedules. People who travel, work long hours,
or don’t have access to a full gym tend to stick with band training because it’s low-friction: you can do it
anywhere with minimal setup. That consistencytwo or three solid lower-body sessions per weekusually produces the
most noticeable results: better stair climbing, more stable knees, improved balance on single-leg movements, and
legs that feel less tired after long days.
One more experience worth mentioning: progression with bands is sneakily satisfying. Instead of jumping to heavier
dumbbells, you can progress by shortening the band, adding a pause, slowing the tempo, or increasing reps. Those
small upgrades feel manageable and help avoid the “I went too heavy and now I’m walking like a baby deer” problem.
Over time, people often find they move better first (less wobble, better control), then get stronger (more tension,
more reps), and finally build visible muscle toneespecially in glutes and thighsbecause the work is consistent and
the form stays honest. Bands won’t do the work for you, but they will absolutely keep you accountable while you do it.