Bored wall, meet brilliant you. Whether you rent, own, or are simply procrastinating laundry, these step-by-step DIY wall art ideas will turn a blank expanse into a conversation piecewithout blowing your budget. Expect approachable materials (hello, painter’s tape and paper), beginner-friendly techniques, and pro tips so your project looks designer, not “dorm.”
Before You Start: Quick Prep & Smart Safety
- Measure twice, hang once: Center artwork at eye level (roughly 57–60 inches from floor to center) and map layouts with painter’s tape.
- Choose adhesives wisely: Use removable picture-hanging strips for rentals; anchors for heavy wood or framed pieces.
- Prime and paint in this order: Clean walls, patch, sand, prime, then paint. Let coats cure fully before taping designs.
- Ventilation & PPE: For spray adhesives, stain, or plaster, open windows and wear a mask and safety glasses.
1) Large-Scale Drop-Cloth Canvas (Abstract Swirls)
Why it works
Big art makes small rooms feel intentional. A cotton drop cloth stretched on a simple wood frame becomes a budget canvas worthy of the living room.
What you’ll need
- Cotton drop cloth, 1×2 furring strips, staple gun
- Acrylics (2–3 hues), large brush or foam roller
Steps
- Build a rectangle frame with 1x2s; square the corners.
- Stretch the drop cloth taut and staple on the back.
- Roll on a light base coat; when dry, add broad, loose swirls in two tones. Stop before it looks “overworked.”
Time & cost: 2–3 hours; $30–$60.
2) Cut-Paper Shapes Diptych
Why it works
Paper collage = high impact, low stress. Abstract shapes feel modern, and color palettes can match any room.
What you’ll need
- Assorted cardstock, craft knife/scissors, glue stick
- Two identical frames with mats
Steps
- Cut 6–10 organic shapes in a cohesive palette.
- Layer on white backing; keep negative space generous.
- Glue, weigh flat to dry, then frame as a matching pair.
Time & cost: 60–90 minutes; $20–$50.
3) Rope Wall Art (Sculptural Lines)
Why it works
Cotton rope bends into minimalist curves that add texture without visual clutter. Perfect over consoles and headboards.
What you’ll need
- ¼–½″ cotton rope, hot glue, wood panel or canvas
- Mounting hardware; optional fabric dye for ombré ends
Steps
- Sketch a flowing line or arch on the substrate.
- Hot-glue rope along the line, pressing in sections.
- Trim clean ends; dye tips for gradient if desired.
Time & cost: 2 hours; $25–$55.
4) Washi-Tape Wall Mural (Renter-Friendly)
Why it works
Washi tape peels off cleanly and lets you “draw” a mural: arches, grids, even a faux headboardno paint required.
What you’ll need
- Washi tape rolls (mix widths), level, soft pencil
Steps
- Lightly pencil guide lines; keep curves generous.
- Apply tape slowly, burnishing edges as you go.
- Layer colors for dimension; trim overlaps with a craft knife.
Time & cost: 1–2 hours; $10–$30.
5) Geometric Wood Mosaic Panel
Why it works
Diagonal cuts and contrasting stains deliver a boutique look. It’s a great scrap-wood project that reads high-end.
What you’ll need
- ¼″ plywood backer, 1×2 or lath strips, miter saw
- Wood glue, brad nails, stain trio (light/medium/dark), poly
Steps
- Sketch a central chevron and mirror it outward.
- Cut pieces at 45°; dry-fit, then glue/nail to the backer.
- Stain in zones for contrast; seal with satin poly.
Time & cost: Weekend; $40–$100.
6) Botanical Plaster Reliefs
Why it works
Pressed leaves and branches cast into plaster create museum-store-worthy art with serene, natural texture.
What you’ll need
- Shallow frame or molding, air-dry clay, plaster of Paris
- Fresh leaves/ferns, rolling pin, hook wire
Steps
- Roll clay inside the frame; press foliage to imprint.
- Mix plaster; pour over imprint, add hook while wet.
- Demold after set; dry overnight; optionally whitewash.
Time & cost: 3–4 hours active + dry time; $20–$40.
7) Mini Macramé Wall Hanging
Why it works
Soft fibers warm up modern rooms and add movement. Even a small piece can balance a gallery wall of frames.
What you’ll need
- Macramé cord, dowel or driftwood, scissors, tape
Steps
- Lark’s head 10–12 cords to the dowel.
- Alternate square knots and half-hitches to form a V.
- Comb out fringe; trim into a crisp chevron.
Time & cost: 1–2 hours; $10–$25.
8) Photo Grid Gallery Wall (Neat & Balanced)
Why it works
A tidy grid turns family photos into a polished installation. Black frames, white mats = timeless.
What you’ll need
- 6–12 matching frames, command strips or hooks, level
- Paper templates cut to frame size
Steps
- Lay out a 2–3 inch gap between frames; tape paper templates to the wall to test spacing.
- Mount the center row first; work outward and upward.
- Load frames last to avoid smudges and re-levels.
Time & cost: 2–3 hours; $60–$180 depending on frames.
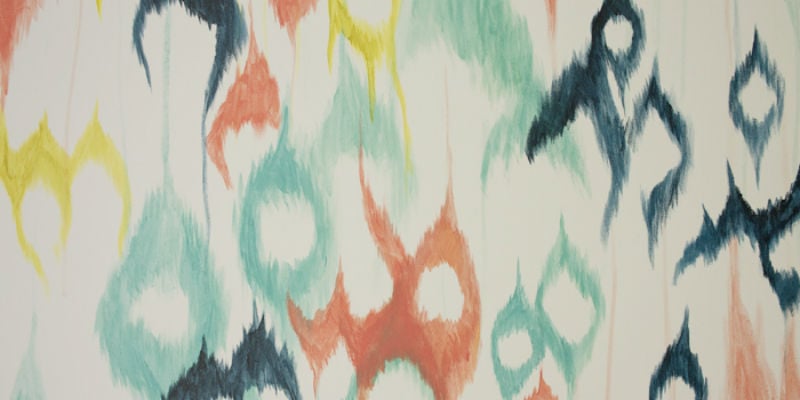
9) Faux Screen-Printed Pop Art
Why it works
Bold color blocks and crisp edges = instant gallery vibeswithout special equipment.
What you’ll need
- Large canvas, latex or craft paint (2 bold colors)
- Organza or sheer fabric, embroidery hoop, foam brush
Steps
- Base-coat the canvas and let dry.
- Stretch organza in a hoop; paint a simple motif on the fabric.
- Press to transfer like a DIY screen; repeat in a grid.
Time & cost: 2 hours; $30–$70.
10) Color-Drench + Painted Arch Accent
Why it works
Painting wall, trim, and even the door the same shade (color drenching) looks luxe; add a soft arch for a focal niche.
What you’ll need
- Interior paint & primer, 9″ roller, angled brush
- String, pushpin, pencil to draw a perfect arch
Steps
- Prep and paint the entire wall/trim in one color.
- Mark centerpoint; tie pencil to string at arch radius; swing to draw a curve.
- Cut in with brush; fill with roller. Remove tape while paint is damp.
Time & cost: Half-day; $40–$120.
11) Basket or Plate Wall (Texture Play)
Why it works
Round shapes soften boxy rooms. Mixing sizes and natural materials brings a curated, travel-collected feel.
What you’ll need
- Woven baskets/chargers or thrifted plates
- Plate hangers or twine loops, small nails or strips
Steps
- Lay out on the floor firstbiggest off-center, smaller orbiting.
- Hang the anchor piece, then build around, maintaining 2–3″ spacing.
Time & cost: 60–90 minutes; $25–$80.
12) Fabric-Wrapped Frames (Instant “Textile Art”)
Why it works
Leftover yardage or linen napkins become art when you stretch them tightgreat for pattern without paint.
What you’ll need
- Fabric remnants, staple gun, canvas or thrifted frames
Steps
- Iron fabric; position motif centered.
- Wrap and staple on the back; pull corners like a present.
Time & cost: 30 minutes; $10–$40.
13) Dollar-Store Woven Wall Hanging (Ultra-Budget)
Why it works
Viral for a reason: simple materials, big style. Try a plunger handle dowel + bulky yarn for a boho look.
What you’ll need
- Bulk yarn, wooden dowel/handle, comb, hot glue
Steps
- Cut equal yarn lengths; lark’s-head to the dowel.
- Create a few braided or wrapped sections for variety.
- Comb and trim into a curve or V.
Time & cost: 45–75 minutes; $8–$15.
14) Trellis Plant Wall (Indoors or Patio)
Why it works
Graphic lattice plus trailing greenery = living art. Works outside or on a bright indoor wall with faux vines.
What you’ll need
- 1×2 lumber, exterior screws, wood filler, paint/stain
- Hooks or ties for vines; masonry anchors if needed
Steps
- Build a grid to fit your wall; sand and finish.
- Anchor into studs/wall plugs; train vines or attach faux greenery.
Time & cost: Half-day; $50–$120.
15) IKEA-Print Glow-Up (Pixel/Pointillist Hack)
Why it works
Turn a budget poster or print into a tactile “paint-by-pixels” piece with acrylic dots, dashes, or blocks layered on top.
What you’ll need
- Inexpensive poster/print, acrylic paint, round brush set
- Painter’s tape to block sections
Steps
- Test colors on a scrap; aim for 2–3 tones per area.
- Work in sections, adding dots/blocks for texture and depth.
- Let cure, then framematting adds a gallery finish.
Time & cost: 90 minutes; $15–$35.
Hanging & Finishing: Pro Tips That Matter
- Consistent spacing makes DIY look professional. Use a spacer block cut from scrap wood.
- Mat it: A wide white mat elevates even simple prints or collages.
- Glare control: Non-glare acrylic fronts are lighter (great for grids above sofas).
- Color confidence: Repeat one accent color in three placesart, pillow, throwfor harmony.
SEO FAQ: Common Questions About DIY Wall Art
What’s the most beginner-friendly project?
Paper collages, washi-tape murals, and fabric-wrapped frames. They require no power tools and forgive mistakes.
How do I plan a gallery wall layout?
Trace frames on kraft paper, tape to the wall, adjust spacing, then hang the center piece first and work outwards for symmetry.
Can DIY art work in bathrooms?
Yesjust keep humidity in mind. Use sealed wood, non-warping substrates, or framed prints behind glass.
500-Word Field Notes: Real-World Lessons From 15 Wall Art DIYs
Every great “after” photo hides a pile of tape rolls and at least one coffee. After testing all fifteen ideas across rentals and fixer-uppers, here’s what we wish we’d known sooner.
Scale solves everything. If your room feels “meh,” go larger. The drop-cloth canvas felt comically big on the floor, but once hung it balanced the sofa and actually made the ceiling feel higher. When in doubt, mock up with taped rectanglesyour eye adjusts fast.
Texture is the secret sauce. Rooms overloaded with frames can read flat. Swapping one framed print for a rope piece or basket instantly added depth. We also learned that even subtle texturelike plaster reliefs washed in off-whitecasts gorgeous shadows in afternoon light without introducing more color.
Color drenching is beginner-proof (really). It looks advanced, but it’s mostly patient prep. We got the cleanest arch by tying a pencil to a string “compass,” then lightly sanding ridge lines after the tape came off. Don’t fear bold hues; when walls and trim match, the room feels intentional rather than loud.
Budget hacks that don’t look budget. The IKEA print glow-up shocked us. A few layers of tonal dots turned a flat poster into something you’d swear was hand-painted. Likewise, dollar-store yarn on a driftwood dowel fooled multiple design-snob friends. The trick is restraint: stick to a limited palette and commit to a crisp silhouette.
Hanging hardware makes or breaks the reveal. We love removable strips for rentals, but check weight limits and the paint sheeneggshell holds better than flat. Grids especially benefit from tiny leveling tweaks; a torpedo level and a 2″ spacer block saved our sanity. For heavy wood mosaics, hit studs and add felt bumpers so frames sit flat.
Humidity is the enemy of paper. Collages and prints buckled near a steamy shower. Swapping to acrylic-front frames and adding a small desiccant pack inside the frame fixed it. If you love the look of unframed paper, consider mounting to a wood panel with archival spray adhesive and sealing with matte medium.
Kids + pets = choose durability. Rope art survives tail whips; baskets do too. Glass-front frames at kid height? Less ideal. In playrooms, we leaned on painted murals and fabric-wrapped panelsno shards, no drama.
Photography matters. If you plan to share your masterpiece, shoot mid-morning with blinds open and overheads off. Angle slightly to avoid glare, and include a piece of furniture for scale. Your DIY will look like it belongs in a catalog (because it kind of does).
Final thought: You don’t need a studio or a trust fund. You need a free afternoon, painter’s tape, and a willingness to stop one step before “just one more.” Hang it up, live with it a week, then decide. Most of the time, you’ll realize you nailed it on the first try.
Conclusion
Your walls aren’t a storage problemthey’re your biggest design opportunity. Pick one idea, keep the palette tight, measure spacing like a pro, and let texture do the heavy lifting. When friends ask where you bought your art, enjoy saying, “Oh this? I made it.”
SEO Goodies
sapo: Ready to finally fill that blank wall? This in-depth guide walks you through 15 stylish DIY wall art ideasfrom large-scale canvas and paper collages to wood mosaics, macramé, and renter-friendly washi murals. Get exact materials, step-by-step instructions, time and budget estimates, and pro hanging tips so your finished piece looks designer, not DIY.